2021年4月30日 星期五

判斷是否為閏年

1,php閏年計算方法一:

閏年是對4取餘為0,對100取餘不等於0,對400取餘等於0的年是閏年。

$day = date('Y');
if ($day%4==0&&($day%100!=0 || $day%400==0)){
    echo $day.'是閏年';
}else{
    echo $day.'不是閏年';
}

2,php判斷閏年 方法二:

date('L');就可以直接判斷當前年份是否是閏年,為真返回1,否則返回0.

$year = 2008;//可以像上例一樣用mt_rand隨機取一個年,也可以隨便賦值。
$time = mktime(20,20,20,4,20,$year);//取得一個日期的 Unix 時間戳;
if (date("L",$time)==1){ //格式化時間,並且判斷是不是閏年,後面的等於一也可以省略;
echo $year."是閏年";
}else{
echo $year."不是閏年";
}

3,php判斷閏年 計算閏年的方法三:

$year = 2000;
$time = mktime(20,20,20,2,1,$year);//取得一個日期的 Unix 時間戳;
if (date("t",$time)==29){ //格式化時間,並且判斷2月是否是29天;
echo $year."是閏年";//是29天就輸出時閏年;
}else{
echo $year."不是閏年";
}

以上就是php判斷是否為閏年的詳細內容 

資料來源: https://tw511.com/a/01/6176.html
2021年4月29日 星期四

Android Studio get device ip

 Get the device ip function


Append the permission for AndroidManifest.xml

<uses-permission android:name="android.permission.INTERNET" />
<uses-permission android:name="android.permission.ACCESS_WIFI_STATE" />
<uses-permission android:name="android.permission.ACCESS_NETWORK_STATE" />

Create an app with a button and a textview.

public class MainActivity extends AppCompatActivity {
TextView txt_log;
Button btn_get_ip;
Button btn_ping_ip;
Button btn_check_url_alive;
Button btn_clean_log;
String device_ip = "192.168.1.10";
@Override
protected void onCreate(Bundle savedInstanceState) {
super.onCreate(savedInstanceState);
setContentView(R.layout.activity_main);

// Asign the items
txt_log = findViewById(R.id.txt_log);
btn_get_ip = findViewById(R.id.btn_get_ip);
btn_ping_ip = findViewById(R.id.btn_ping_ip);
btn_check_url_alive = findViewById(R.id.btn_check_url_alive);
btn_clean_log = findViewById(R.id.btn_clean_log);

// Initial item
txt_log.setMovementMethod(new ScrollingMovementMethod());

// Asign the click function of all items
btn_get_ip.setOnClickListener(btn_get_ip_click);
btn_ping_ip.setOnClickListener(btn_ping_ip_click);
btn_check_url_alive.setOnClickListener(btn_check_url_alive_click);
btn_clean_log.setOnClickListener(btn_clean_log_click);

txt_log.append("App created\n");
}
private View.OnClickListener btn_get_ip_click = new View.OnClickListener() {
@Override
public void onClick(View v) {
txt_log.append("btn_get_ip clicked\n");

String ipAddress = wifiIpAddress(getApplicationContext());
txt_log.append(ipAddress +"\n");
device_ip = ipAddress;
txt_log.append("Set device ip = " + ipAddress +"\n");

int [] ipDot = getDetailsWifiInfo(getApplicationContext());
device_ip = ipDot[0] +"."+ ipDot[1] +"."+ ipDot[2] +".245";
txt_log.append("Set device ip = " + device_ip +"\n");
//txt_log.append(ipDot[0] +"\n");
//txt_log.append(ipDot[1] +"\n");
//txt_log.append(ipDot[2] +"\n");
//txt_log.append(ipDot[3] +"\n");
}
};

private View.OnClickListener btn_ping_ip_click = new View.OnClickListener() {
@Override
public void onClick(View v) {
txt_log.append("btn_ping_ip clicked\n");

String ret = executeCmd("ping -c 1 -w 1 " + device_ip, false);
txt_log.append(ret +"\n");
}
};

private View.OnClickListener btn_check_url_alive_click = new View.OnClickListener() {
@Override
public void onClick(View v) {
txt_log.append("btn_check_url_alive_click\n");

int [] ipDot = getDetailsWifiInfo(getApplicationContext());
for(int cnt =240; cnt < 246; cnt++){
String url_link = "http://"+ ipDot[0] +"."+ ipDot[1] +"."+ ipDot[2] +"." + cnt +"/";
//txt_log.append(url_link + "\n");
new JsonTask().execute(url_link);
}
}
};

private View.OnClickListener btn_clean_log_click = new View.OnClickListener() {
@Override
public void onClick(View v) {
txt_log.setText("");
}
};

protected String wifiIpAddress(Context context) {
WifiManager wifiManager = (WifiManager) context.getSystemService(WIFI_SERVICE);
int ipAddress = wifiManager.getConnectionInfo().getIpAddress();
//txt_log.append(String.valueOf(ipAddress) +"\n" );

// Convert little-endian to big-endianif needed
if (ByteOrder.nativeOrder().equals(ByteOrder.LITTLE_ENDIAN)) {
ipAddress = Integer.reverseBytes(ipAddress);
//txt_log.append(String.valueOf(ipAddress) +"\n" );
}

byte[] ipByteArray = BigInteger.valueOf(ipAddress).toByteArray();

String ipAddressString;
try {
ipAddressString = InetAddress.getByAddress(ipByteArray).getHostAddress();
//txt_log.append(ipAddressString +"\n" );
} catch (UnknownHostException ex) {
txt_log.append("WIFIIP Unable to get host address.");
ipAddressString = null;
}

return ipAddressString;
}

private int [] getDetailsWifiInfo(Context mContext) {
try {
WifiManager wifiManager = (WifiManager) mContext.getSystemService(WIFI_SERVICE);
WifiInfo mWifiInfo = wifiManager.getConnectionInfo();
int ip = mWifiInfo.getIpAddress();

int [] ret = new int[4];
int ip_01 = (ip & 0xFF);
int ip_02 = ((ip >> 8) & 0xFF);
int ip_03 = ((ip >> 16) & 0xFF);
int ip_04 = ((ip >> 24) & 0xFF);
ret[0] = ip_01;
ret[1] = ip_02;
ret[2] = ip_03;
ret[3] = ip_04;
String strIp = "" + (ip_01) + "." + (ip_02) + "." + (ip_03) + "." + (ip_04);

//txt_log.append(ip_01 +"\n");
//txt_log.append(ip_02 +"\n");
//txt_log.append(ip_03 +"\n");
//txt_log.append(ip_04 +"\n");
return ret;
} catch (Exception e) {
txt_log.append(e.toString() + "\n");
}
return null;
}

//

public static String executeCmd(String cmd, boolean sudo){
try {

Process p;
if(!sudo)
p= Runtime.getRuntime().exec(cmd);
else{
p= Runtime.getRuntime().exec(new String[]{"su", "-c", cmd});
}
BufferedReader stdInput = new BufferedReader(new InputStreamReader(p.getInputStream()));

String s;
String res = "";
while ((s = stdInput.readLine()) != null) {
res += s + "\n";
}
p.destroy();
return res;
} catch (Exception e) {
e.printStackTrace();
}
return "";

}

public boolean exists(String URLName) {
try {
URL url = new URL("http://www.android.com/");
HttpURLConnection urlConnection = (HttpURLConnection) url.openConnection();
int responseCode = urlConnection.getResponseCode();
txt_log.append("responseCode:" + responseCode +"\n");
//InputStream in = new BufferedInputStream(urlConnection.getInputStream());
//txt_log.append(in.toString() +"\n");
//readStream(in);
urlConnection.disconnect();
} catch (MalformedURLException e) {
e.printStackTrace();
} catch (IOException e) {
e.printStackTrace();
} finally {
}

try {
HttpURLConnection.setFollowRedirects(false);
// note : you may also need
// HttpURLConnection.setInstanceFollowRedirects(false)
HttpURLConnection con = (HttpURLConnection) new URL(URLName)
.openConnection();
con.setRequestMethod("HEAD");
return (con.getResponseCode() == HttpURLConnection.HTTP_OK);
} catch (Exception e) {
e.printStackTrace();
return false;
}
}


private class JsonTask extends AsyncTask<String, String, String> {
ProgressDialog pd;
HttpURLConnection connection = null;
String url_link;
protected void onPreExecute() {
super.onPreExecute();

pd = new ProgressDialog(MainActivity.this);
pd.setMessage("Please wait");
pd.setCancelable(false);
pd.show();
}

protected String doInBackground(String... params) {
BufferedReader reader = null;

try {
url_link = params[0];
URL url = new URL(url_link);
connection = (HttpURLConnection) url.openConnection();
connection.setConnectTimeout(3000);
connection.connect();


InputStream stream = connection.getInputStream();

reader = new BufferedReader(new InputStreamReader(stream));

StringBuffer buffer = new StringBuffer();
String line = "";

while ((line = reader.readLine()) != null) {
buffer.append(line+"\n");
//Log.d("Response:", "> " + line + "\n");
//txt_log.append("Response: > " + line + "\n"); //here u ll get whole response...... :-)

}
return buffer.toString();


} catch (MalformedURLException e) {
e.printStackTrace();
} catch (IOException e) {
e.printStackTrace();
} finally {
try {
if (reader != null) {
reader.close();
}
} catch (IOException e) {
e.printStackTrace();
}
}
return null;
}

@Override
protected void onPostExecute(String result) {
super.onPostExecute(result);
if (pd.isShowing()){
pd.dismiss();
}
try {
Log.d("Response:", "> " + connection.getResponseCode() + "\n");
txt_log.append(url_link +"->" + connection.getResponseCode() + "\n");
if (connection != null) {
connection.disconnect();
}
} catch (IOException e) {
e.printStackTrace();
}
//txt_log.append(result + "\n");
}
}
}

2021年4月27日 星期二

Android WebView ERR_CLEARTEXT_NOT_PERMITTED

今天無意間用了小米9,測試了WebView打開的一些鏈接,在其他的手機上(系統8.0以下)都是正常可以打開鏈接。

然後定位到問題所在,記錄一下net::ERR_CLEARTEXT_NOT_PERMITTED的原因,如下:


從Android 9.0(API級別28)開始,默認情況下禁用明文支持。因此http的url均無法在webview中加載


附上我使用的解決辦法:

在manifest中application節點添加


android:usesCleartextTraffic="true"

1

添加後如下:


<?xml version="1.0" encoding="utf-8"?>

<manifest ...>

    <uses-permission android:name="android.permission.INTERNET" />

    <application

        ...

        android:usesCleartextTraffic="true"

        ...>

        ...

    </application>

</manifest>


附上鍊接:https://stackoverflow.com/questions/45940861/android-8-cleartext-http-traffic-not-permitted


同時如果你還有webView 的問題,我遇到並記錄的如下


net:err_unknown_url_scheme

android調用js方法

Android9.0_P:ClassNotFoundException:Didn't find class “org.apache.http.ProtocolVersion” on path:

以上是開發中遇到的問題,後期有時間還會繼續整理,或者您有更好的解決方法,添加更完善,不勝感激。歡迎留言交流,

書到用時方恨少,紙上得來終覺淺!共勉。

————————————————

版权声明:本文为CSDN博主「冷冷清清里风风火火是我」的原创文章,遵循CC 4.0 BY-SA版权协议,转载请附上原文出处链接及本声明。

原文链接:https://blog.csdn.net/qq_33721320/article/details/84400825 


2021年4月26日 星期一

How to create an empty DataFrame and append rows & columns to it in Pandas?

Let’s discuss how to create an empty DataFrame and append rows & columns to it in Pandas. There are multiple ways in which we can do this task.

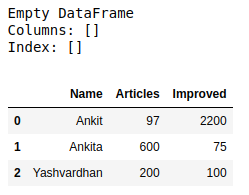
Method #1: Create a complete empty DataFrame without any column name or indices and then appending columns one by one to it.

# import pandas library as pd
import pandas as pd
  
# create an Empty DataFrame object
df = pd.DataFrame()
  
print(df)
  
# append columns to an empty DataFrame
df['Name'] = ['Ankit', 'Ankita', 'Yashvardhan']
df['Articles'] = [97, 600, 200]
df['Improved'] = [2200, 75, 100]
  
df

Output:

python-pandas-empty-dataframe-1

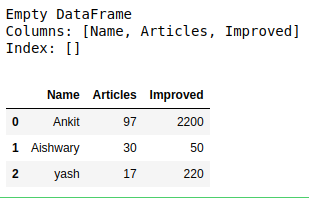
Method #2: Create an empty DataFrame with columns name only then appending rows one by one to it using append() method.


# import pandas library as pd
import pandas as pd
  
# create an Empty DataFrame
# object With column names only
df = pd.DataFrame(columns = ['Name', 'Articles', 'Improved'])
print(df)
  
# append rows to an empty DataFrame
df = df.append({'Name' : 'Ankit', 'Articles' : 97, 'Improved' : 2200}, 
                ignore_index = True)
df = df.append({'Name' : 'Aishwary', 'Articles' : 30, 'Improved' : 50},
                ignore_index = True)
df = df.append({'Name' : 'yash', 'Articles' : 17, 'Improved' : 220},
               ignore_index = True)
  
df

Output:

python-empty-dataframe

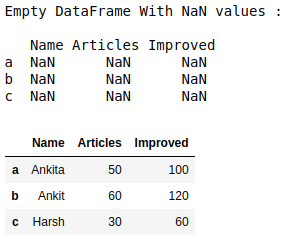
Method #3: Create an empty DataFrame with a column name and indices and then appending rows one by one to it using loc[] method.

# import pandas library as pd
import pandas as pd
  
# create an Empty DataFrame object With
# column names and indices 
df = pd.DataFrame(columns = ['Name', 'Articles', 'Improved'], 
                   index = ['a', 'b', 'c'])
  
print("Empty DataFrame With NaN values : \n\n", df)
  
# adding rows to an empty 
# dataframe at existing index
df.loc['a'] = ['Ankita', 50, 100]
df.loc['b'] = ['Ankit', 60, 120]
df.loc['c'] = ['Harsh', 30, 60]
  
df

Output:

python-pandas-empty-dataframe


資料來源: https://www.geeksforgeeks.org/how-to-create-an-empty-dataframe-and-append-rows-columns-to-it-in-pandas/