多行程 (Multi-Process) 還是多線程 (Multithreading)
作業系統在切換行程 (process) 或線程 (thread) 時需要先保存當前執行的環境,把新任務的執行環境準備好,才能開始執行。切換過程雖然很快,但是也需要耗費時間。任務一旦多到一個限度,反而使得系統性能下降,導致所有任務都做不好。
第二個考慮是任務的類型,可以把任務分為計算密集型和 I/O 密集型。
計算密集型任務的特點是要進行大量的計算,消耗 CPU 資源,雖然也可以用多任務完成,但是任務越多,花在任務切換的時間就越多,CPU 執行任務的效率就越低。這類任務用 Python 執行效率通常很低,最能勝任這類任務的是 C 語言,而 Python 中有嵌入 C/C++ 程式碼的機制。
其他涉及到網絡、存儲介質 I/O 的任務都可以視為 I/O 密集型任務,這類任務的特點是 CPU 消耗很少,任務的大部分時間都在等待 I /O 操作完成, I/O 的速度遠遠低於 CPU 和內存的速度。對於 I/O 密集型任務,如果啟動多任務,就可以減少 I/O 等待時間從而讓 CPU 高效率的運轉。
單線程 (thread) + 異步 I/O
可以利用作業系統提供的異步 I/O 支持,就能用單行程 (process) 單線程 (thread) 來執行多任務,這種模型稱為事件驅動模型。Nginx 就是支持異步 I/O 的 Web 服務器,在單核 CPU 上採用單行程 (process) 模型就可以高效地支持多任務。在多核 CPU 上,可以運行多個行程 (process),充分利用多核 CPU。用 Node.js 開發的服務器端程序也使用了這種工作模式。
在 Python 語言中,單線程 (thread) + 異步 I/O 的編程模型稱為協程,可以基於事件驅動編寫高效的多任務程序。
協程最大的優勢就是極高的執行效率,因為子程序切換不是線程 (thread) 切換,而是由程序自身控制。第二個優勢是不需要多線程 (Multithreading) 的鎖機制,因為只有一個線程 (thread),不存在同時寫變量衝突,只需要判斷狀態就好,所以執行效率高很多。如果想充分利用 CPU 的多核特性,最簡單的方法是多行程 (Multi-Process) + 協程。
範例
範例1 - 將耗時間的任務放到線程 (thread) 中以獲得更好的用戶體驗。
有'下載'和'關於'兩個按鈕,用休眠的方式模擬點擊'下載'按鈕會連網下載文件需要耗費 10 秒,如果不使用多線程 (Multithreading),當點擊'下載'按鈕後整個程序的其他部分都被這個耗時間的任務阻塞而無法執行。
import time
import tkinter
import tkinter.messagebox

def download():
    # 模擬下載任務需要花費 10 秒
    time.sleep(10)
    tkinter.messagebox.showinfo('提示', '下載完成!')

def show_about():
    tkinter.messagebox.showinfo('關於', 'welcome')

def main():
    top = tkinter.Tk()
    top.title('單線程')          # 視窗標題
    top.geometry('250x150')      # 視窗大小
    top.wm_attributes('-topmost', True)  # 視窗彈出置頂的

    panel = tkinter.Frame(top)
    button1 = tkinter.Button (panel, text = '下載', command = download)
    button1.pack(side = 'left')
    button2 = tkinter.Button (panel, text = '關於', command = show_about)
    button2.pack(side = 'right')
    panel.pack(side = 'bottom')

    tkinter.mainloop()

if __name__ == '__main__':
    main()
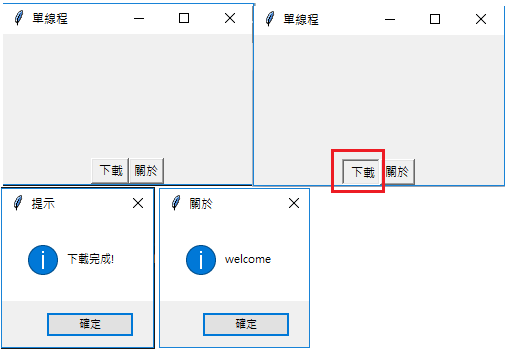
如果使用多線程 (Multithreading) 將耗時間的任務放到一個獨立的線程 (thread) 中執行,這樣就不會因為執行耗時間的任務而阻塞了主線程 (thread) 。
import time
import tkinter
import tkinter.messagebox
from threading import Thread

def main():

    class DownloadTaskHandler(Thread):

        def run(self):
            time.sleep(10)
            tkinter.messagebox.showinfo('提示', '下載完成!')
            # 啟用下載按鈕
            button1.config(state = tkinter.NORMAL)

    def download():
        # 禁用下載按鈕
        button1.config(state = tkinter.DISABLED)
        # 透過 daemon 參數將線程 (thread) 設為守護線程 (thread),
        # 主程式退出就不再保留執行
        # 在線程中處理耗時間的下載任務
        DownloadTaskHandler(daemon = True).start()

    def show_about():
        tkinter.messagebox.showinfo('關於', 'welcome')

    top = tkinter.Tk()
    top.title('單線程')          # 視窗標題
    top.geometry('250x150')      # 視窗大小
    top.wm_attributes('-topmost', 1)  # 視窗彈出置頂的

    panel = tkinter.Frame(top)
    button1 = tkinter.Button (panel, text = '下載', command = download)
    button1.pack(side = 'left')
    button2 = tkinter.Button(panel, text = '關於', command = show_about)
    button2.pack(side = 'right')
    panel.pack(side = 'bottom')

    tkinter.mainloop()


if __name__ == '__main__':
    main()
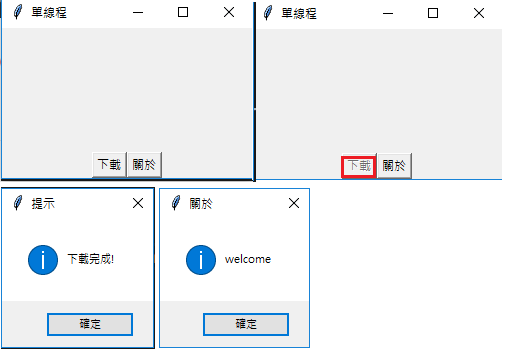
圖中可以看出按鈕被進用了。
範例2 - 使用多行程 (Multi-Process)對複雜任務進行'分而治之'。
完成 1 ~ 100000000 求和的計算密集型任務。
from time import time

def main():
    total = 0
    number_list = [x for x in range(1, 100000001)]
    start = time()
    for number in number_list:
        total += number
    print(total)
    end = time()
    print('Execution time: %.3fs' % (end - start))

if __name__ == '__main__':
    main()

from multiprocessing import Process, Queue
from random import randint
from time import time

def task_handler (curr_list, result_queue):
    total = 0
    for number in curr_list:
        total += number
    result_queue.put(total)

def main():
    processes = []
    number_list = [x for x in range(1, 100000001)]
    result_queue = Queue()
    index = 0
    # 啟動 8 個行程 (process) 將數據切片後進行運算
    for _ in range(8):
        p = Process (target = task_handler,
                    args = (number_list[index:index + 12500000], result_queue))
        index += 12500000
        processes.append(p)
        p.start()
    # 開始記錄所有行程 (process) 執行完成花費的時間
    start = time()
    for p in processes:
        p.join()
    # 執行结果
    total = 0
    while not result_queue.empty():
        total += result_queue.get()
    print(total)
    end = time()
    print('Execution time: ', (end - start), 's', sep = '')

if __name__ == '__main__':
    main()

比較兩段程式碼的執行結果,使用多行程 (Multi-Process) 後由於獲得了更多的 CPU 執行時間以及更好的利用了 CPU 的多核特性,明顯的減少程式的執行時間,而且計算量越大效果越明顯。
資料來源:https://ithelp.ithome.com.tw/articles/10221364