2024年6月30日 星期日

Batch Script - Printing


Printing can also be controlled from within Batch Script via the NET PRINT command.

Syntax

PRINT [/D:device] [[drive:][path]filename[...]]

Where /D:device - Specifies a print device.

Example

print c:\example.txt /c /d:lpt1

The above command will print the example.txt file to the parallel port lpt1.

Command Line Printer Control

As of Windows 2000, many, but not all, printer settings can be configured from Windows's command line using PRINTUI.DLL and RUNDLL32.EXE

Syntax

RUNDLL32.EXE PRINTUI.DLL,PrintUIEntry [ options ] [ @commandfile ]

Where some of the options available are the following −

  • /dl − Delete local printer.

  • /dn − Delete network printer connection.

  • /dd − Delete printer driver.

  • /e − Display printing preferences.

  • /f[file] − Either inf file or output file.

  • /F[file] − Location of an INF file that the INF file specified with /f may depend on.

  • /ia − Install printer driver using inf file.

  • /id − Install printer driver using add printer driver wizard.

  • /if − Install printer using inf file.

  • /ii − Install printer using add printer wizard with an inf file.

  • /il − Install printer using add printer wizard.

  • /in − Add network printer connection.

  • /ip − Install printer using network printer installation wizard.

  • /k − Print test page to specified printer, cannot be combined with command when installing a printer.

  • /l[path] − Printer driver source path.

  • /m[model] − Printer driver model name.

  • /n[name] − Printer name.

  • /o − Display printer queue view.

  • /p − Display printer properties.

  • /Ss − Store printer settings into a file.

  • /Sr − Restore printer settings from a file.

  • /y − Set printer as the default.

  • /Xg − Get printer settings.

  • /Xs − Set printer settings.

Testing if a Printer Exists

There can be cases wherein you might be connected to a network printer instead of a local printer. In such cases, it is always beneficial to check if a printer exists in the first place before printing.

The existence of a printer can be evaluated with the help of the RUNDLL32.EXE PRINTUI.DLL which is used to control most of the printer settings.

Example

SET PrinterName = Test Printer
SET file=%TEMP%\Prt.txt
RUNDLL32.EXE PRINTUI.DLL,PrintUIEntry /Xg /n "%PrinterName%" /f "%file%" /q

IF EXIST "%file%" (
   ECHO %PrinterName% printer exists
) ELSE (
   ECHO %PrinterName% printer does NOT exists
)

The above command will do the following −

  • It will first set the printer name and set a file name which will hold the settings of the printer.

  • The RUNDLL32.EXE PRINTUI.DLL commands will be used to check if the printer actually exists by sending the configuration settings of the file to the file Prt.txt

Batch Script - Network

 Batch script has the facility to work with network settings. The NET command is used to update, fix, or view the network or network settings. This chapter looks at the different options available for the net command.


NET ACCOUNTS

View the current password & logon restrictions for the computer.

Syntax

NET ACCOUNT [/FORCELOGOFF:{minutes | NO}] [/MINPWLEN:length]
[/MAXPWAGE:{days | UNLIMITED}] [/MINPWAGE:days] 
[/UNIQUEPW:number] [/DOMAIN]

Wherein

  • FORCELOGOFF − Force the log-off of the current user within a defined time period.

  • MINPWLEN − This is the minimum password length setting to provide for the user.

  • MAXPWAGE − This is the maximum password age setting to provide for the user.

  • MINPWAGE − This is the minimum password age setting to provide for the user.

Example

NET ACCOUNT

Output

Force user logoff how long after time expires?:      Never
Minimum password age (days):                         0
Maximum password age (days):                         42
Minimum password length:                             0
Length of password history maintained:               None
Lockout threshold:                                   Never
Lockout duration (minutes):                          30
Lockout observation window (minutes):                30
Computer role:                                       SERVER
The command completed successfully.


NET CONFIG

Displays your current server or workgroup settings.

Syntax

NET CONFIG

Example

NET CONFIG

Output

The following running services can be controlled:
   Server
   Workstation
The command completed successfully.


NET COMPUTER

Adds or removes a computer attached to the windows domain controller.

Syntax

NET COMPUTER \\computername {/ADD | /DEL}

Example

NET COMPUTER \\dxbtest /ADD

Output

The above command will add the machine with the name dxbtest to the domain in which the windows domain controller exists.


NET USER

This command can be used for the following −

  • View the details of a particular user account.
  • Add a user account.
  • Delete a user’s account.
  • Modify a user’s account.

Syntax

Net user [username [password | *] [options]] [/DOMAIN] 
username {password | *} /ADD [options] [/DOMAIN] 
username [/DELETE] [/DOMAIN]

Example

NET USER

The above command shows all the accounts defined on a system. Following is the output of the above command.

User accounts for \\WIN-50GP30FGO75
-------------------------------------------------------------------------------
Administrator     atlbitbucket      Guest
The command completed successfully.

net user Guest

The above command shows the details of Guest account defined on a system. Following is the output of the above command.

Output

User name                  Guest
Full Name
Comment                    Built-in account for guest access to the computer/domain
User's comment
Country/region code        000 (System Default)
Account active             No
Account expires            Never

Password last set          1/4/2016 9:34:25 AM
Password expires           Never
Password changeable        1/4/2016 9:34:25 AM
Password required          No
User may change password   No

Workstations allowed       All
Logon script
User profile
Home directory
Last logon                Never

Logon hours allowed       All

Local Group Memberships   *Guests
Global Group memberships  *None
The command completed successfully. 


NET STOP/START

This command is used to stop and start a particular service.

Syntax

Net stop/start [servicename] 

Example

NET STOP Spooler

The above command is used to stop the printer spooler service. Following is the output of the above command.

The Print Spooler service is stopping. The Print Spooler service was stopped successfully. NET START Spooler

The above command is used to start the printer spooler service. Following is the output of the above command.

The Print Spooler service is starting. The Print Spooler service was started successfully. 


NET STATISTICS

Display network statistics of the workstation or server.

Syntax

Net statistics [SERVER/WORKSTATION] 

Example

Net statistics Server

Output

Server Statistics for \\WIN-50GP30FGO75 Statistics since 1/3/2016 9:16:28 PM Sessions accepted 0 Sessions timed-out 0 Sessions errored-out 0 Kilobytes sent 0 Kilobytes received 0 Mean response time (msec) 0 System errors 0 Permission violations 0 Password violations 0 Files accessed 0 Communication devices accessed 0 Print jobs spooled 0 Times buffers exhausted Big buffers 0 Request buffers 0 


NET USE


Connects or disconnects your computer from a shared resource or displays information about your connections.

Syntax

NET USE [devicename | *] [\\computername\sharename[\volume] [password | *]] 
[/USER:[domainname\]username] 
[/USER:[dotted domain name\]username]
[/USER:[username@dotted domain name] 
[/SMARTCARD] 
[/SAVECRED] [[/DELETE] | [/PERSISTENT:{YES | NO}]]

where

  • \\computername\sharename − This is the name of the share which needs to be connected to.

  • /USER − This needs to be specified to ensure that the right credentials are specified when connecting to the network share.

Example

net use z: \\computer\test

The above command will connect to the share name \\computer\test and assign the Z: drive name to it.


Batch Script - Registry


The Registry is one of the key elements on a windows system. It contains a lot of information on various aspects of the operating system. Almost all applications installed on a windows system interact with the registry in some form or the other.

The Registry contains two basic elements: keys and values. Registry keys are container objects similar to folders. Registry values are non-container objects similar to files. Keys may contain values or further keys. Keys are referenced with a syntax similar to Windows' path names, using backslashes to indicate levels of hierarchy.

This chapter looks at various functions such as querying values, adding, deleting and editing values from the registry.


Reading from the Registry

Reading from the registry is done via the REG QUERY command. This command can be used to retrieve values of any key from within the registry.

Syntax

REG QUERY [ROOT\]RegKey /v ValueName [/s] 
REG QUERY [ROOT\]RegKey /ve --This returns the (default) value

Where RegKey is the key which needs to be searched for in the registry.

Example

@echo off 
REG QUERY HKEY_LOCAL_MACHINE\SYSTEM\CurrentControlSet\Control\Windows\

The above command will query all the keys and their respective values under the registry key HKEY_LOCAL_MACHINE\SYSTEM\CurrentControlSet\Control\Windows\

Output

The output will display all the keys and values under the registry key.

HKEY_LOCAL_MACHINE\SYSTEM\CurrentControlSet\Control\Windows\

This location in the registry has some key information about the windows system such as the System Directory location.

HKEY_LOCAL_MACHINE\SYSTEM\CurrentControlSet\Control\Windows
   Directory REG_EXPAND_SZ %SystemRoot%
   SystemDirectory REG_EXPAND_SZ %SystemRoot%\system32
   NoInteractiveServices REG_DWORD 0x1
   CSDBuildNumber REG_DWORD 0x4000
   ShellErrorMode REG_DWORD 0x1
   ComponentizedBuild REG_DWORD 0x1
   CSDVersion REG_DWORD 0x0
   ErrorMode REG_DWORD 0x0
   CSDReleaseType REG_DWORD 0x0
   ShutdownTime REG_BINARY 3AFEF5D05D46D101 


Adding to the Registry

Adding to the registry is done via the REG ADD command. Note that in order to add values to the registry you need to have sufficient privileges on the system to perform this operation.

Syntax

The REG ADD command has the following variations. In the second variation, no name is specified for the key and it will add the name of “(Default)” for the key.

REG ADD [ROOT\]RegKey /v ValueName [/t DataType] [/S Separator] [/d Data] [/f]
REG ADD [ROOT\]RegKey /ve [/d Data] [/f]

Where

  • ValueName − The value, under the selected RegKey, to edit.

  • /d Data − The actual data to store as a "String", integer, etc.

  • /f − Force an update without prompting "Value exists, overwrite Y/N".

  • /S Separator − Character to use as the separator in REG_MULTI_SZ values. The default is "\0".

  • /t DataType − These are the data types defined as per the registry standards which can be −

    • REG_SZ (default)

    • REG_DWORD

    • REG_EXPAND_SZ

    • REG_MULTI_SZ

Example

@echo off 
REG ADD HKEY_CURRENT_USER\Console /v Test /d "Test Data" 
REG QUERY HKEY_CURRENT_USER\Console /v Test

In the above example, the first part is to add a key into the registry under the location HKEY_CURRENT_USER\Console. This key will have a name of Test and the value assigned to the key will be Test Data which will be of the default string type.

The second command just displays what was added to the registry by using the REG QUERY command.

Output

Following will be the output of the above program. The first line of the output shows that the ‘Add’ functionality was successful and the second output shows the inserted value into the registry.

The operation completed successfully. 
HKEY_CURRENT_USER\Console 
   Test REG_SZ Test Data


Deleting from the Registry

Deleting from the registry is done via the REG DEL command. Note that in order to delete values from the registry you need to have sufficient privileges on the system to perform this operation.

Syntax

The REG DELETE command has the following variations. In the second variation, the default value will be removed and in the last variation all the values under the specified key will be removed.

REG DELETE [ROOT\]RegKey /v ValueName [/f] 
   REG DELETE [ROOT\]RegKey /ve [/f] 
   REG DELETE [ROOT\]RegKey /va [/f]

Where

  • ValueName − The value, under the selected RegKey, to edit.

  • /f − Force an update without prompting "Value exists, overwrite Y/N".

Example

@echo off
REG DELETE HKEY_CURRENT_USER\Console /v Test /f
REG QUERY HKEY_CURRENT_USER\Console /v Test

In the above example, the first part is to delete a key into the registry under the location HKEY_CURRENT_USER\Console. This key has the name of Test. The second command just displays what was deleted to the registry by using the REG QUERY command. From this command, we should expect an error, just to ensure that our key was in fact deleted.

Output

Following will be the output of the above program. The first line of the output shows that the ‘Delete’ functionality was successful and the second output shows an error which was expected to confirm that indeed our key was deleted from the registry.

The operation completed successfully. 
ERROR: The system was unable to find the specified registry key or value. 


Copying Registry Keys


Copying from the registry is done via the REG COPY command. Note that in order to copy values from the registry, you need to have sufficient privileges on the system to perform this operation on both the source location and the destination location.

Syntax

REG COPY [\\SourceMachine\][ROOT\]RegKey [\\DestMachine\][ROOT\]RegKey

Example

@echo off REG COPY HKEY_CURRENT_USER\Console HKEY_CURRENT_USER\Console\Test REG QUERY HKEY_CURRENT_USER\Console\Test

In the above example, the first part is to copy the contents from the location HKEY_CURRENT_USER\Console into the location HKEY_CURRENT_USER\Console\Test on the same machine. The second command is used to query the new location to check if all the values were copied properly.

Output

Following is the output of the above program. The first line of the output shows that the ‘Copy’ functionality was successful and the second output shows the values in our copied location.

The operation completed successfully. HKEY_CURRENT_USER\Console\Test HistoryNoDup REG_DWORD 0x0 FullScreen REG_DWORD 0x0 ScrollScale REG_DWORD 0x1 ExtendedEditKeyCustom REG_DWORD 0x0 CursorSize REG_DWORD 0x19 FontFamily REG_DWORD 0x0 ScreenColors REG_DWORD 0x7 TrimLeadingZeros REG_DWORD 0x0 WindowSize REG_DWORD 0x190050 LoadConIme REG_DWORD 0x1 PopupColors REG_DWORD 0xf5 QuickEdit REG_DWORD 0x0 WordDelimiters REG_DWORD 0x0 ColorTable10 REG_DWORD 0xff00 ColorTable00 REG_DWORD 0x0 ColorTable11 REG_DWORD 0xffff00 ColorTable01 REG_DWORD 0x800000 ColorTable12 REG_DWORD 0xff 


Comparing Registry Keys

Comparing registry keys is done via the REG COMPARE command.

Syntax

REG COMPARE [ROOT\]RegKey [ROOT\]RegKey [/v ValueName] [Output] [/s]
REG COMPARE [ROOT\]RegKey [ROOT\]RegKey [/ve] [Output] [/s]

Wherein Output − /od (only differences) /os (only matches) /oa (all) /on (no output).

Example

@echo off
REG COMPARE HKEY_CURRENT_USER\Console HKEY_CURRENT_USER\Console\Test

The above program will compare all of the values between the registry keys HKEY_CURRENT_USER\Console & HKEY_CURRENT_USER\Console\Test.

Output

Result Compared: Identical
The operation completed successfully.

If there is a difference between the values in either registry key, it will be shown in the output as shown in the following result. The following output shows that the value ‘EnableColorSelection’ is extra I the registry key ‘HKEY_CURRENT_USER\Console’.

< Value: HKEY_CURRENT_USER\Console EnableColorSelection REG_DWORD 0x0
Result Compared: Different
The operation completed successfully.


Batch Script - Process , Aliases shortcuts


In this chapter, we will discuss the various processes involved in Batch Script.

Viewing the List of Running Processes

In Batch Script, the TASKLIST command can be used to get the list of currently running processes within a system.

Syntax

TASKLIST [/S system [/U username [/P [password]]]] [/M [module] | /SVC | /V] [/FI filter]
[/FO format] [/NH]

Examples

TASKLIST

The above command will get the list of all the processes running on your local system. Following is a snapshot of the output which is rendered when the above command is run as it is. As you can see from the following output, not only do you get the various processes running on your system, you also get the memory usage of each process.

Image Name                    PID       Session Name       Session#     Mem Usage
========================= ========    ================ =========== ============
System Idle Process             0        Services            0              4 K
System                          4        Services            0            272 K
smss.exe                      344        Services            0          1,040 K
csrss.exe                     528        Services            0          3,892 K
csrss.exe                     612        Console             1         41,788 K
wininit.exe                   620        Services            0          3,528 K
winlogon.exe                  648        Console             1          5,884 K
services.exe                  712        Services            0          6,224 K
lsass.exe                     720        Services            0          9,712 K
svchost.exe                   788        Services            0         10,048 K
svchost.exe                   832        Services            0          7,696 K
dwm.exe                       916        Console             1        117,440 K
nvvsvc.exe                    932        Services            0          6,692 K
nvxdsync.exe                  968        Console             1         16,328 K
nvvsvc.exe                    976        Console             1         12,756 K
svchost.exe                  1012        Services            0         21,648 K
svchost.exe                   236        Services            0         33,864 K
svchost.exe                   480        Services            0         11,152 K
svchost.exe                  1028        Services            0         11,104 K
svchost.exe                  1048        Services            0         16,108 K
wlanext.exe                  1220        Services            0         12,560 K
conhost.exe                  1228        Services            0          2,588 K
svchost.exe                  1276        Services            0         13,888 K
svchost.exe                  1420        Services            0         13,488 K
spoolsv.exe                  1556        Services            0          9,340 K

tasklist > process.txt

The above command takes the output displayed by tasklist and saves it to the process.txt file.

tasklist /fi "memusage gt 40000"

The above command will only fetch those processes whose memory is greater than 40MB. Following is a sample output that can be rendered.

Image Name                    PID      Session Name     Session#     Mem Usage
=========================   ======== ================ =========== ============
dwm.exe                        916     Console             1        127,912 K
explorer.exe                  2904     Console             1        125,868 K
ServerManager.exe             1836     Console             1         59,796 K
WINWORD.EXE                   2456     Console             1        144,504 K
chrome.exe                    4892     Console             1        123,232 K
chrome.exe                    4976     Console             1         69,412 K
chrome.exe                    1724     Console             1         76,416 K
chrome.exe                    3992     Console             1         56,156 K
chrome.exe                    1168     Console             1        233,628 K
chrome.exe                     816     Console             1         66,808 K

Killing a Particular Process

Allows a user running Microsoft Windows XP professional, Windows 2003, or later to kill a task from a Windows command line by process id (PID) or image name. The command used for this purpose is the TASKILL command.

Syntax

TASKKILL [/S system [/U username [/P [password]]]] { [/FI filter] 
[/PID processid | /IM imagename] } [/T] [/F]

Examples

taskkill /f /im notepad.exe

The above command kills the open notepad task, if open.

taskill /pid 9214

The above command kills a process which has a process of 9214.

Starting a New Process

DOS scripting also has the availability to start a new process altogether. This is achieved by using the START command.

Syntax

START "title" [/D path] [options] "command" [parameters]

Wherein

  • title − Text for the CMD window title bar (required.)

  • path − Starting directory.

  • command − The command, batch file or executable program to run.

  • parameters − The parameters passed to the command.

Examples

START "Test Batch Script" /Min test.bat

The above command will run the batch script test.bat in a new window. The windows will start in the minimized mode and also have the title of “Test Batch Script”.

START "" "C:\Program Files\Microsoft Office\Winword.exe" "D:\test\TESTA.txt"

The above command will actually run Microsoft word in another process and then open the file TESTA.txt in MS Word.


Batch Script - Aliases

Aliases means creating shortcuts or keywords for existing commands. Suppose if we wanted to execute the below command which is nothing but the directory listing command with the /w option to not show all of the necessary details in a directory listing.

Dir /w

Suppose if we were to create a shortcut to this command as follows.

dw = dir /w

When we want to execute the dir /w command, we can simply type in the word dw. The word ‘dw’ has now become an alias to the command Dir /w.

Creating an Alias

Alias are managed by using the doskey command.

Syntax

DOSKEY [options] [macroname=[text]]

Wherein

  • macroname − A short name for the macro.

  • text − The commands you want to recall.

Following are the description of the options which can be presented to the DOSKEY command.

S.No. Options & Description
1.

/REINSTALL

Installs a new copy of Doskey

2.

/LISTSIZE = size

Sets size of command history buffer.

3.

/MACROS

Displays all Doskey macros.

4.

/MACROS:ALL

Displays all Doskey macros for all executables which have Doskey macros.

5.

/MACROS:exename

Displays all Doskey macros for the given executable.

6.

/HISTORY

Displays all commands stored in memory.

7.

/INSERT

Specifies that new text you type is inserted in old text.

8.

/OVERSTRIKE

Specifies that new text overwrites old text.

9.

/EXENAME = exename

Specifies the executable.

10.

/MACROFILE = filename

Specifies a file of macros to install.

11.

macroname

Specifies a name for a macro you create.

12.

text

Specifies commands you want to record.

Example

Create a new file called keys.bat and enter the following commands in the file. The below commands creates two aliases, one if for the cd command, which automatically goes to the directory called test. And the other is for the dir command.

@echo off
doskey cd = cd/test
doskey d = dir

Once you execute the command, you will able to run these aliases in the command prompt.

Output

The following screenshot shows that after the above created batch file is executed, you can freely enter the ‘d’ command and it will give you the directory listing which means that your alias has been created.

Alias Example Output

Deleting an Alias

An alias or macro can be deleted by setting the value of the macro to NULL.

Example

@echo off
doskey cd = cd/test
doskey d = dir
d= 

In the above example, we are first setting the macro d to d = dir. After which we are setting it to NULL. Because we have set the value of d to NULL, the macro d will deleted.

Replacing an Alias

An alias or macro can be replaced by setting the value of the macro to the new desired value.

Example

@echo off
doskey cd = cd/test
doskey d = dir

d = dir /w

In the above example, we are first setting the macro d to d = dir. After which we are setting it to dir /w. Since we have set the value of d to a new value, the alias ‘d’ will now take on the new value.


Batch Script - Functions


A function is a set of statements organized together to perform a specific task. In batch scripts, a similar approach is adopted to group logical statements together to form a function.

As like any other languages, functions in Batch Script follows the same procedure −

  • Function Declaration − It tells the compiler about a function's name, return type, and parameters.

  • Function Definition − It provides the actual body of the function.

Function Definition

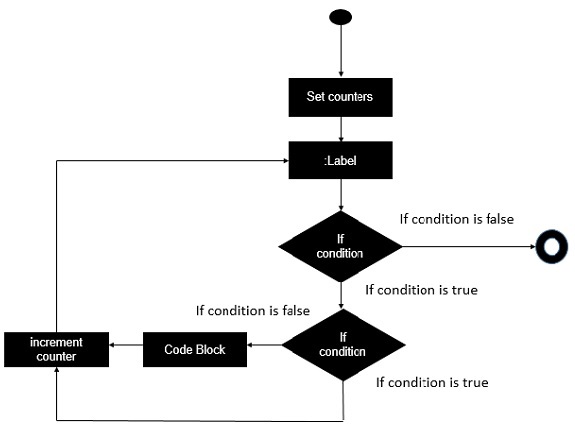
In Batch Script, a function is defined by using the label statement. When a function is newly defined, it may take one or several values as input 'parameters' to the function, process the functions in the main body, and pass back the values to the functions as output 'return types'.

Every function has a function name, which describes the task that the function performs. To use a function, you "call" that function with its name and pass its input values (known as arguments) that matches the types of the function's parameters.

Following is the syntax of a simple function.

:function_name 
Do_something 
EXIT /B 0
  • The function_name is the name given to the function which should have some meaning to match what the function actually does.

  • The EXIT statement is used to ensure that the function exits properly.

Following is an example of a simple function.

Example

:Display 
SET /A index=2 
echo The value of index is %index% 
EXIT /B 0


Calling a Function

A function is called in Batch Script by using the call command. Following is the syntax.

Syntax

call :function_name

Following example shows how a function can be called from the main program.

Example

@echo off 
SETLOCAL 
CALL :Display 
EXIT /B %ERRORLEVEL% 
:Display 
SET /A index=2 
echo The value of index is %index% 
EXIT /B 0

One key thing to note when defining the main program is to ensure that the statement EXIT /B %ERRORLEVEL% is put in the main program to separate the code of the main program from the function.

Output

The above command produces the following output.

The value of index is 2


Functions with Parameters

Functions can work with parameters by simply passing them when a call is made to the function.

Syntax

Call :function_name parameter1, parameter2… parametern

The parameters can then be accessed from within the function by using the tilde (~) character along with the positional number of the parameter.

Following example shows how a function can be called with parameters.

Example

@echo off
SETLOCAL
CALL :Display 5 , 10
EXIT /B %ERRORLEVEL%
:Display
echo The value of parameter 1 is %~1
echo The value of parameter 2 is %~2
EXIT /B 0

As seen in the above example, ~1 is used to access the first parameter sent to the function, similarly ~2 is used to access the second parameter.

Output

The above command produces the following output.

The value of parameter 1 is 5
The value of parameter 2 is 10


Functions with Return Values

Functions can work with return values by simply passing variables names which will hold the return values when a call is made to the function as shown below

Syntax

Call :function_name value1, value2… valuen

The return values are set in the function using the set command and the tilde(~) character along with the positional number of the parameter.

Following example shows how a function can be called with return values.

Example

@echo off
SETLOCAL
CALL :SetValue value1,value2
echo %value1%
echo %value2%
EXIT /B %ERRORLEVEL%
:SetValue
set "%~1 = 5"
set "%~2 = 10"
EXIT /B 0

Output

The above command produces the following output.

5 
10


Local Variables in Functions

Local variables in functions can be used to avoid name conflicts and keep variable changes local to the function. The SETLOCAL command is first used to ensure the command processor takes a backup of all environment variables. The variables can be restored by calling ENDLOCAL command. Changes made in between are local to the current batch script. ENDLOCAL is automatically called when the end of the batch file is reached, i.e. by calling GOTO:EOF.

Localizing variables with SETLOCAL allows using variable names within a function freely without worrying about name conflicts with variables used outside the function.

Following example shows how local variables can be used in functions.

Example

@echo off
set str = Outer
echo %str%
CALL :SetValue str
echo %str%
EXIT /B %ERRORLEVEL%
:SetValue
SETLOCAL
set str = Inner
set "%~1 = %str%"
ENDLOCAL
EXIT /B 0

Output

In the above program, the variable ‘str’ is being localized in the function SetValue. Thus even though the str value is being returned back to the main function, the value of str in the main function will not be replaced by the value being returned from the function.

The above command produces the following output.

Outer
Outer 


Recursive Functions

The ability to completely encapsulate the body of a function by keeping variable changes local to the function and invisible to the caller. We can now have the ability to call a function recursively making sure each level of recursion works with its own set of variables even though variable names are being reused.

Following example shows how recursive functions can be used.

Example

The example shows how to calculate a Fibonacci number recursively. The recursion stops when the Fibonacci algorism reaches a number greater or equal to a given input number. The example starts with the numbers 0 and 1, the :myFibo function calls itself recursively to calculate the next Fibonacci number until it finds the Fibonacci number greater or equal to 1000000000.

The first argument of the myFibo function is the name of the variable to store the output in. This variable must be initialized to the Fibonacci number to start with and will be used as current Fibonacci number when calling the function and will be set to the subsequent Fibonacci number when the function returns.

@echo off
set "fst = 0"
set "fib = 1"
set "limit = 1000000000"
call:myFibo fib,%fst%,%limit%
echo.The next Fibonacci number greater or equal %limit% is %fib%.
echo.&pause&goto:eof
:myFibo -- calculate recursively
:myFibo -- calculate recursively the next Fibonacci number greater or equal to a limit
SETLOCAL
set /a "Number1 = %~1"
set /a "Number2 = %~2"
set /a "Limit = %~3"
set /a "NumberN = Number1 + Number2"

if /i %NumberN% LSS %Limit% call:myFibo NumberN,%Number1%,%Limit%
(ENDLOCAL
   IF "%~1" NEQ "" SET "%~1 = %NumberN%"
)goto:eof

Output

The above command produces the following output.

The next Fibonacci number greater or equal 1000000000 is 1134903170.


Creating Files


The creation of a new file is done with the help of the redirection filter >. This filter can be used to redirect any output to a file. Following is a simple example of how to create a file using the redirection command.

Example

@echo off
echo "Hello">C:\new.txt

Output

If the file new.txt is not present in C:\, then it will be created with the help of the above command.


Writing to Files

Content writing to files is also done with the help of the redirection filter >. This filter can be used to redirect any output to a file. Following is a simple example of how to create a file using the redirection command to write data to files.

Example

@echo off
dir C:\>C:\new.txt

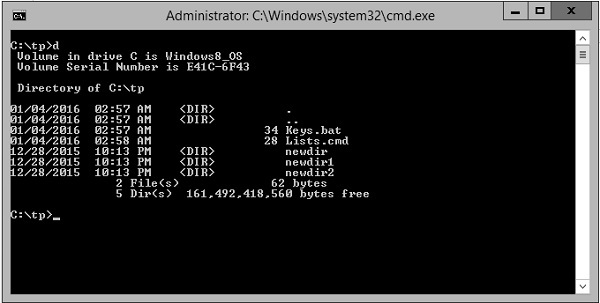
The above code snippet first uses the DIR command to get the directory listing of the entire C:\ . It then takes that output and with the help of the redirection command sends it to the file new.txt.

Output

If you open up the file new.txt on your C drive, you will get the contents of your C drive in this file. Following is a sample output.

Volume in drive C is Windows8_OS
Volume Serial Number is E41C-6F43

Directory of C:\

12/22/2015 09:02 PM   <DIR>       01 - Music
06/14/2015 10:31 AM   <DIR>       02 - Videos
09/12/2015 06:23 AM   <DIR>       03 - Pictures
12/17/2015 12:19 AM   <DIR>       04 - Software
12/15/2015 11:06 PM   <DIR>       05 - Studies
12/20/2014 09:09 AM   <DIR>       06 - Future
12/20/2014 09:07 AM   <DIR>       07 - Fitness
09/19/2015 09:56 AM   <DIR>       08 - Tracking
10/19/2015 10:28 PM   <DIR>       09 – Misc 


Appending to Files

Content writing to files is also done with the help of the double redirection filter >>. This filter can be used to append any output to a file. Following is a simple example of how to create a file using the redirection command to append data to files.

Example

@echo off
echo "This is the directory listing of C:\ Drive">C:\new.txt
dir C:\>>C:\new.txt

In the above example, you can see that the first echo command is used to create the file using the single redirection command whereas the DIR command is outputted to the file using the double redirection filter.

Output

If you open the file new.txt on your C drive, you will get the contents of your C drive in this file plus the string “This is the directory listing of C:\ Drive” . Following is a sample output.

"This is the directory listing of C:\ Drive"
Volume in drive C is Windows8_OS
Volume Serial Number is E41C-6F43

Directory of C:\

12/22/2015 09:02 PM   <DIR>       01 - Music
06/14/2015 10:31 AM   <DIR>       02 - Videos
09/12/2015 06:23 AM   <DIR>       03 - Pictures
12/17/2015 12:19 AM   <DIR>       04 - Software
12/15/2015 11:06 PM   <DIR>       05 - Studies
12/20/2014 09:09 AM   <DIR>       06 - Future
12/20/2014 09:07 AM   <DIR>       07 - Fitness
09/19/2015 09:56 AM   <DIR>       08 - Tracking
10/19/2015 10:28 PM   <DIR>       09 – Misc 


Reading from Files

Reading of files in a Batch Script is done via using the FOR loop command to go through each line which is defined in the file that needs to be read. Since there is a no direct command to read text from a file into a variable, the ‘for’ loop needs to be used to serve this purpose.

Let’s look at an example on how this can be achieved.

Example

@echo off
FOR /F "tokens=* delims=" %%x in (new.txt) DO echo %%x

The delims parameter is used to break up the text in the file into different tokens or words. Each word or token is then stored in the variable x. For each word which is read from the file, an echo is done to print the word to the console output.

Output

If you consider the new.txt file which has been considered in previous examples, you might get the following output when the above program is run.

"This is the directory listing of C:\ Drive"
Volume in drive C is Windows8_OS
Volume Serial Number is E41C-6F43

Directory of C:\

12/22/2015 09:02 PM   <DIR>       01 - Music
06/14/2015 10:31 AM   <DIR>       02 - Videos
09/12/2015 06:23 AM   <DIR>       03 - Pictures
12/17/2015 12:19 AM   <DIR>       04 - Software
12/15/2015 11:06 PM   <DIR>       05 - Studies
12/20/2014 09:09 AM   <DIR>       06 - Future
12/20/2014 09:07 AM   <DIR>       07 - Fitness
09/19/2015 09:56 AM   <DIR>       08 - Tracking
10/19/2015 10:28 PM   <DIR>       09 – Misc


Deleting Files

For deleting files, Batch Script provides the DEL command.

Syntax

DEL [/P] [/F] [/S] [/Q] [/A[[:]attributes]] names

Following are the description of the options which can be presented to the DEL command.

S.No. Options & Description
1.

Names

Specifies a list of one or more files or directories. Wildcards may be used to delete multiple files. If a directory is specified, all files within the directory will be deleted

2.

/P

Prompts for confirmation before deleting each file.

3.

/F

Force deletes of read-only files.

4.

/S

Deletes specified files from all subdirectories.

5.

/Q

Quiet mode, do not ask if ok to delete on global wildcard.

6.

/A

Selects files to delete based on attributes.

7.

attributes

R Read-only files, S System files, H Hidden files, A Files ready for archiving - Prefix meaning not

Following examples show how the DEL command can be used.

Examples

del test.bat

The above command will delete the file test.bat in the current directory, if the file exists.

del c:\test.bat

The above command will delete the file C:\test.bat in the current directory, if the file exists.

del c:\*.bat

The * (asterisks) is a wild character. *.bat indicates that you would like to delete all bat files in the c:\directory.

del c:\?est.tmp

The ? (question mark) is a single wild character for one letter. The use of this command in the above example will delete any file ending with "est.tmp", such as pest.tmp or test.tmp.


Renaming Files

For renaming files, Batch Script provides the REN or RENAME command.

Syntax

RENAME [drive:][path][directoryname1 | filename1] [directoryname2 | filename2]

Let’s take a look at some examples of renaming files.

Examples

rename *.txt *.bak

The above command will rename all text files to files with .bak extension.

rename "TESTA.txt" "TESTB.txt"

The above command will rename the file TESTA.txt to TESTB.txt.


Moving Files

For moving files, Batch Script provides the MOVE command.

Syntax

MOVE [/Y | /-Y] [drive:][path]filename1[,...] destination

Following are the description of the options which can be presented to the DEL command.

S.No. Options & Description
1.

[drive:][path]filename1

Specifies the location and name of the file or files you want to move

2.

destination

Specifies the new location of the file. Destination can consist of a drive letter and colon, a directory name, or a combination. If you are moving only one file, you can also include a filename if you want to rename the file when you move it.

3.

[drive:][path]dirname1

Specifies the directory you want to rename.

4.

dirname2

Specifies the new name of the directory.

5.

/Y

Suppresses prompting to confirm you want to overwrite an existing destination file.

6.

/-Y

Causes prompting to confirm you want to overwrite an existing destination file.

Let’s look at some examples of renaming files.

Examples

move c:\windows\temp\*.* c:\temp

The above command will move the files of c:\windows\temp to the temp directory in root.

move new.txt, test.txt c:\example

The above command will move the files new.txt and test.txt into the c:\example folder.


Files Pipes


The pipe operator (|) takes the output (by default, STDOUT) of one command and directs it into the input (by default, STDIN) of another command. For example, the following command sorts the contents of the directory C:\

dir C:\ | sort

In this example, both commands start simultaneously, but then the sort command pauses until it receives the dir command's output. The sort command uses the dir command's output as its input, and then sends its output to handle 1 (that is, STDOUT).

Following is another example of the pipe command. In this example, the contents of the file C:\new.txt are sent to the sort command through the pipe filter.

@echo off 
TYPE C:\new.txt | sort

Combining Commands with Redirection Operators

Usually, the pipe operator is used along with the redirection operator to provide useful functionality when it comes to working with pipe commands.

For example, the below command will first take all the files defined in C:\, then using the pipe command, will find all the files with the .txt extension. It will then take this output and print it to the file AllText.txt.

dir C:\ | find "txt" > AllText.txt

Using Multiple Pipe Commands

To use more than one filter in the same command, separate the filters with a pipe (|). For example, the following command searches every directory on drive C:, finds the file names that include the string "Log", and then displays them in one Command Prompt window at a time −

dir c:\ /s /b | find "TXT" | more

Following are some examples of how the pipe filter can be used.

Examples

The following example send’s the list of all running tasks using the tasklist command and sends the output to the find command. The find command will then find all processes which are of the type notepad and display them in the command prompt.

tasklist | find "notepad"

Output

Following is a sample output.

notepad.exe               1400 Console            1      8,916 K
notepad.exe               4016 Console            1      11,200 K
notepad.exe               1508 Console            1      8,720 K
notepad.exe               4076 Console            1      8,688 K

The following example send’s the list of all running tasks using the tasklist command and sends the output to the more command. The more command will then display the lists of running tasks one page at a time.

Example

tasklist | more

Output

Image Name                PID Session Name  Session#     Mem Usage
======================    ================  ===========  ============
System Idle Process           0 Services        0             4 K
System                        4 Services        0           276 K
smss.exe                    344 Services        0         1,060 K
csrss.exe                   524 Services        0         4,188 K
csrss.exe                   608 Console         1        58,080 K
wininit.exe                 616 Services        0         3,528 K
winlogon.exe                644 Console         1         5,636 K
services.exe                708 Services        0         7,072 K
lsass.exe                   716 Services        0        10,228 K
svchost.exe                 784 Services        0        10,208 K
svchost.exe                 828 Services        0         7,872 K
dwm.exe                     912 Console         1       208,316 K
nvvsvc.exe                  932 Services        0         6,772 K
nvxdsync.exe                968 Console         1        16,584 K
nvvsvc.exe                  976 Console         1        12,780 K
svchost.exe                1008 Services        0        20,340 K
svchost.exe                 224 Services        0        39,740 K
svchost.exe                 468 Services        0        11,864 K
svchost.exe                 860 Services        0        11,184 K
svchost.exe                 232 Services        0        16,992 K
wlanext.exe                1168 Services        0        12,840 K
-- More --

The following example send’s the list of all running tasks using the tasklist command and sends the output to the find command. The find command will then find all processes which are of the type notepad and then uses the redirection command to send the content to the file tasklist.txt.

Example

tasklist | find "notepad" > tasklist.txt

Output

If you open the file tasklist.txt, you will get the following sample output.

notepad.exe            1400 Console            1      8,916 K
notepad.exe            4016 Console            1      11,200 K
notepad.exe            1508 Console            1      8,720 K
notepad.exe            4076 Console            1      8,688 K


Files Inputs

When a batch file is run, it gives you the option to pass in command line parameters which can then be read within the program for further processing. The batch files parameters can be recalled from within the program using the % operator along with the numeric position of the parameter. Following is how the command line parameters are defined.

  • %0 is the program name as it was called.
  • %1 is the first command line parameter.
  • %2 is the second command line parameter.
  • So on till %9.

Let’s take a look at a simple example of how command line parameters can be used.

Example

@echo off
echo The first parameter is %1
echo The second parameter is %2
echo The third parameter is %3

Output

If the above code is stored in a file called test.bat and the file is run as

test.bat 5 10 15

then, following will be the output.

The first parameter is 5
The second parameter is 10
The third parameter is 15


Using the SHIFT Operator

One of the limitations of command line arguments is that it can accept only arguments till %9. Let’s take an example of this limitation.

Example

@echo off
echo %1
echo %2
echo %3
echo %4
echo %5
echo %6
echo %7
echo %8
echo %9
echo %10

Output

If the above code is stored in a file called test.bat and the file is run as

test.bat a b c d e f g h i j

Then following will be the output.

a 
b
c
d
e
f
h
i
a0

As you can see from the above output, the final value which should be shown as ‘j’ is being shown as a0. This is because there is no parameter known as %10.

This limitation can be avoided by using the SHIFT operator. After your batch file handled its first parameter(s) it could SHIFT them (just insert a line with only the command SHIFT), resulting in %1 getting the value B, %2 getting the value C, etcetera, till %9, which now gets the value J. Continue this process until at least %9 is empty.

Let’s look at an example of how to use the SHIFT operator to overcome the limitation of command line arguments.

Example

@ECHO OFF
:Loop

IF "%1"=="" GOTO Continue
   echo %1%
SHIFT
GOTO Loop
:Continue

If the above code is stored in a file called test.bat and the file is run as

test.bat a b c d e f g h i j

Then following will be the output.

a 
b
c
d
e
f
h
i
j

Note

Some characters in the command line are ignored by batch files, depending on the DOS version, whether they are "escaped" or not, and often depending on their location in the command line −

  • Commas (",") are replaced by spaces, unless they are part of a string in doublequotes.

  • Semicolons (";") are replaced by spaces, unless they are part of a string in doublequotes.

  • "=" characters are sometimes replaced by spaces, not if they are part of a string in doublequotes.

  • The first forward slash ("/") is replaced by a space only if it immediately follows the command, without a leading space.

  • Multiple spaces are replaced by a single space, unless they are part of a string in doublequotes.

  • Tabs are replaced by a single space.

  • Leading spaces before the first command line argument are ignored.

  • Trailing spaces after the last command line argument are trimmed.


Renaming Folders


For renaming folders, Batch Script provides the REN or RENAME command.

Syntax

RENAME [drive:][path][directoryname1 | filename1] [directoryname2 | filename2]

Let’s look at some examples of renaming folders.

Examples

ren Example Example1

The above command will rename the folder called Example in the current working directory to Example1.

ren C:\Example Example1

The above command will rename the folder called Example in C Drive to Example1.


Moving Folders

For moving folders, Batch Script provides the MOVE command.

Syntax

MOVE [/Y | /-Y] [drive:][path]filename1[,...] destination

Following are the description of the options which can be presented to the DEL command.

S.No. Options & Description
1.

[drive:][path]filename1

Specifies the location and name of the file or files you want to move

2.

destination

Specifies the new location of the file. Destination can consist of a drive letter and colon, a directory name, or a combination. If you are moving only one file, you can also include a filename if you want to rename the file when you move it.

3.

[drive:][path]dirname1

Specifies the directory you want to rename.

4.

dirname2

Specifies the new name of the directory.

5.

/Y

Suppresses prompting to confirm you want to overwrite an existing destination file.

6.

/-Y

Causes prompting to confirm you want to overwrite an existing destination file.

Let’s look at some examples of moving folders.

Examples

move *.* C:\Example

The above command will move all files from the current directory to the folder C:\Example.

move *.txt C:\Example

The above command will move all files with the txt extension from the current directory to the folder C:\Example.

move C:\old\*.* C:\Example

The above command will move all files from the folder called ‘old’ in C drive to the folder C:\Example.


Batch Script - Return Code


By default when a command line execution is completed it should either return zero when execution succeeds or non-zero when execution fails. When a batch script returns a non-zero value after the execution fails, the non-zero value will indicate what is the error number. We will then use the error number to determine what the error is about and resolve it accordingly.

Following are the common exit code and their description.

Error Code Description
0 Program successfully completed.
1 Incorrect function. Indicates that Action has attempted to execute non-recognized command in Windows command prompt cmd.exe.
2 The system cannot find the file specified. Indicates that the file cannot be found in specified location.
3 The system cannot find the path specified. Indicates that the specified path cannot be found.
5 Access is denied. Indicates that user has no access right to specified resource.

9009

0x2331

Program is not recognized as an internal or external command, operable program or batch file. Indicates that command, application name or path has been misspelled when configuring the Action.

221225495

0xC0000017

-1073741801

Not enough virtual memory is available.

It indicates that Windows has run out of memory.

3221225786

0xC000013A

-1073741510

The application terminated as a result of a CTRL+C. Indicates that the application has been terminated either by the user's keyboard input CTRL+C or CTRL+Break or closing command prompt window.

3221225794

0xC0000142

-1073741502

The application failed to initialize properly. Indicates that the application has been launched on a Desktop to which the current user has no access rights. Another possible cause is that either gdi32.dll or user32.dll has failed to initialize.

Error Level

The environmental variable %ERRORLEVEL% contains the return code of the last executed program or script.

By default, the way to check for the ERRORLEVEL is via the following code.

Syntax

IF %ERRORLEVEL% NEQ 0 ( 
   DO_Something 
)

It is common to use the command EXIT /B %ERRORLEVEL% at the end of the batch file to return the error codes from the batch file.

EXIT /B at the end of the batch file will stop execution of a batch file.

Use EXIT /B < exitcodes > at the end of the batch file to return custom return codes.

Environment variable %ERRORLEVEL% contains the latest errorlevel in the batch file, which is the latest error codes from the last command executed. In the batch file, it is always a good practice to use environment variables instead of constant values, since the same variable get expanded to different values on different computers.

Let’s look at a quick example on how to check for error codes from a batch file.

Example

Let’s assume we have a batch file called Find.cmd which has the following code. In the code, we have clearly mentioned that we if don’t find the file called lists.txt then we should set the errorlevel to 7. Similarly, if we see that the variable userprofile is not defined then we should set the errorlevel code to 9.

if not exist c:\lists.txt exit 7 
if not defined userprofile exit 9 
exit 0

Let’s assume we have another file called App.cmd that calls Find.cmd first. Now, if the Find.cmd returns an error wherein it sets the errorlevel to greater than 0 then it would exit the program. In the following batch file, after calling the Find.cnd find, it actually checks to see if the errorlevel is greater than 0.

Call Find.cmd

if errorlevel gtr 0 exit 
echo Successful completion

Output

In the above program, we can have the following scenarios as the output −

  • If the file c:\lists.txt does not exist, then nothing will be displayed in the console output.

  • If the variable userprofile does not exist, then nothing will be displayed in the console output.

  • If both of the above condition passes then the string “Successful completion” will be displayed in the command prompt.

Loops

In the decision making chapter, we have seen statements which have been executed one after the other in a sequential manner. Additionally, implementations can also be done in Batch Script to alter the flow of control in a program’s logic. They are then classified into flow of control statements.


While Statement Implementation

There is no direct while statement available in Batch Script but we can do an implementation of this loop very easily by using the if statement and labels.

The following diagram shows the diagrammatic explanation of this loop.

While Statement Implementation

The first part of the while implementation is to set the counters which will be used to control the evaluation of the ‘if’ condition. We then define our label which will be used to embody the entire code for the while loop implementation. The ‘if’ condition evaluates an expression. If the expression evaluates to true, the code block is executed. If the condition evaluates to false then the loop is exited. When the code block is executed, it will return back to the label statement for execution again.

Following is the syntax of the general implementation of the while statement.

Syntax

Set counters
:label
If (expression) (
   Do_something
   Increment counter
   Go back to :label
)
  • The entire code for the while implementation is placed inside of a label.

  • The counter variables must be set or initialized before the while loop implementation starts.

  • The expression for the while condition is done using the ‘if’ statement. If the expression evaluates to true then the relevant code inside the ‘if’ loop is executed.

  • A counter needs to be properly incremented inside of ‘if’ statement so that the while implementation can terminate at some point in time.

  • Finally, we will go back to our label so that we can evaluate our ‘if’ statement again.

Following is an example of a while loop statement.

Example

@echo off
SET /A "index = 1"
SET /A "count = 5"
:while
if %index% leq %count% (
   echo The value of index is %index%
   SET /A "index = index + 1"
   goto :while
)

In the above example, we are first initializing the value of an index integer variable to 1. Then our condition in the ‘if’ loop is that we are evaluating the condition of the expression to be that index should it be less than the value of the count variable. Till the value of index is less than 5, we will print the value of index and then increment the value of index.

Output

The above command produces the following output.

The value of index is 1
The value of index is 2
The value of index is 3
The value of index is 4
The value of index is 5

For Statement List Implementations

The "FOR" construct offers looping capabilities for batch files. Following is the common construct of the ‘for’ statement for working with a list of values.

Syntax

FOR %%variable IN list DO do_something

The classic ‘for’ statement consists of the following parts −

  • Variable declaration – This step is executed only once for the entire loop and used to declare any variables which will be used within the loop. In Batch Script, the variable declaration is done with the %% at the beginning of the variable name.

  • List – This will be the list of values for which the ‘for’ statement should be executed.

  • The do_something code block is what needs to be executed for each iteration for the list of values.

The following diagram shows the diagrammatic explanation of this loop.

For Statement - List Implementations

Following is an example of how the ‘goto’ statement can be used.

Example

@echo off 
FOR %%F IN (1 2 3 4 5) DO echo %%F

The key thing to note about the above program is −

  • The variable declaration is done with the %% sign at the beginning of the variable name.

  • The list of values is defined after the IN clause.

  • The do_something code is defined after the echo command. Thus for each value in the list, the echo command will be executed.

Output

The above program produces the following output.

1 
2 
3 
4 
5 
 

Looping through Ranges

The ‘for’ statement also has the ability to move through a range of values. Following is the general form of the statement.

Syntax

FOR /L %%variable IN (lowerlimit,Increment,Upperlimit) DO do_something

Where

  • The /L switch is used to denote that the loop is used for iterating through ranges.

  • Variable declaration – This step is executed only once for the entire loop and used to declare any variables which will be used within the loop. In Batch Script, the variable declaration is done with the %% at the beginning of the variable name.

  • The IN list contains of 3 values. The lowerlimit, the increment, and the upperlimit. So, the loop would start with the lowerlimit and move to the upperlimit value, iterating each time by the Increment value.

  • The do_something code block is what needs to be executed for each iteration.

Following is an example of how the looping through ranges can be carried out.

Example

@ECHO OFF 
FOR /L %%X IN (0,1,5) DO ECHO %%X

Output

The above program produces the following output.

0 
1 
2 
3 
4 
5 


Classic for Loop Implementation

Following is the classic ‘for’ statement which is available in most programming languages.

Syntax

for(variable declaration;expression;Increment) {
   statement #1
   statement #2
   …
}

The Batch Script language does not have a direct ‘for’ statement which is similar to the above syntax, but one can still do an implementation of the classic ‘for’ loop statement using if statements and labels.

Following is the general flow of the classic ‘for’ loop statement.

Classic for Loop Implementation

Let’s look at the general syntax implementation of the classic for loop in batch scripting.

Set counter
:label

If (expression) exit loop
Do_something
Increment counter
Go back to :label
  • The entire code for the ‘for’ implementation is placed inside of a label.

  • The counters variables must be set or initialized before the ‘for’ loop implementation starts.

  • The expression for the ‘for’ loop is done using the ‘if’ statement. If the expression evaluates to be true then an exit is executed to come out of the loop.

  • A counter needs to be properly incremented inside of the ‘if’ statement so that the ‘for’ implementation can continue if the expression evaluation is false.

  • Finally, we will go back to our label so that we can evaluate our ‘if’ statement again.

Following is an example of how to carry out the implementation of the classic ‘for’ loop statement.

Example

@echo off 
SET /A i = 1 
:loop 

IF %i%==5 GOTO END 
echo The value of i is %i% 
SET /a i=%i%+1 
GOTO :LOOP 
:END

Output

The above command produces the following output.

The value of i is 1 
The value of i is 2 
The value of i is 3 
The value of i is 4


Looping through Command Line Arguments

The ‘for’ statement can also be used for checking command line arguments. The following example shows how the ‘for’ statement can be used to loop through the command line arguments.

Example

@ECHO OFF 
:Loop 

IF "%1"=="" GOTO completed 
FOR %%F IN (%1) DO echo %%F 
SHIFT 
GOTO Loop 
:completed

Output

Let’s assume that our above code is stored in a file called Test.bat. The above command will produce the following output if the batch file passes the command line arguments of 1,2 and 3 as Test.bat 1 2 3.

1 
2 
3


Break Statement Implementation

The break statement is used to alter the flow of control inside loops within any programming language. The break statement is normally used in looping constructs and is used to cause immediate termination of the innermost enclosing loop.

The Batch Script language does not have a direct ‘for’ statement which does a break but this can be implemented by using labels. The following diagram shows the diagrammatic explanation of the break statement implementation in Batch Script.

Break Statement Implementation

The key thing to note about the above implementation is the involvement of two ‘if’ conditions. The second ‘if’ condition is used to control when the break is implemented. If the second ‘if’ condition is evaluated to be true, then the code block is not executed and the counter is directly implemented.

Following is an example of how to carry out the implementation of the break statement.

Example

@echo off 
SET /A "index=1" 
SET /A "count=5" 
:while 
if %index% leq %count% ( 
   if %index%==2 goto :Increment 
      echo The value of index is %index% 
:Increment 
   SET /A "index=index + 1" 
   goto :while 
)

The key thing to note about the above program is the addition of a label called :Increment. When the value of index reaches 2, we want to skip the statement which echoes its value to the command prompt and directly just increment the value of index.

Output

The above command produces the following output.

The value of index is 1 
The value of index is 3 
The value of index is 4 
The value of index is 5


Batch Script - Input / Output


There are three universal “files” for keyboard input, printing text on the screen and printing errors on the screen. The “Standard In” file, known as stdin, contains the input to the program/script. The “Standard Out” file, known as stdout, is used to write output for display on the screen. Finally, the “Standard Err” file, known as stderr, contains any error messages for display on the screen.

Each of these three standard files, otherwise known as the standard streams, are referenced using the numbers 0, 1, and 2. Stdin is file 0, stdout is file 1, and stderr is file 2.

Redirecting Output (Stdout and Stderr)

One common practice in batch files is sending the output of a program to a log file. The > operator sends, or redirects, stdout or stderr to another file. The following example shows how this can be done.

Dir C:\ > list.txt

In the above example, the stdout of the command Dir C:\ is redirected to the file list.txt.

If you append the number 2 to the redirection filter, then it would redirect the stderr to the file lists.txt.

Dir C:\ 2> list.txt

One can even combine the stdout and stderr streams using the file number and the ‘&’ prefix. Following is an example.

DIR C:\ > lists.txt 2>&1

Suppressing Program Output

The pseudo file NUL is used to discard any output from a program. The following example shows that the output of the command DIR is discarded by sending the output to NUL.

Dir C:\ > NUL

Stdin

To work with the Stdin, you have to use a workaround to achieve this. This can be done by redirecting the command prompt’s own stdin, called CON.

The following example shows how you can redirect the output to a file called lists.txt. After you execute the below command, the command prompt will take all the input entered by user till it gets an EOF character. Later, it sends all the input to the file lists.txt.

TYPE CON > lists.txt