顯示具有 Raspberry Pi 標籤的文章。 顯示所有文章

2022年6月28日 星期二

Raspberry Pi SSL Certificates using Let’s Encrypt

This Raspberry Pi SSL certificate project will walk you through the steps to installing and setting up the Let’s Encrypt Certbot client on the Pi.

Raspberry Pi SSL with Lets Encrypt

This Certbot client allows the user to grab an SSL certificate from Let’s Encrypt by either utilizing your web server or running a temporary server.

Let’s Encrypt is the best way to easily obtain a secure and certified SSL certificate for your Raspberry Pi completely free.

Before you get started with setting up SSL on your Raspberry Pi, make sure that you have a domain name already set up and pointed at your IP address as an IP Address cannot have a certified SSL Certificate.

If you are using Cloudflare as your DNS provider, make sure you have the DNS set to bypass Cloudflare’s proxy. The proxy hides your IP address meaning the Let’s Encrypt tool will fail to verify your Raspberry Pi’s IP address and generate an SSL certificate.

Below are all the bits and pieces that I used for setting up Let’s Encrypt SSL on my Raspberry Pi. You also will need an internet connection to be able to complete this tutorial.

This tutorial on acquiring an SSL Certificate was last tested on Raspberry Pi OS Bullseye and the Raspberry Pi 3.

Installing and Running LetsEncrypt

1. Before we setup LetsEncrypt on our Raspberry Pi we should first ensure everything is up to date.

We can do this by running the following two commands.

sudo apt update
sudo apt upgradeCopy

2. Now we can go ahead and install the actual LetsEncrypt software to our Raspberry Pi by running one of the following commands.

This piece of software is called “Cerbot”. If you are running Apache, you can install the certbot module for it otherwise install the standard version of certbot.

Apache

sudo apt install python3-certbot-apacheCopy

Everything Else

sudo apt install certbotCopy

3. With Certbot finally installed we can proceed with grabbing an SSL certificate for our Raspberry Pi from Let’s Encrypt. There is a couple of ways of handling this.

If you are not using Apache, you can skip this step. If you are using Apache, then the easiest way of grabbing a certificate is by running the command shown below, this will automatically grab and install the certificate into Apache’s configuration.

Before you do that, you will first have to make sure port 80 and port 443 are port forwarded. Also, if you are using Cloudflare as your DNS provider, you will need to temporarily bypass it as it hides your real IP address.

certbot --apacheCopy

4. If you are not running Apache, there are two different ways we can go about grabbing a certificate from Let’s Encrypt. Thanks to the certbot software, we can either grab the server using a standalone python server.

Alternatively, if you are running another web server such as NGINX, we can also utilize that to grab the certificate as well. Though you will have to set up the certificate manually once it has been grabbed.

Go to step 5a if you are not running another web server, otherwise go to step 5b.

5a. Utilizing the standalone built-in web server is incredibly easy, though first, you will have to make sure your port 80 is unblocked and forwarded. Make sure you replace example.com with the domain name you intend on utilizing.

certbot certonly --standalone -d example.com -d www.example.comCopy

5b. Using web root requires a bit more knowledge then using the built-in web server. Make sure /var/www/example points to a working website directory that can be reached from the internet. Also, make sure to replace example.com with the domain name you are using for your website.

certbot certonly --webroot -w /var/www/example -d example.com -d www.example.comCopy

6. After running these commands, you will be prompted to enter some details, such as your email address. These details are required for Let’s Encrypt to keep track of the certificates it provides and also allow them to contact you if any issues arrive with the certificate.

Once you have filled out the required information, it will proceed to grab the certificate from Let’s Encrypt.

If you run into any issues, make sure you have a valid domain name pointing at your IP, make sure port 80 and port 443 are not blocked. Finally, if you are using Cloudflare as your DNS provider, ensure that you have the DNS currently set to bypass the proxy servers.

The certificates that are grabbed by the certbot client will be stored in the following folder. Of course, swapping out example.com with your own domain name.

/etc/letsencrypt/live/example.com/

You will find both the full chain file (fullchain.pem) and the certificate’s private key file (privkey.pem) within these folders. Make sure you don’t allow others to access these files as they are what keep your SSL connection secure and identify it as a legitimate connection.

With the files now successfully grabbed you can proceed to set up any piece of software you need to use them. For instance, if you wanted to setup NGINX to utilize the SSL certificates then follow our Raspberry Pi SSL Nginx guide below.

Using your new SSL Certificate with NGINX

1. Begin by opening your NGINX configuration file. These are typically stored in /etc/nginx/ or /etc/nginx/sites-available/

Once you have found your configuration file, open it up using your favorite text editor, mine, for instance, is nano. Once you are within the file search for a text block like what is display below.

Make sure you swap out our example.com with the domain name that you are using.

server {
        listen 80 default_server;
        listen [::]:80 default_server;

        root /usr/share/nginx/html;
        index index.html index.htm;

        server_name example.com;

        location / {
                try_files $uri $uri/ =404;
        }
}Copy

2. To this block of code, we will need to make some changes. Follow our steps and read our explanations of why we are making the change below.

Find

listen [::]:80 default_serverCopy

Add Below

listen 443 ssl;Copy

This change tells NGINX to start listening on port 443. Port 443 is important as it is the port that handles HTTPS/SSL traffic and will be the port web browsers try to connect over when using https://.

Find

server_name example.com;Copy

Add Below

ssl_certificate /etc/letsencrypt/live/example.com/fullchain.pem;
ssl_certificate_key /etc/letsencrypt/live/example.com/privkey.pem;Copy

This change tells NGINX where to find our certificate files. It will use these to set up the SSL/HTTPS connection.

The private key secures the actual connection. Only your server can read and see this file, and this file should be kept secure otherwise, people could potentially intercept and decrypt your traffic.

The fullchain contains all the information needed to talk with the server over the HTTPS connection. It also contains the information needed to verify it is a legitimately signed SSL file.

3. With all those changes done, you should end up with something similar to what is displayed below. Of course, make sure you replaced example.com with your domain name.

Once you are satisfied that you have entered the new data correctly, you can save and quit out of the file and then restart NGINX so it loads in the new configuration.

server {
        listen 80 default_server;
        listen [::]:80 default_server

        listen 443 ssl;

        root /usr/share/nginx/html;
        index index.html index.htm;

        server_name example.com;

        ssl_certificate /etc/letsencrypt/live/example.com/fullchain.pem;
        ssl_certificate_key /etc/letsencrypt/live/example.com/privkey.pem;

        location / {
                try_files $uri $uri/ =404;
        }
}

4. You should now have a fully operational HTTPS connection for your NGINX web server utilizing the certificate we generated with Let’s Encrypt.

You should now hopefully have a fully validated SSL certificate that is provided to you from Let’s Encrypt. You will find this tutorial pretty handy across a wide range of projects, especially the server based Raspberry Pi projects.

Hopefully, you have found this Raspberry Pi SSL tutorial helpful, if you have any issues or feedback feel free to leave a comment below.

資料來源:https://pimylifeup.com/raspberry-pi-ssl-lets-encrypt/

2021年2月18日 星期四

Linux 匹配文字 grep 指令用法教學與範例

本篇介紹如何使用 Linux 的 grep 指令,根據關鍵字或正規表示法找出想要的資料。

Linux 的 grep 是一個很好用的指令,可以從串流資料或檔案中,使用關鍵字或正規表示法(regular expression)篩選出想要尋找的資料,並且顯示出來,以下是 grep 的用法教學以及實際範例。

grep 這個指令名稱其實是來自於正規表示法的 g/RE/p,其意義是代表以正規表示法全域搜尋並列印出來(globally search for RE and print it)。

搜尋關鍵字

grep 最基本的用法就是以普通的關鍵字來搜尋,其基本語法如下:

grep 關鍵字 檔案1 檔案2 ...

例如在 /etc/os-release 檔案中搜尋 Ubuntu 關鍵字:

grep Ubuntu /etc/os-release
NAME="Ubuntu"
PRETTY_NAME="Ubuntu 18.04.3 LTS"

執行的結果會列出所有含有關鍵字的整行文字。

grep 亦可搭配萬用字元(*)同時搜尋多個檔案,例如在 /etc/ 目錄之下所有 *.conf 檔案中,尋找 network 這個字眼:

grep network /etc/*.conf
ltrace.conf:hex(uint) inet_network(string);
nsswitch.conf:networks:       files
sysctl.conf:# Additional settings - these settings can improve the network
sysctl.conf:# security of the host and prevent against some network attacks
sysctl.conf:# redirection. Some network environments, however, require that these

搜尋多個檔案時,在輸出中會標示資料來源是哪一個檔案。

除了搜尋檔案內容之外,亦可搭配管線(pipe)篩選串流資料,例如篩選出含有 network 關鍵字的檔案名稱:

ls /etc/ | grep network
network
networkd-dispatcher
networks

不分大小寫

grep 預設會區分字母的大小寫,如果希望以不分大小寫的方式搜尋,可以加上 -i 參數:

grep -i Ubuntu /etc/os-release

標示行號

若要標示匹配文字的行號,可以加上 -n 參數:

grep -n Ubuntu /etc/os-release
1:NAME="Ubuntu"
5:PRETTY_NAME="Ubuntu 18.04.3 LTS"

反向匹配

若想要將匹配的資料排除,只顯示出沒有關鍵字的那幾行資料,可以加上 -v 參數。例如顯示不包含 Ubuntu 關鍵字的那幾行:

grep -v Ubuntu /etc/os-release

遞迴搜尋檔案

如果想要在指定目錄與其子目錄下所有的檔案中,搜尋指定的關鍵字,可以加上 -r 參數:

grep -r ubuntu /etc/

如果只想要從特定的檔案中尋找關鍵字,可以使用 -r 搭配 --include 指定檔案類型:

grep -r --include="*.conf" ubuntu /etc/

如果自己的權限沒辦法讀取所有的檔案,就會出現某些檔案無法讀取的錯誤訊息,這時候可以將這種錯誤訊息導向 /dev/null,只看正常訊息就好:

grep -r ubuntu /etc/ 2>/dev/null

顯示前後幾行

有時候只顯示匹配成功那一行,不容易看出是否是我們想要找的資料,這時候可以加上 -A(After)、-B(Before)或-C(Context),指定要顯示的前後行數:

grep -A 1 Ubuntu /etc/os-release


grep -B 1 Ubuntu /etc/os-release


grep -C 1 Ubuntu /etc/os-release

顏色標示

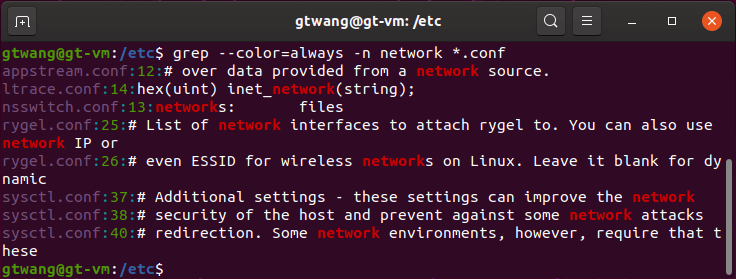
grep 可以使用顏色標示的方式,將成功匹配的部分文字標示出來,方便使用者閱讀。顏色標示功能可以透過 --color=never--color=always--color=auto 這幾種參數來關閉、開啟或設為自動。開啟顏色標示的輸出會像這樣:

grep 顏色標示

grep 顏色標示

正規表示法

grep 在搜尋關鍵字時,其實是以正規表示法的方式匹配文字的,所以一般的正規表示法都可以直接使用,以下是一些常用的範例。開頭與結尾是最常用的:

ls | grep "^a"


ls | grep "b$"


ls | grep "^[ab]"


ls | grep "[ab]$"

各種出現次數的指定:

ls | grep "^ab*"


ls | grep "^ab?"


ls | grep "^ab+"

多種字眼的組合,也很常用:

ls | grep "ab|cd"


ls | grep -E "ab|cd"

如果只想要精準篩選出 net 這個單字,可以這樣寫:

ls | grep "<net>"
issue.net

這樣就只會出現含有 net 這一個單字的結果,像是 network 這樣的字眼就會被排除。

參考資料:鳥哥的 Linux 私房菜Carlos-StudioLinux 命令大全 

資料來源: https://blog.gtwang.org/linux/linux-grep-command-tutorial-examples/

Linux udev usb 插入自訂執行 script

 在這個單元,我們要開始運用 udev 呼叫 my_script 的時候,所傳過來的環境變數(environment variables)。其中最重要,而且每次都一定會設定的變數就是:SUBSYSTEM 及 ACTION。其他的許多變數常因 SUBSYSTEM 而異。

第一個單元裡,我們曾寫了一個範例程式,叫做 my_script,讓 Linux 系統每次發生 udev 事件時,都會發出一次聲響(sound effect)。以一個 USB thumb drive 做實驗,插入(insert)或拔除(unplug)時分別都會聽見約 6、7 次,以及 3 次聲響。也就是說,插入一個 USB 隨身碟時,系統上會產生許多次的 uevents。拔除時亦然。我們再複習一下這個簡單的掛勾機制(hook):

$ cat /etc/udev/rules.d/z99_test.rules
RUN+="/home/nobody/my_script"
$ ls -l ~/my_script
-rwxr-xr-x 1 nobody nobody 1056 Nov 22 03:04 /home/nobody/my_script

為了篩選出(match)方便與之掛勾的特定事件(uevent),我們必須更進一步追蹤這些事件的內幕。首先,把 my_script 改寫為以下 3 行:

#!/bin/sh
echo $SEQNUM $SUBSYSTEM $ACTION $DEVNAME >> /tmp/my_script.log
exit $?

先以 root 的權限把 logfile /tmp/my_script.log 的內容清空,再插入,或拔除手邊任何一個 USB 隨身碟。然後再看看在 /tmp/my_script.log 這個檔案裡面,我們到底收集到了那些情資。結果大概會很接近如下所示的內容:

2124 usb add /dev/1-6
2125 usb add
2126 scsi_host add
2127 usb_device add /dev/bus/usb/001/007
2134 bdi add
2128 scsi add
2129 scsi_disk add
2131 scsi change
2130 scsi_device add
2132 block add /dev/sda
2133 block add /dev/sda1
2136 scsi_disk remove
2135 scsi_device remove
2137 block remove /dev/sda1
2140 scsi remove
2143 usb_device remove /dev/bus/usb/001/007
2138 bdi remove
2141 scsi_host remove
2142 usb remove
2139 block remove /dev/sda
2144 usb remove /dev/1-6

其中第一個 field 是環境變數 SEQNUM 的值,可用來判別事件發生的先後順序,第二個是 SUBSYSTEM,第三個是 ACTION,第四個則為 DEVNAME 的值,其中,DEVNAME 有時候並未設定。細數後可知,插入 USB 的動作導致系統上一共產生了 11 次的 uevents,拔除時,則產生了 10 次的 uevents。在這眾多的 uevents 當中,特別適合用來唯一識別 USB 裝置插入(insert)及拔除(remove)動作的事件,也就是只發生過一次的事件可說是:

SUBSYSTEM==usb_device
ACTION==add

以及

SUBSYSTEM==usb_device
ACTION==remove

以下這個 my_script 示範如何限縮這個 script 的反應,只在插入或移除一個 USB device 時發出聲響,而且分別只響一次:

#!/bin/sh
# my_script example 3-1
LOGFILE=/tmp/my_script.log # 定義變數 LOGFILE
exec 3>> $LOGFILE && exec >& 3 && exec 2>&1 # 把 stdout/stderr 導入 $LOGFILE
SND_USB_INSERT="/xp/WINDOWS/Media/Windows XP Pop-up Blocked.wav" # 定義聲音檔
SND_USB_REMOVE="/xp/WINDOWS/Media/chimes.wav" # 定義聲音檔

if [ "$SUBSYSTEM" = "usb_device" -a "$ACTION" = "add" ]
then
    echo ""
    echo "=============================="
    date "+%G-%m-%dT%H:%M:%S %z"
    echo "$SUBSYSTEM $ACTION"
    echo "aplay -q \"$SND_USB_INSERT\""
    aplay -q "$SND_USB_INSERT"
elif [ "$SUBSYSTEM" = "usb_device" -a "$ACTION" = "remove" ]
then
    echo ""
    echo "=============================="
    date "+%G-%m-%dT%H:%M:%S %z"
    echo "$SUBSYSTEM $ACTION"
    echo "aplay -q \"$SND_USB_REMOVE\""
    aplay -q "$SND_USB_REMOVE"
fi
exit $?

編輯 my_script 的時候,要確認聲音檔是不是存在。編輯完畢之後,要記得做

$ chmod 755 ~/my_script

以上的 script 是說,當(if) SUBSYSTEM 這個變數的值等於(=)usb_device,而且(-a)當 變數 ACTION 的值為 add 的時候,就(then)執行一些 echo(1), date(1), aplay(1) 的指令;要不然的話當(elif)變數 SUBSYSTEM 的值為(=) usb_device,而且(-a)變數 ACTION 的值為(=)remove 時,就(then)執行另一批指令。請注意,方括號 [ 及 ] 跟 = 的前後,要有空白(space),變數(variable)的前後,也必須加上雙引號(double quotation marks),因為變數值可能會包含空白字元(embedded spaces)。

最後一個指令 "exit $?",是要結束這個 script 並把當時的執行結果傳回(return)給呼叫這個 script 的任何程式。想要省略掉的話,也沒什麼問題,然而我們必須平時就養成撰寫程式的正確習慣,在 UNIX 系統上,任何程式、函式都必須要有傳回值,就算是不知道有誰會去用它。我們不希望看到那一天,當有人突然去用它的時候,就必須面對噩運。這看似小事一件,然而缺乏持續性對小節的正確習慣或態度,我們對核四的運轉,為了自己的生存,必須反對到底。

做完以上的 script,只要隨手找個 USB 設備插入,或拔出,就都會聽到變數 $SND_USB_INSERT 或是 $SND_USB_REMOVE 所設定的聲效檔(sound file)。這是採用正面表列只當變數 SUBSYSTEM 內傳過來的值為 usb_device 時,才依變數 ACTION 的值是 add 或是 remove 來採取行動。

如果我們也希望這個程式對記憶卡以及 PCMCIA、CF 以及 SD 插槽也有所反應的話,則可修改程式,也檢查變數 SUBSYSTEM 是否為 "mmc" 或是 "pcmcia"。以同樣的方法可以得知,SD 卡插槽,以及 PCMCIA 插槽的插入與拔除動作可以:

SUBSYSTEM==mmc
ACTION==add

SUBSYSTEM==mmc
ACTION==remove

SUBSYSTEM==pcmcia
ACTION==add

SUBSYSTEM==pcmcia
ACTION==remove

可靠地識別。以下的另一個 my_script 範例則示範採用負面表列的邏輯結構,檢查變數 SUBSYSTEM 如果不是 "usb_device"、"mmc"、"pcmcia" 其中之一的話,即立刻結束程式(terminate),不然,則印出訊息,再判斷變數 ACTION 為 "add" 或 "remove" 分別作出對應的音效:

#!/bin/sh
# my_script example 3-2
LOGFILE=/tmp/my_script.log # 定義變數 LOGFILE
exec 3>> $LOGFILE && exec >& 3 && exec 2>&1 # redirect stdout/stderr 到 LOGFILE
SND_INSERT="/xp/WINDOWS/Media/Windows XP Pop-up Blocked.wav" # 定義聲音檔
SND_REMOVE="/xp/WINDOWS/Media/chimes.wav" # 定義聲音檔

if [ "$SUBSYSTEM" != "usb_device" -a "$SUBSYSTEM" != "pcmcia" -a "$SUBSYSTEM" != "mmc" ]
then
    exit 0
fi

echo ""
echo "=============================="
date "+%G-%m-%dT%H:%M:%S %z"
echo "$SUBSYSTEM $ACTION"

if [ "$ACTION" = "add" ]
then
    echo "aplay -q \"$SND_INSERT\""
    aplay -q "$SND_INSERT"

elif [ "$ACTION" = "remove" ]
then
    echo "aplay -q \"$SND_REMOVE\""
    aplay -q "$SND_REMOVE"
fi
exit $?

編輯完畢、儲存檔案後,程式會立即生效。這時,無論是在 PCMCIA 插槽、CF 插槽、SD 插槽,還是 USB 插座插入或拔除週邊設備,電腦都會發出預設的音效,而且每個動作只會發出一次聲音,不像在第一單元那樣發出 6、7 次的聲響。

變數 ACTION 除了 "add" 跟 "remove" 兩個可能的值以外,還可能會是 "change"。這例如可能會發生於以下的情況:如果你使用的是一台含有內建電池的筆記型電腦(notebooks),那麼,在插上或拔掉外接電源線(AC power cord)時,udev 系統分別會產生兩種 uevents:

SUBSYSTEM=power_supply
ACTION=change
POWER_SUPPLY_ONLINE=1

以及

SUBSYSTEM=power_supply
ACTION=change
POWER_SUPPLY_ONLINE=0

我們現在就繼續改良以上的 my_script,讓它在插入跟拔掉電源線時,也會發出聲音信號:

#!/bin/sh
# my_script example 3-3
LOGFILE=/tmp/my_script.log # 定義變數 LOGFILE
exec 3>> $LOGFILE && exec >& 3 && exec 2>&1 # redirect stdout/stderr 到 LOGFILE
SND_INSERT="/xp/WINDOWS/Media/Windows XP Pop-up Blocked.wav" # 定義聲音檔
SND_REMOVE="/xp/WINDOWS/Media/chimes.wav" # 定義聲音檔

PRINT_DATE()
{
    echo ""
    echo "=============================="
    date "+%G-%m-%dT%H:%M:%S %z"
}

if [ "$SUBSYSTEM" != "usb_device" -a "$SUBSYSTEM" != "pcmcia" -a "$SUBSYSTEM" != "mmc" -a "$SUBSYSTEM" != "power_supply" ]
then
    exit 0
fi
if [ "$SUBSYSTEM" = "power_supply" -a "$ACTION" = "change" ]
then
    if [ "$POWER_SUPPLY_ONLINE" = "0" ]
    then
        PRINT_DATE
        echo "$SUBSYSTEM $ACTION OFFLINE"
        echo "aplay -q \"$SND_REMOVE\""
        aplay -q "$SND_REMOVE"
    elif  [ "$POWER_SUPPLY_ONLINE" = "1" ]
    then
        PRINT_DATE
        echo "$SUBSYSTEM $ACTION ONLINE"
        echo "aplay -q \"$SND_INSERT\""
        aplay -q "$SND_INSERT"
    fi
else
    if [ "$ACTION" = "add" ]
    then
        PRINT_DATE
        echo "$SUBSYSTEM $ACTION"
        echo "aplay -q \"$SND_INSERT\""
        aplay -q "$SND_INSERT"
    elif [ "$ACTION" = "remove" ]
    then
        PRINT_DATE
        echo "$SUBSYSTEM $ACTION"
        echo "aplay -q \"$SND_REMOVE\""
        aplay -q "$SND_REMOVE"
    fi
fi
exit $?

這個第三個版本,我們在程式的前面,定義了一個函數叫做 "PRINT_DATE ()",它是用來避免重複的程式碼(repeated codes),使得程式比較簡短易讀(readability)。

還記得我們把這個程式的所有 stdout 以及 stderr 都導向 $LOGFILE 了嗎?在指令行打:

$ less /tmp/my_script.log 

則會看到類似以下的文字紀錄(logs):

==============================
2011-11-11T05:02:52 +0800
pcmcia add
aplay -q "/xp/WINDOWS/Media/Windows XP Pop-up Blocked.wav"

==============================
2011-11-11T05:03:01 +0800
pcmcia remove
aplay -q "/xp/WINDOWS/Media/chimes.wav"

==============================
2011-11-11T05:03:16 +0800
mmc add
aplay -q "/xp/WINDOWS/Media/Windows XP Pop-up Blocked.wav"

==============================
2011-11-11T05:03:23 +0800
mmc remove
aplay -q "/xp/WINDOWS/Media/chimes.wav"

==============================
2011-11-11T07:24:26 +0800
power_supply change OFFLINE
aplay -q "/xp/WINDOWS/Media/chimes.wav"

==============================
2011-11-11T07:24:29 +0800
power_supply change ONLINE
aplay -q "/xp/WINDOWS/Media/Windows XP Pop-up Blocked.wav"

==============================
2011-11-11T05:05:18 +0800
usb_device add
aplay -q "/xp/WINDOWS/Media/Windows XP Pop-up Blocked.wav"

==============================
2011-11-11T05:05:46 +0800
usb_device remove
aplay -q "/xp/WINDOWS/Media/chimes.wav"

資料來源: http://kolmogolovi.blogspot.com/2011/11/linux-udev-3.html

2021年2月3日 星期三

How to Enable HTTPS on the Raspberry Pi Apache Web Server

Note that this enables only “self-signed” certificates. I followed these directions but invariably encountered problems that were not addressed. Running Wheezy on a Raspberrry Pi B v1.

As usual, update first.

$ sudo apt-get update

Then make sure Apache and OpenSSL is installed:

$ sudo apt-get install apache2 openssl

If it is already installed, like it was on mine, then you will see:

Reading package lists... Done
Building dependency tree
Reading state information... Done
apache2 is already the newest version.
openssl is already the newest version.
openssl set to manually installed.
0 upgraded, 0 newly installed, 0 to remove and 4 not upgraded.

Your external certs are installed in /etc/ssl/certs. You won’t put these certs there.

Create a new directory for local certificates (-p means no error if existing, make parent directories as needed):

$ sudo mkdir -p /etc/ssl/localcerts

The next line starts the certificate generation. The cert is good for 365 days – you can change that.

$ sudo openssl req -new -x509 -days 365 -nodes -out /etc/ssl/localcerts/apache.pem -keyout /etc/ssl/localcerts/apache.key

The result of this command is:

Generating a 2048 bit RSA private key
......., etc.

Next, you will enter the answers to the following questions. This is where I effed up, so don’t you do it too. the FQDN name is the name of your Apache web server. For me, since I’m just running it locally, that would be the server name, like “raspberrypi” – if you kept the default. That server name is mapped to an internal IP, like 192.168.1.11 or something.

Country Name (2 letter code) [AU]:US
State or Province Name (full name) [Some-State]:California
Locality Name (eg, city) []:San Francisco
Organization Name (eg, company) [Internet Widgits Pty Ltd]:PaynsName
Organizational Unit Name (eg, section) []:SysOpsProgFest
Common Name (e.g. server FQDN or YOUR name) []:raspberrypi_orwhatever
Email Address []:noNeed@forrealemail.com

When that is done, you will have two new files in this directory: /etc/ssl/localcerts

Then chmod those files:

$ sudo chmod 600 /etc/ssl/localcerts/apache*

Enable SSL:

$ sudo a2ensite ssl

If you get a “not found” error, try:

sudo a2ensite default-ssl

I think my ssl file already existed in /etc/apache2/sites-available.

Now you need to edit the ssl configuration file in the /etc/apache2/sites-available directory.

$ cd /etc/apache2/sites-available 
$ ls -l

See what’s in there. For me, it looked like this:

-rw-r--r-- 1 root root 692 Jul 19 2016 default
-rw-r--r-- 1 root root 7461 Mar 18 14:51 default-ssl

Copy the default-ssl to a new file named the same name as your FQDN name above – for this example:

$ sudo cp default-ssl raspberrypi_orwhatever

Then edit it:

$ sudo nano raspberrypi_orwhatever

Change this line:

 <VirtualHost _default_:443>

to this:

 <VirtualHost raspberrypi_orwhatever:443>

and change these two lines:

SSLCertificateFile    /etc$
SSLCertificateKeyFile /etc$

to this (your new key location):

SSLCertificateFile /etc/ssl/localcerts/apache.pem
SSLCertificateKeyFile /etc/ssl/localcerts/apache.key

Save, close, then do:

$ sudo a2ensite raspberrypi_orwhatever

The link above says to enable port 443 in /etc/apache2/ports.conf, but mine already had it enabled with these lines:

<IfModule mod_gnutls.c>
    Listen 443
</IfModule>

So I didn’t modify that file.

Now restart Apache:

$ sudo service apache2 restart

And what you should get is a browser error, telling you that the site is not secure. That means it’s working! Because you didn’t pay a service to generate a validated certificate, you have to take your own word for it that it’s valid.

FireFox

firefox-self-signed-ssl-warning[1]

Click on I Understand the Risks, then click on Add Exception….

Next click on Get Certificate, and finally Confirm Security Exception to bypass SSL warning in FireFox.

Chrome

chrome-your-connection-is-not-private[1]

Click on Advanced, then Proceed to example.com (unsafe) to bypass SSL warning in Chrome.

Internet Explorer

internet-explorer-self-signed-ssl-warning[1]

Click on Continue to this website (not recommended) to bypass SSL warning in Internet Explorer. 

資料來源: https://variax.wordpress.com/2017/03/18/adding-https-to-the-raspberry-pi-apache-web-server/comment-page-1/