2021年12月15日 星期三

Win10 儲存集區 的讀寫效能比較 Storage Space

三種 Win10 儲存集區 的效能比較

三種 Win10 儲存集區 的讀寫效能比較,當你在建立儲存集區 ,其實就是建立 Windows 作業系統的【 軟體 RAID 】,而這種【 軟體 RAID 】( Win10 storage space )並不支援當成電腦的系統碟,只能當資料碟。另外,當建立儲存空間之前,請先完成建立儲存集區,因為儲存空間是配置於儲存集區上。詳細儲存空間、儲存集區的定義,可以參考微軟網站: 儲存空間直接存取概觀

這一篇文章就來看電腦系統的記憶體容量大小( 8GB, 16GB, 24GB ),會不會對不同的 Windows 10 儲存空間 ( Storage Space )類型,造成讀寫效能的影響。

Win10儲存集區的實驗條件

電腦規格

使用的電腦與作業系統,其實都跟前一篇文章一樣 ( 記憶體容量大小會影響SSD的效能嗎? ):

  1. 記憶體: DDR4-2133 8 GB
    • 記憶體單通道: DDR4-2133 8 GB x 1 
    • 記憶體雙通道: DDR4-2133 8 GB x 2
    • 記憶體單通道: DDR4-2133 8 GB x 3
  2. 作業系統: Windows 10 家用版 64 位元
  3. 測試軟體: CrystalDiskMark 
  4. SSD固態硬碟:
    • KingSton: SUV400S37/240G SSDNow UV400 240 GB, SATA 6G
    • SanDisk: SDSSDXPS-240G-G25 240GB 固態硬碟, SATA 6G
    • Micron: 美光Micron Crucial BX500 240GB SATAⅢ固態硬碟, SATA 6G

建立三種儲存集區

如何建立 Win10 storage space 與 儲存集區,可以參考另一篇文章的建立儲存集區流程的圖文: 儲存空間 : 用 Acer E5-575G 來實現磁碟陣列

在這裡會分別測試以下儲存集區中的儲存空間讀寫效能:

  • 簡單(無備援): Simple
  • 雙向鏡像: Two-way mirror
  • 同位: Parity

簡單(無備援): Simple

下圖是這次實驗的簡單(無備援): Simple 儲存空間細節,因為三顆SSD的容量大小都是223GiB(240GB),所以整個儲存空間大小就是223GiB * 3 = 669GiB。

這種儲存空間就是將資料儲存在N (N≧2) 個以上的硬碟,組合成一個大的儲存空間,但是缺點是完全沒有更正錯誤的能力,只要有一個硬碟故障,就會造成所有存放在硬碟裡面的資料毀損,就無法挽回。

所以,這種儲存集區下的儲存空間適合暫存資料 (例如,視訊轉譯檔案)、影像編輯器草稿檔案,以及中繼編譯器物件檔案。
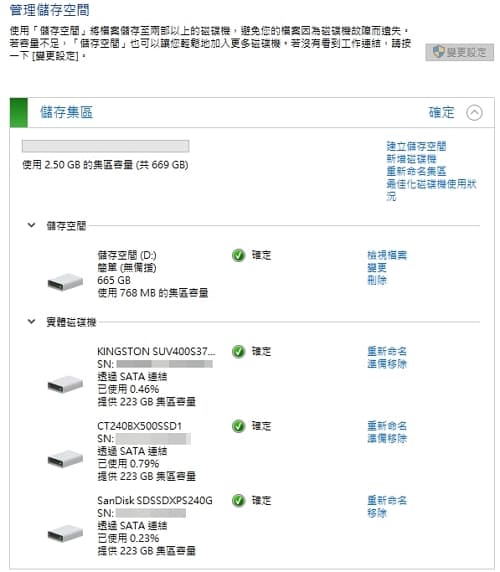
05_-Win10-儲存集區-的讀寫效能比較-簡單-500x572-1
簡單(無備援): Simple 儲存空間 容量大小

雙向鏡像: Two-way mirror

下圖是這次實驗的雙向鏡像: Two-way mirror 儲存空間細節,因為三顆SSD的容量大小都是223GiB(240GB),所以整個儲存空間大小就是223GiB * 3 * 0.5 約 331GiB。其中*0.5是因為雙向鏡像的儲存空間會將原始資料,儲存兩份相同的資料在這個空間當中。所以,當其中一顆SSD損壞時,可以插入另一顆新的SSD到電腦中,Windows 會自動維護資料的完整性,將資料復原成兩份。缺點就是,這種儲存空間的容量是全部硬碟容量的一半,但是可以換來最佳的資料保護目的。
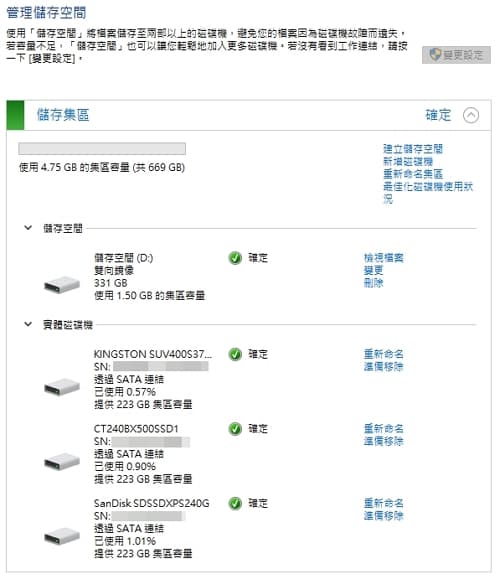
06_ Win10 儲存集區 的讀寫效能比較 雙面鏡像 500x574
雙向鏡像: Two-way mirror 儲存空間 容量大小

同位: Parity

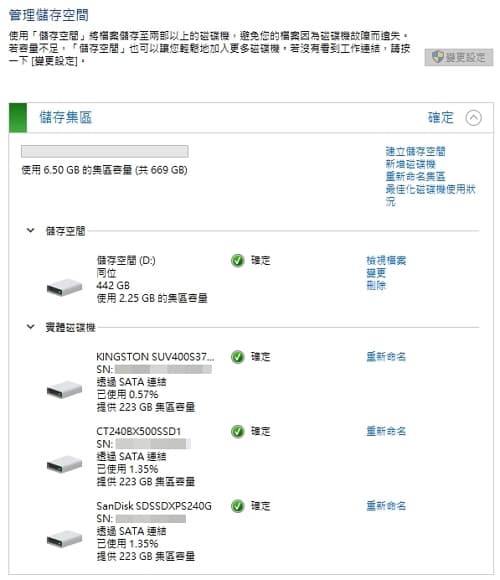
下圖是這次實驗的同位: Parity 儲存空間細節,因為三顆SSD的容量大小都是223GiB(240GB),所以整個儲存空間大小就是223GiB * 3 *0 .667約 442GiB。

這種儲存空間有點小複雜,所以只要會使用就好了。簡單說,它提供

  • 更好的儲存效率: 與雙向鏡像相比,可以使用比較多的容量。因為一個是可以使用總儲存空間容量的一半;而一個是可以使用總儲存空間容量的三分之二。
  • 具備容錯能力: 與雙向鏡像一樣,可以允許一顆SSD損壞,資料還可以正確存在。
07_ Win10 儲存集區 的讀寫效能比較 同位 500x580_U0826
同位: Parity 儲存空間 容量大小

>>> 你可能會有興趣: 【使用情境】影片錄影搭配 Storage Space,讓工作更有效率!

Win10 儲存集區 的讀寫效能結果

比單顆 SSD 效能好一點

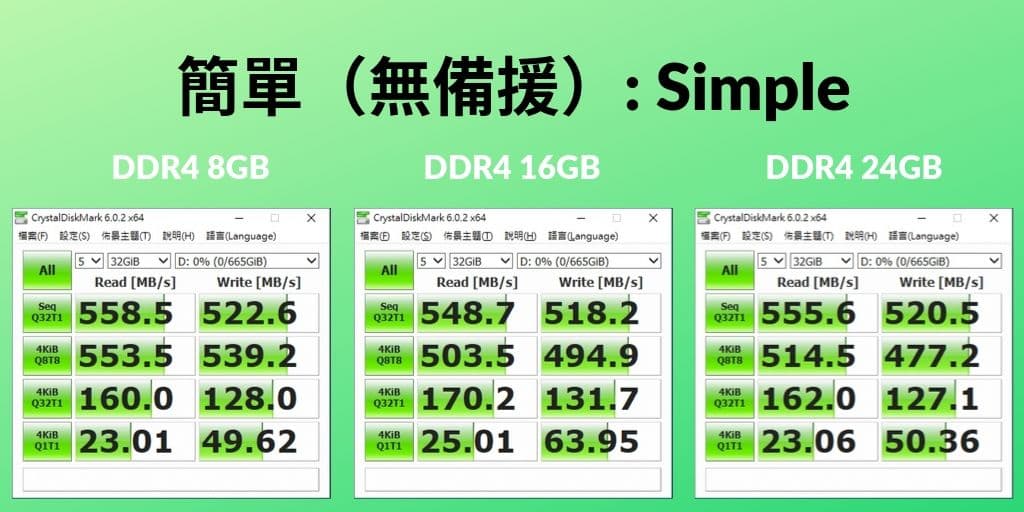
跟前一篇文章單顆 SSD 效能比較的話 ( 記憶體容量大小會影響 SSD 的效能嗎 ? ),效能有好一點,尤其是【 4KiB Q8T8 】這一個項目。不過,卻是三種儲存空間中,連續讀取速度( Sequential Read )效能最差的一個。
02_ Win10 儲存集區 的讀寫效能比較 簡單 1024X512
Windows 10 儲存集區: 簡單(無備援, Simple)的讀寫效能比較

雙通道記憶體效能提升並不明顯

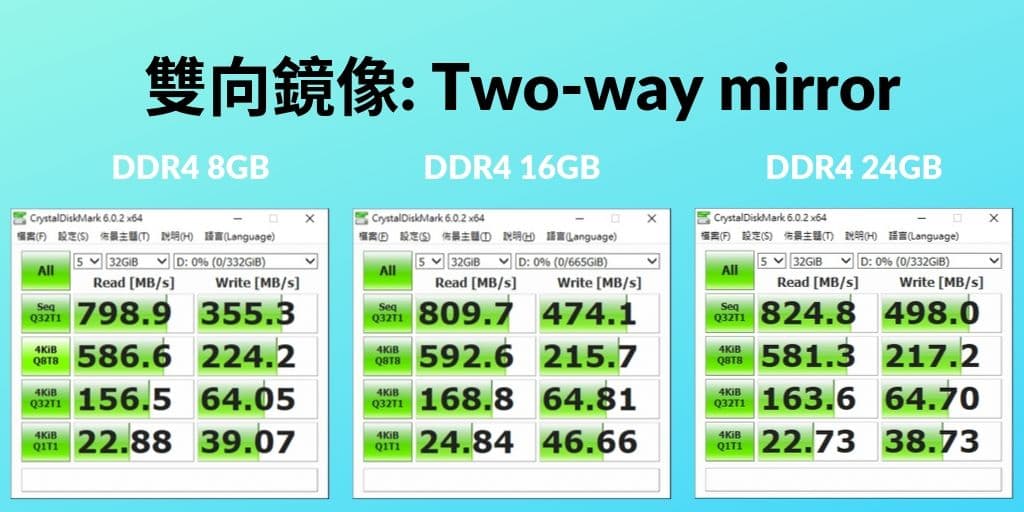
雙向鏡像 ( Two-way mirror ) 的寫入速度明顯比簡單 ( 無備援 Simple ) 來的差。不過讀取速度卻是明顯提升很多。

另外,在雙向鏡像 ( Two-way mirror ) 的儲存空間下,記憶體容量越大,連續讀取速度 ( Sequential Read ) 會越好,不過,幅度卻不是很大。與記憶體跑單通道或雙通道,沒有太直接的關係。
03_ Win10 儲存集區 的讀寫效能比較 雙面鏡像 1024X512
Windows 10 儲存集區: 雙向鏡像 ( Two-way mirror )的讀寫效能比較

適合跑雙通道記憶體

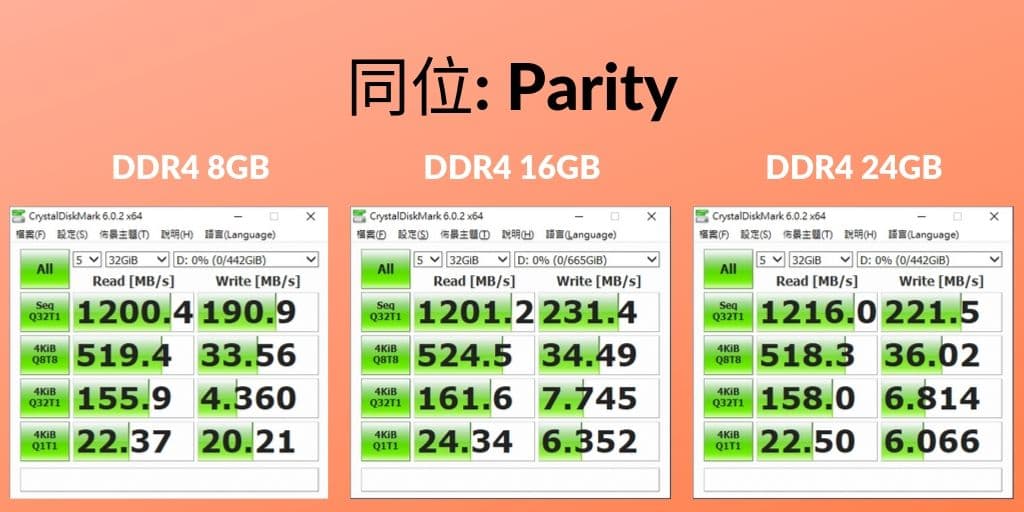
很明顯地看到,連續讀取速度 ( Sequential Read ) 優於其他兩種儲存空間;不過,寫入速度卻是最差的一種儲存空間。
04_ Win10 儲存集區 的讀寫效能比較 同位 1024X512_U0826
Windows 10 儲存集區: 同位 ( Parity ) 的讀寫效能比較

>>> 你可能會有興趣: 【免費軟體】Macrium、Acronis 無法備份 Storage Space的資料, 不過這套可以!

Win10 儲存集區 的心得

你懂你的需求嗎?

像我們這種一般使用者而言,哪一種儲存集區的儲存空間適合自己呢?

我是將手邊堪用又捨不得丟掉的幾顆小硬碟 ( 500 GB ) ,建立【 簡單 ( 無備援 ) :  Simple 】 來二次利用。畢竟現在大家家裡都不只一台電腦 ( 桌上型電腦 + 筆記型電腦 ) ,可以將資料備份到其他台電腦的硬碟 ( 也許是 1 TB 或 4 TB 硬碟中 ) ,甚至還可以把重要的資料,設定成電腦開機就同步到雲端。而且這種儲存空間整體的 讀 、 寫效能,是最適合我的使用習慣了。 

而想要了解更詳細的 4 種 Storage Space types 讀寫效能的數據,可以參考: Storage Space in Windows 10: performance result,裡面有詳細的 4 種類型讀寫效能數據,可以讓你參考。例如:

  • Storage Space types:
    • Simple
    • Two-way mirror
    • Three-way mirror
    • Parity
  • Outstanding I/Os: 1 ~ 32
  • Data size: 512Byte, 4KByte, 16KByte, 32KByte, 64KByte, 256KByte, 512KByte, 1024KByte
  • Test pattern:
    • Sequential
      • Read, Write
    • Random
      • Read, Write

Storage Space無法做開機碟,那麼硬體 RAID 可以嗎?

想要建立開機碟的話,有兩個選擇: 一個是使用主機板 RAID,另一個是使用硬體 RAID CARD。不過以價格來考慮的話,會優先推薦先使用主機板RAID。有興趣的話,可以參考這篇文章: 主機板RAID 0/1/5/10 的讀寫效能 


資料來源:https://hipay0.com/performance-comparison-for-windows-10-storage-space/

2021年12月14日 星期二

Web AR.js

本篇文章紀錄我根據TechBridge 技術共筆部落格製作webAR的過程與碰到的難處。

AR.js成果展示
webAR成果

AR.js介紹

AR.js是一款融合了 artoolkit、three.js、WebGL 和 WebRTC 等技術的工具。

先說優點:

AR.js 使用了 A-Frame (基於 Three.js) 以及 JSARTookit5,而這兩個技術主要皆是利用 WebGL 為主,因此大多現行的瀏覽器都能直接支援,不需要特殊的 API。這大概也是為何 AR.js 能在 GitHub 上擁有一萬多顆星星,遠勝過上列其他套件的原因。

TechBridge 技術共筆部落格

缺點:

AR.js雖然快速好用,但也不是萬能的目前只能支援以Marker定位的方式運行webAR,即是需要在鏡頭內放置一個設定好的 Marker圖片讓其辨識。如果想要以偵測平面或其他非Mark的方式運行webAR就必須研究WebXR Device API

應用AR.js

首先,AR.js有提供了一個專門製作Marker的工具AR.js Marker Training,在這個網頁可以製作自己想要的Marker圖片,製作完成後點選Download Marker會給你一個副檔名為patt的Marker。

接下來準備想要呈現的3D模型,可以到 Poly 或是 sketchfab 下載 gltf 格式的 3D 模型。

最後,進入AR.js的程式部分,Coding部分很簡單,只有幾行的html:

最先的兩段先匯入Libraries:

<script src="https://aframe.io/releases/0.9.2/aframe.min.js"></script>
<script src="https://cdn.rawgit.com/jeromeetienne/AR.js/1.7.5/aframe/build/aframe-ar.js"></script>

在 <a-scene /> 中,我們指定一個 attribute arjs,並且設定 sourceType 為 webcam,相關 attribute 設定其實來自 artoolkit system,有需要可以到 GitHub 的列表查看。

接著我們透過 <a-marker /> 放入我們製作的 marker,副檔名為 .patt,這邊的 type attribute,如果你是單純用 barcode 的話,可以設為 type=barcode,但若是客製化的 marker,就要設為 type=pattern

最後在 <a-entity /> 上頭設定我們想要呈現的 AR 3D Model,gltf-model attribute 設定模型的路徑,再透過 position 與 rotation 來調整你的模型出現在鏡頭的位置。


資料來源:https://z0935323866.medium.com/%E5%88%A9%E7%94%A8ar-js%E8%A3%BD%E4%BD%9Cwebar-3479abb5f62b 


Example

https://sharebyboss.github.io/test_arjs/


2021年12月10日 星期五

ml5js WebCam Face Hack

介紹

首先介紹什麼是 p5.js,
p5.js 是基於 Processing 在瀏覽器中提供友善的畫布 (canvas) 使用介面。(https://creativecoding.in/2020/04/24/p5-js-%E5%BF%AB%E9%80%9F%E4%B8%8A%E6%89%8B/)

p5.js 與 ml5 的共同點是它們都可以透過瀏覽器使用 GPU 及 GPU 的專屬記憶體。

備料

接著備料,

  1. 在 hello-ml5 裡新增兩個檔案,一檔名為 face_p5.html,另一檔名為 face_nop5.html
  2. 在 face_p5.html 與 face_nop5.html 分別輸入以下程式碼。

face_p5.html 的程式碼如下—

<html>

<head>
    <meta charset="UTF-8">
    <title>FaceApi Landmarks Demo With p5.js</title>

    <script src="https://cdnjs.cloudflare.com/ajax/libs/p5.js/0.9.0/p5.min.js"></script>
    <script src="https://cdnjs.cloudflare.com/ajax/libs/p5.js/0.9.0/addons/p5.dom.min.js"></script>
    <script src="https://unpkg.com/ml5@latest/dist/ml5.min.js"></script>
</head>

<body>
    <h1>FaceApi Landmarks Demo With p5.js</h1>
    <script src="sketch_face_p5.js"></script>
</body>

</html>

face_nop5.html 的程式碼如下—

<html>

<head>
    <meta charset="UTF-8">
    <title>FaceApi Landmarks Demo With no p5.js</title>

    <script src="https://unpkg.com/ml5@latest/dist/ml5.min.js" type="text/javascript"></script>
</head>

<body>
    <h1>FaceApi Landmarks Demo With no p5.js</h1>
    <script src="sketch_face_nop5.js"></script>
</body>

</html>
  1. 在 hello-ml5 裡新增兩個檔案,一檔名為 sketch_face_p5.js,另一檔名為 sketch_face_nop5.js
    且分別輸入以下程式碼。

sketch_face_p5.js 的程式碼如下—

let faceapi;
let video;
let detections;

const detection_options = {
    withLandmarks: true,
    withDescriptors: false
}

let width = 360;
let height = 280;

function setup() {
    createCanvas(width, height);

    // load up your video
    video = createCapture(VIDEO);
    video.size(width, height);
    video.hide(); // Hide the video element, and just show the canvas

    faceapi = ml5.faceApi(video, detection_options, modelReady);
}

function modelReady() {
    console.log('ready!');
    faceapi.detect(gotResults);
}

function gotResults(err, result) {
    if (err) {
        console.log(err);
        return;
    }

    // console.log(result)
    detections = result;

    image(video, 0, 0, width, height);

    if (detections) {
        if (detections.length > 0) {
            drawLandmarks(detections);
        }
    }
    faceapi.detect(gotResults);
}

function drawLandmarks(detections) {

    stroke(161, 95, 251);

    for (let i = 0; i < detections.length; i++) {
        const alignedRect = detections[i].alignedRect;
        const x = alignedRect._box._x;
        const y = alignedRect._box._y;
        const boxWidth = alignedRect._box._width;
        const boxHeight = alignedRect._box._height;

        rect(x, y, boxWidth, boxHeight);

        const mouth = detections[i].parts.mouth;
        const nose = detections[i].parts.nose;
        const leftEye = detections[i].parts.leftEye;
        const rightEye = detections[i].parts.rightEye;
        const rightEyeBrow = detections[i].parts.rightEyeBrow;
        const leftEyeBrow = detections[i].parts.leftEyeBrow;

        drawPart(mouth, true);
        drawPart(nose, false);
        drawPart(leftEye, true);
        drawPart(leftEyeBrow, false);
        drawPart(rightEye, true);
        drawPart(rightEyeBrow, false);
    }

}

function drawPart(feature, closed) {

    beginShape();
    for (let i = 0; i < feature.length; i++) {
        const x = feature[i]._x;
        const y = feature[i]._y;

        vertex(x, y);
    }

    if (closed === true) {
        endShape(CLOSE);
    } else {
        endShape();
    }

}

sketch_face_nop5.js 的程式碼如下—

let faceapi;
let video;
let detections;

const detection_options = {
    withLandmarks: true,
    withDescriptors: false
}

let width = 360;
let height = 280;

window.addEventListener('DOMContentLoaded', function () {
    setup();
});
async function setup() {
    createCanvas(width, height);

    // load up your video
    video = await getVideo();

    faceapi = ml5.faceApi(video, detection_options, modelReady);
}

let canvas, ctx;
function createCanvas(w, h) {
    canvas = document.createElement("canvas");
    canvas.width = w;
    canvas.height = h;
    document.body.appendChild(canvas);
    ctx = canvas.getContext('2d');
}

async function getVideo() {
    const videoElement = document.createElement('video');
    videoElement.width = width;
    videoElement.height = height;
    videoElement.setAttribute("style", "display: none;"); // Hide the video element, and just show the canvas
    document.body.appendChild(videoElement);

    // Create a webcam capture
    const capture = await navigator.mediaDevices.getUserMedia({ video: true });
    videoElement.srcObject = capture;
    videoElement.play();

    return videoElement;
}

function modelReady() {
    console.log('ready!');
    faceapi.detect(gotResults);
}

function gotResults(err, result) {
    if (err) {
        console.log(err);
        return;
    }

    // console.log(result)
    detections = result;

    ctx.drawImage(video, 0, 0, width, height);

    if (detections) {
        if (detections.length > 0) {
            drawLandmarks(detections);
        }
    }
    faceapi.detect(gotResults);
}

function drawLandmarks(detections) {

    ctx.strokeStyle = "#a15ffb";

    for (let i = 0; i < detections.length; i++) {
        const alignedRect = detections[i].alignedRect;
        const x = alignedRect._box._x;
        const y = alignedRect._box._y;
        const boxWidth = alignedRect._box._width;
        const boxHeight = alignedRect._box._height;

        ctx.beginPath();
        ctx.rect(x, y, boxWidth, boxHeight);
        ctx.fillStyle = "white";
        ctx.fill();

        const mouth = detections[i].parts.mouth;
        const nose = detections[i].parts.nose;
        const leftEye = detections[i].parts.leftEye;
        const rightEye = detections[i].parts.rightEye;
        const rightEyeBrow = detections[i].parts.rightEyeBrow;
        const leftEyeBrow = detections[i].parts.leftEyeBrow;

        drawPart(mouth, true);
        drawPart(nose, false);
        drawPart(leftEye, true);
        drawPart(leftEyeBrow, false);
        drawPart(rightEye, true);
        drawPart(rightEyeBrow, false);
    }

}

function drawPart(feature, closed) {

    ctx.beginPath();
    for (let i = 0; i < feature.length; i++) {
        const x = feature[i]._x;
        const y = feature[i]._y;

        if (i === 0) {
            ctx.moveTo(x, y);
        } else {
            ctx.lineTo(x, y);
        }
    }

    if (closed === true) {
        ctx.closePath();
    }
    ctx.stroke();

}

執行

備料完成後,就可啟動 Live Server,
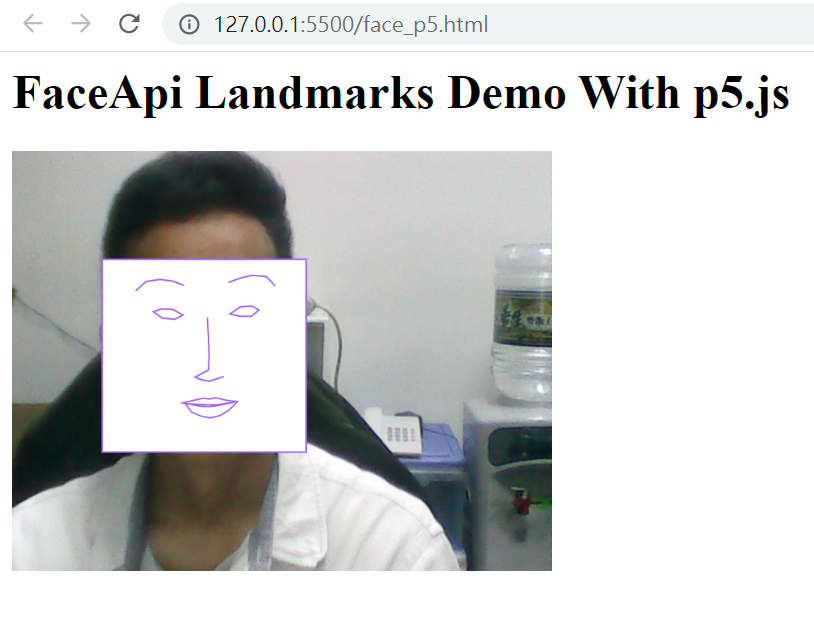
在 VS Code 裡的 face_p5.html 程式碼按右鍵,在顯示的內容選單裡,點選 Open with Live Server
就可顯示如下畫面。(會先跳出詢問是否讓此網頁有使用網路攝影機的權限,請按同意)
https://ithelp.ithome.com.tw/upload/images/20201028/20132156w825fEFlIQ.png
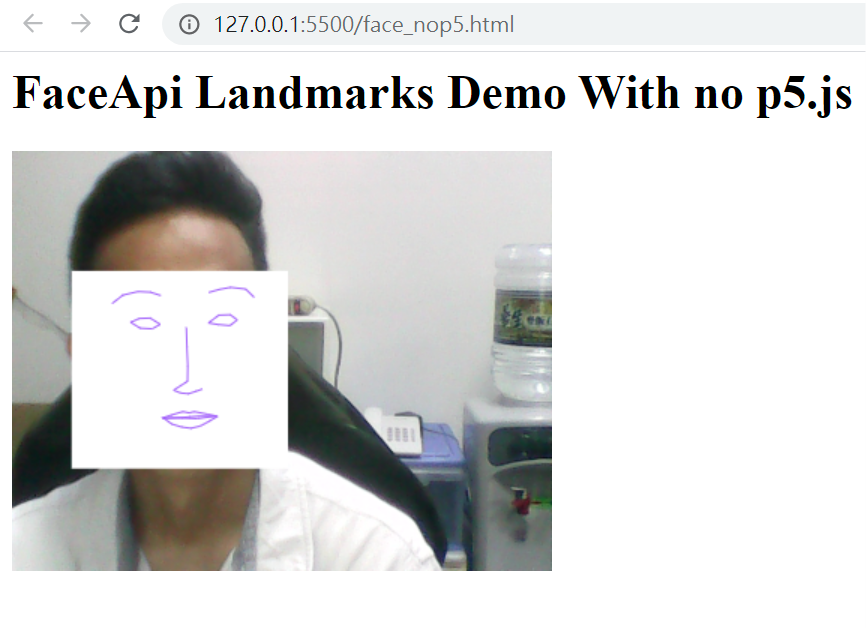
face_nop5.html 同上的步驟啟動,
就可顯示如下畫面。
https://ithelp.ithome.com.tw/upload/images/20201028/20132156LsMuGLiKB9.png
可見兩者的執行結果是一樣的。

比較

使用 WinMerge 比較 sketch_face_p5.js 與 sketch_face_nop5.js 的差異,
就可以了解 p5.js 能做的, javascript 原本就能做到,
但 p5.js 真的把程式碼變得更簡潔,在這個例子幾乎減少了四分之一的程式碼。

所以, p5.js 及 ml5 都是讓程式設計師在使用新技術時,可以更專注在

客製化的需求 

資料來源: https://ithelp.ithome.com.tw/articles/10253993

Like a Multi thread in Linux shell script

Multi thread in shell script code
your initial code
your loop
{
    {
        do something
    }&
}
end loop
wait

SQLite db lock
sqlite3 -cmd ".timeout 1000" data_base "SQL string"


Example
#!/bin/sh

cd /www/pages/system/
ConfigPath="/www/pages/_config/"
LOGFILE="${ConfigPath}test.log"

echo ${ConfigPath}
echo ${LOGFILE}

##  Get camera list from database
array=($(sqlite3 -cmd ".timeout 1000" ../bootstrap/db_camera "SELECT active, status, record, id, address, camera_port, camera_login_id, camera_login_pw, camera_protocol, camera_link FROM db_camera WHERE active=1;"))

for i in "${array[@]}"; do
    {
        echo ""
        echo "*** START"
    
        ##  Get camera information
        c_active=$(echo $i |awk -F '|' '{printf "%s" , $1}')
        echo "Data: $i"
        if [ $c_active == 1 ];then
            c_status=$(echo $i |awk -F '|' '{printf "%s" , $2}')
            c_record=$(echo $i |awk -F '|' '{printf "%s" , $3}')
            c_id=$(echo $i |awk -F '|' '{printf "%s" , $4}')
            c_address=$(echo $i |awk -F '|' '{printf "%s" , $5}')
            c_ip=$(traceroute ${c_address} |head -1 |cut -d '(' -f 2 |cut -d ')' -f 1)
            c_port=$(echo $i |awk -F '|' '{printf "%s" , $6}')
            c_login_id=$(echo $i |awk -F '|' '{printf "%s" , $7}')
            c_login_pw=$(echo $i |awk -F '|' '{printf "%s" , $8}')
            c_protocol=$(echo $i |awk -F '|' '{printf "%s" , $9}')
            c_link=$(echo $i |awk -F '|' '{printf "%s" , $10}')
        
            ##  Get the status of camera and update to database
            camera_live=$(timeout --preserve-status 10s echo >/dev/tcp/${c_address}/${c_port} && echo '1' || echo '0')
            sqlite3 -cmd ".timeout 1000" ../bootstrap/db_camera "UPDATE db_camera SET status=${camera_live} WHERE id=${c_id};"
            echo "Update db: status = $camera_live"
            
            ##  Start record process if exists and not in record process
            if [ $camera_live == 1 ];then
                if [ $c_record == 1 ];then
                    if [ $c_protocol == "rtsp" ];then
                        echo "Start record process"
                        
                        sqlite3 -cmd ".timeout 1000" ../bootstrap/db_camera "UPDATE db_camera SET record=2 WHERE id=${c_id};"
                        echo "Update db: record = 2"
                        
                        echo "Get video link"
                        if [ ${#c_login_id} -ne 0 ];then
                            camera_login_link="${c_protocol}://${c_login_id}:${c_login_pw}@${c_ip}:${c_port}/${c_link}"
                        else
                            camera_login_link="${c_protocol}://${c_ip}:${c_port}/${c_link}"
                        fi
                        echo $camera_login_link
                        /www/pages/raid/ffmpeg -rtsp_transport tcp -i "${camera_login_link}" -c copy -f segment -segment_time 180 -reset_timestamps 1  -strftime 1 /www/pages/raid/Record/camera_${c_id}_%Y%m%d_%H%M%S.mp4 -y &
                    fi
                fi
                
                if [ $c_record == 3 ];then
                    echo "Stop record process"
                    pkill -2 -f "camera_${c_id}"
                    sqlite3 -cmd ".timeout 1000" ../bootstrap/db_camera "UPDATE db_camera SET record=0 WHERE id=${c_id};"
                    echo "Update db: record = 0"
                fi
            fi
        fi
        echo "*** END"
        echo ""
    }&
done 
wait