2024年6月30日 星期日

Batch Script - Commands


Example

@echo off 
ver

Output

The output of the above command is as follows. The version number will depend upon the operating system you are working on.

Microsoft Windows [Version 6.3.9600]


Example

@echo off assoc > C:\lists.txt assoc | find “.doc” > C:\listsdoc.txt

Output

The list of file associations will be routed to the file lists.txt. The following output shows what is there in the listsdoc.txt file after the above batch file is run.

.doc=Word.Document.8 .dochtml=wordhtmlfile .docm=Word.DocumentMacroEnabled.12 .docmhtml=wordmhtmlfile .docx=Word.Document.12 .docxml=wordxmlfile


Example

The following example shows how the cd command can be used in a variety of ways.

@echo off Rem The cd without any parameters is used to display the current working directory cd Rem Changing the path to Program Files cd\Program Files cd Rem Changing the path to Program Files cd %USERPROFILE% cd Rem Changing to the parent directory cd.. cd Rem Changing to the parent directory two levels up cd..\.. cd

Output

The above command will display the following output after changing to the various folder locations.

C:\Users\Administrator C:\Program Files C:\Users\Administrator C:\Users C:\


Example

@echo off Cls

Output

The command prompt screen will be cleared.


Example

The following example shows the different variants of the copy command.

@echo off
cd
Rem Copies lists.txt to the present working directory.
If there is no destination identified , it defaults to the present working directory.
copy c:\lists.txt
Rem The file lists.txt will be copied from C:\ to C:\tp location
copy C:\lists.txt c:\tp
Rem Quotation marks are required if the file name contains spaces
copy “C:\My File.txt”
Rem Copies all the files in F drive which have the txt file extension to the
current working directory copy
F:\*.txt
Rem Copies all files from dirA to dirB. Note that directories nested in dirA will not be copied
copy C:\dirA dirB

Output

All actions are performed as per the remarks in the batch file.


Example

The following example shows the different variants of the del command.

@echo off 
Rem Deletes the file lists.txt in C:\ 
del C:\lists.txt 
Rem Deletes all files recursively in all nested directories
del /s *.txt 
Rem Deletes all files recursively in all nested directories , but asks for the 
confirmation from the user first 
Del /p /s *.txt

Output

All actions are performed as per the remarks in the batch file.


Example

The following example shows the different variants of the dir command.

@echo off
Rem All the directory listings from C:\ will be routed to the file lists.txt
dir C:\>C:\lists.txt
Rem Lists all directories and subdirectories recursively
dir /s
Rem Lists the contents of the directory and all subdirectories recursively, one 
file per line, displaying complete path for each listed file or directory.
dir /s /b
Rem Lists all files with .txt extension.
dir *.txt
Rem Includes hidden files and system files in the listing.
dir /a
Rem Lists hidden files only.
dir /ah

Output

All actions are performed as per the remarks in the batch file.


Example

@echo off 
echo %DATE%

Output

The current date will be displayed in the command prompt. For example,

Mon 12/28/2015 


Example

The following example shows the different variants of the dir command.

Rem Turns the echo on so that each command will be shown as executed echo on echo "Hello World" Rem Turns the echo off so that each command will not be shown when executed @echo off echo "Hello World" Rem Displays the contents of the PATH variable echo %PATH%

Output

The following output will be displayed in the command prompt.

C:\>Rem Turns the echo on so that each command will be shown as executed C:\>echo on C:\>echo "Hello World" "Hello World" C:\>Rem Turns the echo off so that each command will not be shown when executed "Hello World" C:\Users\ADMINI~1\AppData\Local\Temp 


Example

@echo off 
echo "Hello World" 
exit

Output

The batch file will terminate and the command prompt window will close.


Example

@echo off 
md newdir 
cd newdir 
cd Rem “Goes back to the parent directory and create 2 directories” 
cd.. 
md newdir1 newdir1 
cd newdir1 
cd 
cd.. 
cd newdir2 
cd

Output

The above command produces the following output.

C:\newdir 
C:\newdir1 
C:\newdir2 


Example

@echo off md newdir cd newdir cd Rem “Goes back to the parent directory and create 2 directories” cd.. md newdir1 newdir1 cd newdir1 cd cd.. cd newdir2 cd

Output

The above command produces the following output.

C:\newdir C:\newdir1 C:\newdir2 


Example

The following example shows the different variants of the move command.

@echo off
Rem Moves the file list.txt to the directory c:\tp
move C:\lists.txt c:\tp
Rem Renames directory Dir1 to Dir2, assuming Dir1 is a directory and Dir2 does not exist. 
move Dir1 Dir2
Rem Moves the file lists.txt to the current directory.
move C:\lists.txt

Output

All actions are performed as per the remarks in the batch file.


Example

@echo off 
Echo %PATH%

Output

The value of the path variable will be displayed in the command prompt.


Example

@echo off 
pause

Output

The command prompt will show the message “Press any key to continue….” to the user and wait for the user’s input.


Example

@echo off 
prompt myprompt$G

The $G is the greater than sign which is added at the end of the prompt.

Output

The prompt shown to the user will now be myprompt>


Example

The following example shows the different variants of the rd command.

@echo off
Rem removes the directory called newdir
rd C:\newdir

Rem removes 2 directories
rd Dir1 Dir2

Rem Removes directory with spaces
rd "Application A"

Rem Removes the directory Dir1 including all the files and subdirectories in it rd /s Dir1
Rem Removes the directory Dir1 including all the files and subdirectories in it but
asks for a user confirmation first.
rd /q /s Dir1

Output

All actions are performed as per the remarks in the batch file.


Example

@echo off 
ren C:\lists.txt C:\newlists.txt

Output

The file lists.txt will be renamed to newlists.txt.


Example

@echo off 
REM This is a batch file

 :: This is comment


Example

@echo off
start notepad.exe

Output

When the batch file is executed, a new notepad windows will start.


Example

@echo off 
echo %TIME%

Output

The current system time will be displayed. For example,

22:06:52.87 


Example

@echo off TYPE C:\tp\lists.txt

Output

The contents of the file lists.txt will be displayed to the command prompt.


Example

@echo off 
VOL

Output

The output will display the current volume label. For example,

Volume in drive C is Windows8_OS 
Volume Serial Number is E41C-6F43 


Example

The following example shows the different variants of the attrib command.

@echo off Rem Displays the attribites of the file in the current directory Attrib Rem Displays the attributes of the file lists.txt attrib C:\tp\lists.txt Rem Adds the "Read-only" attribute to the file. attrib +r C:\tp\lists.txt Attrib C:\tp\lists.txt Rem Removes the "Archived" attribute from the file attrib -a C:\tp\lists.txt Attrib C:\tp\lists.txt

Output

For example,

A C:\tp\assoclst.txt A C:\tp\List.cmd A C:\tp\lists.txt A C:\tp\listsA.txt A C:\tp\lists.txt A R C:\tp\lists.txt R C:\tp\lists.txt 


Example

@echo off 
chkdsk

Output

The above command starts checking the current disk for any errors.


Example

@echo off 
echo "What is the file size you what" 
echo "A:10MB" 
echo "B:20MB" 
echo "C:30MB" 
choice /c ABC /m "What is your option A , B or C"

Output

The above program produces the following output.

"What is the file size you what"
"A:10MB"
"B:20MB"
"C:30MB"
What is your option A , B or C [A,B,C]? 


Example

@echo off COMP C:\tp\lists.txt C:\tp\listsA.txt

Output

The above command will compare the files lists.txt and listsA.txt and find out if the two file sizes are different.


Example

@echo off 
FIND "Application" C:\tp\lists.txt

Output

If the word “Application” resides in the file lists.txt, the line containing the string will be displayed in the command prompt.


Example

@echo off 
FC lists.txt listsA.txt

Output

The above command will display the differences in the contents of the files (lists.txt and listsA.txt ) if any.

 https://ss64.com/nt/fc.html

 fc /b %Default_FILE% %NEW_DRIVE%\default_test.txt > nul && (

echo "The file is same default_test.txt %Default_FILE%"

) || (

echo %NEW_DRIVE%\default_test.txt

echo "%Default_FILE%"

copy /Y %Default_FILE% %NEW_DRIVE%\default_test.txt

echo "%Default_Startup_FILE%"

copy /Y %Default_Startup_FILE% %NEW_DRIVE%\startup.nsh

)


Example

@echo off 
Title “New Windows Title”

Output

The above command will change the title of the window to “New Windows Title”.


Example

@echo off 
set

Output

The above command displays the list of environment variables on the current system.


2024年3月22日 星期五

Ubuntu 22.04上運行SSH服務器設定


安裝

  1. 輸入sudo apt install openssh-server -y
  2. 輸入sudo systemctl enable ssh開啟開機啟動
  3. 輸入sudo systemctl start ssh

允許防火牆

  1. 輸入sudo ufw allow ssh
  2. 輸入sudo ufw enable
  3. 輸入sudo ufw status

此時已能使用密碼登入

RSA金鑰

Client端

  1. 輸入mkdir -p $HOME/.ssh建立存放金鑰的檔案
  2. 輸入chmod 0700 $HOME/.ssh設定權限
  3. 輸入ssh-keygen -t rsa -b 4096 -C "my key for ubuntu server"產生金鑰
  4. 按Enter到底
  5. 輸入ssh-copy-id -f <ssh-server-account>@<ssh-server-ip>將公鑰送到SSH Server

Server端

  1. 輸入sudo nano /etc/ssh/sshd_config
  2. 找到參數PasswordAuthentication將其修改成以下
1
PasswordAuthentication no
  1. 輸入sudo systemctl restart ssh
  2. 完成

後記:轉移金鑰

  • 取出~/.ssh/id_rsa
  • 將檔案打開最後按一個Enter再存檔,不然會出現錯誤invalid format
  • 輸入ssh -i ./id_rsa ubuntu@192.168.1.102,就能成功連線
  • 完成


 資料來源:https://astroicers.link/p/%E5%9C%A8ubuntu-22.04%E4%B8%8A%E9%81%8B%E8%A1%8Cssh%E6%9C%8D%E5%8B%99%E5%99%A8%E9%9D%9E%E5%B8%B8%E5%AE%B9%E6%98%93.html


Ubuntu 安裝與設定 ssh server

要安裝 ssh server, 以下兩行指令都可以

# apt-get install ssh
# apt-get install openssh-server

安裝後可以修改一些 ssh 的設定, 如port, 密碼認證, root登入等

# vim /etc/ssh/sshd_config
Port 22
PasswordAuthentication yes
PermitRootLogin yes -> 是否開放 root 登入
更改完存檔後記得重啟服務
# /etc/init.d/ssh restart
資料來源https://www.nc.com.tw/modules/answer/question/44?srsltid=AfmBOoqLrjlq31HYhqLp3T0Nj07i2FNUa8adDFcCZht3m1lWpYJO0HjA

2024年3月19日 星期二

測試磁碟 FIO , DISKSPD

基準測試磁碟

適用於: ✔️ Linux VM ✔️ Windows VM ✔️ 彈性擴展集 ✔️ 統一擴展集

效能評定的過程中會在應用程式上模擬不同工作負載,並測量應用程式在每個工作負載上達到的效能。 您已根據為高效能而設計一文所述的步驟來收集應用程式效能需求。 您可以在裝載應用程式的 VM 上執行效能評定工具,以判斷應用程式利用進階 SSD 可達成的效能等級。 在本文中,我們針對以 Azure 進階 SSD 佈建的 Standard_D8ds_v4 VM,提供效能評定範例。

我們分別在 Windows 和 Linux 上使用一般效能評定工具 DiskSpd 和 FIO。 這些工具會繁衍多個執行緒來模擬類似實際執行的工作負載,並測量系統效能。 您也可以使用這些工具來設定參數,例如區塊大小和佇列深度,您通常無法在應用程式中變更這些參數。 針對不同類型的應用程式工作負載,這可讓您在以進階 SSD 佈建的高延展性 VM 上,更靈活地發揮最大效能。 若要深入瞭解每個效能評定工具,請造訪 DiskSpd 和 FIO。

若要遵循下列範例,請建立Standard_D8ds_v4,並將四個進階 SSD 連結至 VM。 在四個磁碟中,將三個磁碟的主機快取設定為「無」,並將其串接成一個名為 NoCacheWrites 的磁碟區。 在剩下的磁碟上,將主機快取設定為「唯讀」,並使用此磁碟建立一個稱為 CacheReads 的磁碟區。 使用此設定,您就可以看到 Standard_D8ds_v4 VM 發揮最大的讀取和寫入效能。 如需使用進階 SSD 建立 Standard_D8ds_v4 的詳細步驟,請參閱為高效能而設計。

準備快取

設有「唯讀」主機快取的磁碟能夠提供高於磁碟限制的 IOPS。 若要從主機快取獲得這種最高的讀取效能,您必須先準備此磁碟的快取。 如此可確保效能評定工具在 CacheReads 磁碟區上推動的讀取 IO 實際上是命中快取,而非直接觸及磁碟。 快取命中會讓已啟用快取的單一磁碟產生更多 IOPS。

重要

每次重新啟動 VM 時,您必須在執行效能評定之前將快取準備好。

DISKSPD

在 VM 上下載 DISKSP 工具。 DISKSPD 是一種您可自訂的工具,可建立您自己的綜合工作負載。 我們將使用上述的相同設定來執行效能評定測試。 您可以變更規格以測試不同的工作負載。

在此範例中,我們使用下列一組基準參數:

  • -c200G:建立 (或重新建立) 測試中使用的樣本檔案。 可以設定為位元組、KiB、MiB、GiB 或區塊。 在此案例下,會使用 200-GiB 目標檔案的大型檔案來將記憶體快取降至最低。
  • -w100:指定寫入要求 (-w0 相當於 100% 讀取) 的作業百分比。
  • -b4K:表示區塊大小 (以位元組、KiB、MiB 或 GiB 為單位)。 在此案例下,會使用 4K 區塊大小來模擬隨機 I/O 測試。
  • -F4:設定四個執行緒的總計。
  • -r:指出隨機 I/O 測試 (會覆寫 -s 參數)。
  • -o128:表示每個執行緒每個目標未處理的 I/O 要求數目。 這也稱為佇列深度。 在此案例下,會使用 128 來強調 CPU。
  • -W7200:指定開始測量之前準備時間的持續時間。
  • -d30:指定測試的持續時間,不包括準備時間。
  • -Sh:停用軟體和硬體寫入快取 (相當於 -Suw)。

如需完整的參數清單,請參閱 GitHub 存放庫。

最大寫入 IOPS

我們使用 128 的高佇列深度為、8 KB 的小型區塊大小,以及四個背景工作執行緒來推動寫入作業。 寫入背景工作角色會在「NoCacheWrites」磁碟區上推動流量,此磁碟區有三個其快取設為「無」的磁碟。

執行下列命令,進行 30 秒的準備和 30 秒的測量:

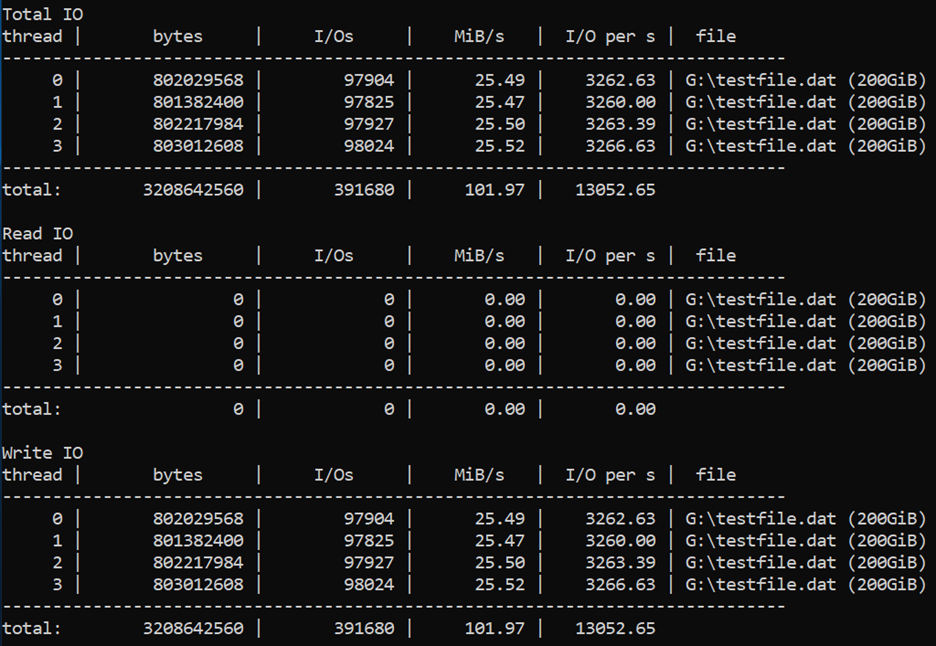
diskspd -c200G -w100 -b8K -F4 -r -o128 -W30 -d30 -Sh testfile.dat

結果顯示 Standard_D8ds_v4 VM 產生其最大寫入 IOPS 限制 (12,800)。

For 3208642560 total bytes, max total I/Os of 391680, with a total of 101.97 MiB/s, and a total of 13052.65 I/O per second.

最大讀取 IOPS

我們使用 128 的高佇列深度為、4 KB 的小型區塊大小,以及四個背景工作執行緒來推動讀取作業。 讀取背景工作角色會在「CacheReads」磁碟區上推動流量,此磁碟區有一個其快取設為「唯讀」的磁碟。

執行下列命令,進行兩小時的準備和 30 秒的測量:

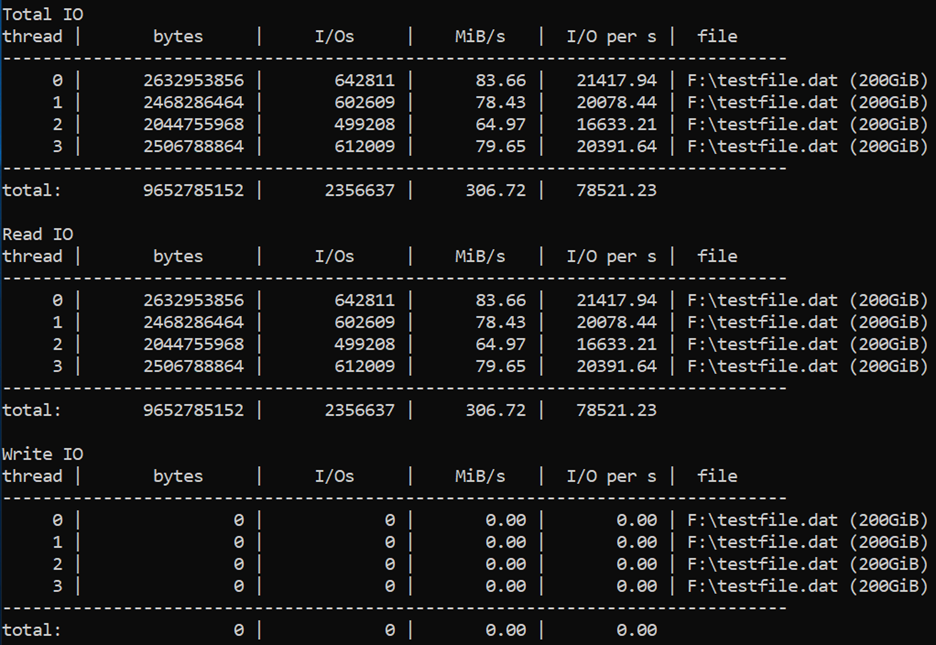
diskspd -c200G -b4K -F4 -r -o128 -W7200 -d30 -Sh testfile.dat

結果顯示 Standard_D8ds_v4 VM 產生其最大讀取 IOPS 限制 (77,000)。

For 9652785152 total bytes, there were 2356637 total I/Os, at 306.72 total MiB/s, and a total of 78521.23 I/Os per second.

輸送量上限

若要取得讀取和寫入輸送量上限,您可以變更為較大的區塊大小 (64 KB)。

FIO

FIO 是 Linux VM 上用於儲存體效能評定的一項常用工具。 它可以靈活地選取不同的 IO 大小、循序或隨機讀取和寫入。 它會繁衍背景工作執行緒或處理程序來執行指定的 I/O 作業。 您可以使用工作檔案,指定每個背景工作執行緒必須執行的 I/O 作業類型。 我們已經為下面範例所示的每個案例建立一個工作檔案。 您可以變更這些工作檔案中的規格,對進階儲存體上執行的不同工作負載進行效能評定。 在範例中,我們使用執行 Ubuntu 的 Standard_D8ds_v4。 請使用效能評定一節開頭所述的相同設定,並於執行效能評定測試之前準備快取。

開始進行之前,請先在虛擬機器上 下載 FIO 並安裝。

對 Ubuntu 執行下列命令,

apt-get install fio

我們會在磁碟上使用四個背景工作執行緒來推動讀取作業,並使用四個背景工作執行緒來推動讀取作業。 寫入背景工作角色會在「nocache」磁碟區上推動流量,此磁碟區有三個其快取設為「無」的磁碟。 讀取背景工作角色會在「readcache」磁碟區上推動流量,此磁碟區有一個其快取設為「唯讀」的磁碟。

最大寫入 IOPS

使用下列規格建立作業檔案,以產生最大寫入 IOPS。 將它命名為 "fiowrite.ini"。

ini
[global]
size=30g
direct=1
iodepth=256
ioengine=libaio
bs=4k
numjobs=4

[writer1]
rw=randwrite
directory=/mnt/nocache

請注意以下與先前幾節所述的設計指導方針一致的重要事項。 這些規格對於達到最大 IOPS 很重要,

  • 較高的佇列深度 256。
  • 較小的區塊大小 4 KB。
  • 執行隨機寫入的多個執行緒。

執行下列命令,開始執行 FIO 測試 30 秒,

sudo fio --runtime 30 fiowrite.ini

當測試執行時,您能夠看到 VM 和高階磁碟產生的寫入 IOPS 數目。 如下列樣本所示,Standard_D8ds_v4 VM 產生其最大寫入 IOPS 限制 (12,800 IOPS)。
Number of write IOPS VM and premium SSDs are delivering, shows that writes are 13.1k IOPS.

最大讀取 IOPS

使用下列規格建立作業檔案,以產生最大讀取 IOPS。 將它命名為 "fioread.ini"。

ini
[global]
size=30g
direct=1
iodepth=256
ioengine=libaio
bs=4k
numjobs=4

[reader1]
rw=randread
directory=/mnt/readcache

請注意以下與先前幾節所述的設計指導方針一致的重要事項。 這些規格對於達到最大 IOPS 很重要,

  • 較高的佇列深度 256。
  • 較小的區塊大小 4 KB。
  • 執行隨機寫入的多個執行緒。

執行下列命令,開始執行 FIO 測試 30 秒,

sudo fio --runtime 30 fioread.ini

當測試執行時,您能夠看到 VM 和高階磁碟產生的讀取 IOPS 數目。 如下列樣本所示,Standard_D8ds_v4 VM 產生超過 77,000 的讀取 IOPS。 這是磁碟和快取效能的組合。
Screenshot of the number of write IOPS VM and premium SSDs are delivering, shows that reads are 78.6k.

最大讀取和寫入 IOPS

使用下列規格建立作業檔案,以產生最大讀取和寫入 IOPS。 將它命名為 "fioreadwrite.ini"。

ini
[global]
size=30g
direct=1
iodepth=128
ioengine=libaio
bs=4k
numjobs=4

[reader1]
rw=randread
directory=/mnt/readcache

[writer1]
rw=randwrite
directory=/mnt/nocache
rate_iops=3200

請注意以下與先前幾節所述的設計指導方針一致的重要事項。 這些規格對於達到最大 IOPS 很重要,

  • 較高的佇列深度 128。
  • 較小的區塊大小 4 KB。
  • 執行隨機讀取和寫入的多個執行緒。

執行下列命令,開始執行 FIO 測試 30 秒,

sudo fio --runtime 30 fioreadwrite.ini

當測試執行時,您能夠看到 VM 和高階磁碟產生的結合讀取和寫入 IOPS 數目。 如下列樣本所示,Standard_D8ds_v4 VM 產生超過 90,000 的結合讀取和寫入 IOPS。 這是磁碟和快取效能的組合。
Combined read and write IOPS, shows that reads are 78.3k and writes are 12.6k IOPS.

結合的最大輸送量

若要獲得最大的結合讀取和寫入輸送量,請使用較大的區塊大小和較大佇列深度,並搭配執行讀取和寫入的多個執行緒。 您可以使用 64 KB 的區塊大小和 128 的佇列深度。

下一步

繼續閱讀為高效能而設計一文。

在本文中,您會為原型建立一份類似於現有應用程式的檢查清單。 您可以使用效能評定工具,在原型應用程式上模擬工作負載並測量效能。 這樣做可讓您判斷哪一個磁碟供應項目可符合或超越您的應用程式效能需求。 然後,您可以對實際執行的應用程式運用相同的指導方針。


 https://learn.microsoft.com/zh-tw/azure/virtual-machines/disks-benchmarks

2024年3月6日 星期三

使用PXE 在 WINDOWS 安裝 Linux

 這編是引導大家使用WINDOWS 設置 PXE SERVER 來安裝 網絡內其他電腦安裝 Ubuntu(Linux)


1. 第一步到以下網址安載 Tftpd32

http://tftpd32.jounin.net/

下載後直接安排即可


2. 我們先建立一個資料夾,如 C:\PXE

然後從C:\Program Files\Tftpd32\Tftpd32.exe 複制到 C:\PXE


3. 到以下位置下載 netboot.tar.gz

http://archive.ubuntu.com/ubuntu/dists/

e.g. : http://archive.ubuntu.com/ubuntu/dists/jaunty/main/installer-i386/alpha-5/images/netboot/

jaunty 為 9.04 版


4. 然後解壓到C:\PXE

5. C:\PXE\Ubuntu-installer\i386 下的 linux, pxelinux.0, pxelinux.cfg 複制到 C:\PXE

6. 執行 C:\PXE\Tftpd32.exe

7. 進入 setting -> choice "PXE Compatiliby" and "Allow / As Virtual Root" -> OK -> 重新開啟程式

8. 進入程式後轉去 DHCP Server

IP Address : 192.168.1.100

Size of pool : 30

Boot file : pxelinux.0

DNS : 192.168.1.1

Mask : 255.255.255.0

然後儲存"Save"


這樣就完成, 從其他電腦用PXE 即開機即可!

https://handingsky.blogspot.com/2012/01/pxe-windows-linux.html

2024年2月22日 星期四

FIO 命令列參數詳解

 Command:

fio -filename=/dev/sdb1 -direct=1 -iodepth 1 -thread -rw=randread -ioengine=psync -bs=16k -size=200G -numjobs=10 -runtime=1000 -group_reporting -name=mytestG -numjobs=10 -runtime=1000 -group_reporting -name=mytest

說明:
filename=/dev/sdb1 測試檔案名稱,通常選擇需要測試的磁碟的data目錄。
direct=1 測試過程繞過機器自帶的buffer。使測試結果更真實。
rw=randwrite 測試隨機寫的I/O
rw=randrw 測試隨機寫入和讀取的I/O
bs=16k 單次io的區塊檔案大小為16k
bsrange=512-2048 同上,提定資料區塊的大小範圍
size= 5g 本次的測試檔案大小為5g,以每次4k的io進行測試。
numjobs=30 本次的測試執行緒為30.
runtime=1000 測試時間為1000秒,如果不寫則一直將5g檔分4k每次寫完為止。
ioengine=psync io引擎使用pync方式
rwmixwrite=30 在混合讀寫的模式下,寫佔30%
group_reporting 關於顯示結果的,匯總每個進程的資訊。
另外
lockmem=1g 只使用1g記憶體進行測試。
zero_buffers 用0初始化系統buffer。
nrfiles=8 每個行程產生檔案的數量。

順序讀:

fio -filename=/dev/sdb1 -direct=1 -iodepth 1 -thread -rw=read -ioengine=psync -bs=16k -size=200G -numjobs=30 -runtime=1000 -group_reporting -name=mytest

隨機寫:

fio -filename=/dev/sdb1 -direct=1 -iodepth 1 -thread -rw=randwrite -ioengine=psync -bs=16k -size=200G -numjobs=30 -runtime=1000 -group_reporting -name=mytest

順序寫:

fio -filename=/dev/sdb1 -direct=1 -iodepth 1 -thread -rw=write -ioengine=psync -bs=16k -size=200G -numjobs=30 -runtime=1000 -group_reporting -name=mytestG -numjobs=30 -runtime=1000 -group_reporting -name=mytest

混合隨機讀寫:

fio -filename=/dev/sdb1 -direct=1 -iodepth 1 -thread -rw=randrw
-rwmixread=70 -ioengine=psync -bs=16k -size=200G -numjobs=30 -runtime=100 -group_reporting -name= mytest -ioscheduler=noop

資料來源:https://blog.csdn.net/guyan1101/article/details/113760090


2023年12月28日 星期四

前端UI軍火庫

2017 iT 邦幫忙鐵人賽   前端UI軍火庫

 https://ithelp.ithome.com.tw/users/20020617/ironman/988


Best practicing for password protection


如何有效保護用戶密碼的議題,估計在網路上討論不下數千次。本篇文章除了整理並分析何種方式是個 “壞方法” 外,也希望經過不斷的思考來理出最佳的解決方案(Best practices)。

本篇文章標題取用 “Best practicing” 而非 “Best practices” 的意義,在於內容所建議的方法,目前可能並非是最佳解決方案,未來若有更好的方法也將持續更新本篇的內容。

前言

現在做 “好” 一個網路應用是非常困難的事 (前提是如果 “想” 做好的話)。因為單是如何保護好客戶的密碼,就是一門大學問。

首先,我們要思考的是 “是否有必要儲存客戶的密碼在我們的系統中”? 如果將認證的系統由他方服務提供而不會影響商業模式的運作時,那麼與其它系統整合會是個比較好的,例如使用 Facebook 的帳號登入網站或系統的認證方式。

反之,如果決定要自行建置,則考量點就會有很多。除了需要考量安全性外,還需要考慮效能的問題,因為 “通常” 安全性高的同時也伴隨著低效能的壞處。這意謂著同樣是數萬人上線的網站,若選擇安全性高的方法,可能會比安全性低的方法額外需要更多的機器來運作。

另外在資料外洩的議題上,本篇將討論 “資料庫外洩” 以及 “資料庫與網站程式皆外洩” 的兩種情形,後者在網路上是目前比較少人探討的議題。有時資料外洩的並不只是資料庫的資料,更嚴重的是除了資料庫外,連整個網站的程式也一併遭到竊取,而這兩種情形面對著不同層級的威脅。

然而一旦資料外洩後,有心人士可以依照密碼保存的方式,決定採用 “Unhash/Decrypt attacks” 或 “Statistics attacks” 等攻擊方式。不管是何種方式,目的就是希望能夠還原用戶的密碼,而我們想做的就是盡量降低被還原的可能性。

以下是筆者整理的常見方法及其分析。

儲存用戶密碼之方法

1. 明碼(plaintext)

最簡單的保存方式,就是將用戶註冊時所輸入的密碼,不經過任何的處理,原封不動的儲存在資料庫中。例如密碼為 “123456”,在資料庫中則以 “123456” 儲存。然而這種簡單的方式也是最危險的。

例如,用戶 ant 帳號所使用的密碼為 “123456”, 則在資料庫中以 “123456” 儲存,如下:

img

如果資料庫外洩時,任何人都可以直接看到所有用戶的密碼。另一個問題是,只要是有權限瀏覽資料庫的人,也幾乎都可能隨時取得用戶的密碼,例如資料庫管理員或甚至是程式設計師。

這種方式不管是面對 “資料庫外洩” 或 “資料庫與網站程式皆外洩” 的情形都沒有任何防護措施,因此明碼是最不建議使用的方式。

2. 簡易雜湊法 (Pure Hash)

演算法為: Hash(明碼)。

雜湊法 (Hash) 可以視為一數學函式,專職將某值轉換成另一值。常見的雜湊法有很多,例如 MD5, SHA1 等。

假設選定為 MD5, 在實際操作上,當用戶註冊的密碼為 “123456” 時,此時會先將 “123456” 經由 MD5 函式運算,也就是 MD5(123456) 會得到 “f447b20a7fcbf53a5d5be013ea0b15af” 結果,再將 “f447b20a7fcbf53a5d5be013ea0b15af” 值寫入資料庫中,而不是將明碼 “123456” 寫入資料庫。

img

當下次該用戶嘗試登入時,會將輸入的值經過 MD5 函式運算後,再與資料庫的值進行比對,如果字串完全符合則表示用戶輸入了正確的密碼,進而允許用戶登入網站或系統。所以當用戶以 “ant” 為用戶名及密碼為 “123456” 登入時,則網站或系統會先將 “123456” 以 MD5 函式運算後得值為 “f447b20a7fcbf53a5d5be013ea0b15af”,再使用 “姓名=ant AND 密碼=f447b20a7fcbf53a5d5be013ea0b15af” 為搜尋值於資料庫中查詢。

整個密碼的處理流程中,明碼 “123456” 將不會永久性的儲存在系統或資料庫中,而可避免資料庫人員在瀏覽資料庫時,可以直接看到明碼的情形。另外當使用這種方式保存密碼時,如果資料庫外洩時,對方取得的密碼欄位會是 “f447b20a7fcbf53a5d5be013ea0b15af” ,而不是明碼 “123456”。

取得資料庫的有心人士若想要知道原本的明碼,就需要解譯 “f447b20a7fcbf53a5d5be013ea0b15af” 的還原值為何,這在數學原理中是比較困難的。因為雜湊 )(Hash) 演算法是一種單向 (one-way) 運算函式,在原理上是難以從計算值推回原先的值,也就是幾乎無法由 “f447b20a7fcbf53a5d5be013ea0b15af” 經運算逆推回 “123456”,進而保護了所有用戶的原始密碼。

雖然從這點上看起來比明碼的方式好太多了,但仍然存在著弱點,例如目前常見的 “查表法” 式的攻擊。簡單來說,攻擊者可以事先準備好所有可能性的 MD5 清單表,如:

img

如此攻擊者只需要把 “f447b20a7fcbf53a5d5be013ea0b15af” 值於資料庫中查詢即可馬上比對出明碼為 “123456”,進而得知該用戶的密碼。所以理論上,只要查表資料庫夠齊全(即收集夠多的明碼對照表),即可把解譯任何雜湊 (Hash) 值。所以,簡易雜湊法仍然不夠安全。

3. 加料式雜湊法 (Salted Hash)

演算法為: Hash(亂定值 + 明碼)。

面對 “查表法” 類的攻擊時,最直覺的方法就是增加查表的困難度。我們知道查表資料庫理論上可以收集所有可能之明碼的雜湊 (Hash) 值,但在實作上是有困難度的,因為攻擊者在空間與時間上,不太可能收集 “所有” 可能的查表值,而是僅盡量收集常見的對照值,例如 “password”, “123456” 等。因此,在這種限制下,查表資料庫 “通常” 不會收錄較無規則或看似亂碼的明碼值,例如 “i3flm234rmsldk543kf2jvl2sdfj123456”,這也是認定用戶通常不會真的將這麼難記的值當作密碼。

於是在防護手法上,網站或系統可以 “自動” 替用戶密碼添加 “亂定數” (salty),如 “i3flm234rmsldk543kf2jvl2sdfj”。在這種情況下,當用戶使用 “123456” 密碼註冊時,程式會將 “亂定數” 加上其密碼後,才經由雜湊 (Hash) 函式運算,再儲存至資料庫中。如 MD5(“i3flm234rmsldk543kf2jvl2sdfj” + “123456”),得出值為 “d0a970cc71d15aa10b07584a7bd31ff6”。

img

因此當用戶下次登入時,輸入密碼 “123456” 後,程式會再 “自動” 替用戶密碼添加 “亂定數” (salty),成為 MD5(“i3flm234rmsldk543kf2jvl2sdfj” + “123456”) 來運算,則得出的值就會與資料庫的值一樣。這種防護方法就是賭定查表資料庫不會有 “亂定數” 為首的對照表。以此例來說,就是賭查表資料庫沒有 “i3flm234rmsldk543kf2jvl2sdfj” + “123456” 的對照表。

加料式雜湊法 (Salted Hash) 加強原本簡易雜湊法的安全性,加上操作簡單的特性,所以目前成為最常見的密碼保護方式。不過筆者要提醒的是,這種方法是基於賭上查表資料庫 “可能” 不會有 “亂定數” 前提下的保護策略,所以 “亂定數” 取值就變得非常重要,例如值不得太短,且值必須不是常見的值(盡量是亂數或近乎亂數產生的值)。

另外,加料式雜湊法的另一個前提是,網站或系統程式碼未遭受外洩。如果入侵行為導致除了資料庫外,程式也一併外洩時,此時有心人士可以從程式碼中得知 “亂定數” 之值,那麼依然可以有效地利用 “查表法” 進行解譯的攻擊。

例如,有心人士手中的查表資料庫如下:

img

此時從網站或系統程式碼中,發現 “亂定數” 為 “i3flm234rmsldk543kf2jvl2sdfj”,則可以據此來重新產生查表資料庫的對照值,例如原本的 “password” 明碼,改用 MD5(“i3flm234rmsldk543kf2jvl2sdfj” + “password”) 來取值,以此類推從而產生針對此資料庫的查表資料庫:

img

此時,再用原本查表式的攻擊時,就很容易找到 “d0a970cc71d15aa10b07584a7bd31ff6” 的對照值為 “123456”。

4. 加密方法 (Encrypted Password)

演算法為: Encrypt(明碼, 金鑰值)。

有些人會使用加解密的方式來保護密碼,例如 DES, AES 等。但這種方法的問題也不少,第一,加密耗用的資源比單一雜湊 (Hash) 演算法多;第二,加密金鑰需妥善保管,否則知道金鑰的人都可以解出所有用戶的密碼;第三,如果資料庫、程式與金鑰外洩,則此防護方式等同虛設,因為有心人士不需查表就可以直接用解密的方式還原密碼。

因此,筆者認為除非有完善的配套措施,否則不建議使用此種保護方法。

5. 複合式雜湊法

基於加料式雜湊法 (Salted Hash) 可以衍生出許多不同的變形。

A. “亂定數” 使用兩次以上

其中一種演算法為: 亂定數 + Hash(亂定數 + 明碼)。

延伸先前舉例的 “i3flm234rmsldk543kf2jvl2sdfj” 亂定數,則雜湊值為 “i3flm234rmsldk543kf2jvl2sdfj” + MD5(“i3flm234rmsldk543kf2jvl2sdfj” + “123456”),並得其值為 “i3flm234rmsldk543kf2jvl2sdfj” + “d0a970cc71d15aa10b07584a7bd31ff6”。

這種複合式雜湊法加強的是查表資料庫的困難度,但是仍然沒有解決若程式一併外洩時的問題,因為有心人士從程式碼中得知 “亂定數” 後,可以直接將 “亂定數” 去除,進而留下 “d0a970cc71d15aa10b07584a7bd31ff6”。如此強度與加料式雜湊法 (Salted Hash) 是差不多的。

B. 使用兩種以上的加料式雜湊演算法

其中一種演算法為: MD5(SHA1(亂定數 + 明碼))。

以 PHP 程式語言為例:

1
2
$salty = "i3flm234rmsldk543kf2jvl2sdfj";
$password_hash = md5(sha1($salty + $password));

這種複合式雜湊法加強的是查表資料庫的困難度,因為要建立這種查表資料庫需要耗用較多的運算資源(因為使用兩次雜湊演算法),但相對而言,比加料式雜湊法 (Salted Hash) 來得安全許多。但是最大的缺點就是我們網站或系統的運算資源也會耗用較多。

因此,有心人士取得資料庫及網站程式時,即使在知道 “亂定數” 的條件下,要重新產生查表資料庫也是一件很耗資源的事情。

6. HMAC 加料式演算法

其中一種演算法為: HMAC(SHA1, 亂定數 + 明碼, 金鑰值)。

以 PHP 程式語言為例:

1
2
3
$key = "146c07ef2479cedcd54c7c2af5cf3a80";
$salty = "i3flm234rmsldk543kf2jvl2sdfj";
$password_hash = hash_hmac("sha1", $salty + $password, $key);

HMAC 演算法有著加料式及加密方法的優點,使得查表式攻擊的成本以等比級數倍增,但因為 HMAC 耗用的資源更多,所以運算量要求最大,這也會造成網站或系統的負載需求更高。

統計特徵值的攻擊方法

排除不建議或類似的防護方法,筆者建議的是 “加料式雜湊法 (Salted Hash)”, “使用兩種以上的加料式雜湊演算法” 或 “HMAC 加料式演算法”,但若您有著更高安全的需求,則建議採用後面兩者。

另外,筆者在前言中有提到 “Statistics attacks”,此種攻擊方式是針對 “亂定數” 的手法。以前例的 “加料式雜湊法 (Salted Hash)” 來說,所有的用戶密碼皆是加上 “定數” 來處理,例如 “i3flm234rmsldk543kf2jvl2sdfj”,則用戶 ant 的密碼 “123456” 在資料庫會是:

img

我們知道 “123456” 其實是個常見的密碼,所以如果網站或系統的用戶數夠多,那麼我們可以假設 “123456” 為密碼的用戶比例,就會存有顯著的統計特徵值,例如資料庫可能為:

img

這意謂著 ant, guest 及 newbie 的密碼因為都是 “123456” 所以其值皆相同。此時就算僅有資料庫外洩,有心人士依然可以取得其統計特徵值,來猜測最多人使用的 “123456” 來進行猜 “亂定數” 的破解,而只要解譯 “亂定數” 後再取得明碼就不難了。

因此為了防止 “Statistics attacks”,加料 (Salted) 的東西就不能是個 “定數” 而必須是個 “隨機數”,且這個隨機數需依每個人有所不同。例如 ant 的隨機數是 “i3flm234rmsldk543kf2jvl2sdfj”, 而 guest 的隨機數是 “43kf2jvl2sdfji3flm234rmsldk5”,那麼即使 ant 及 guest 的明碼是一樣的,儲存在資料庫的 Hash 值仍然是不一樣的。”隨機數” 的值可以是亂數產生,然後儲存在某一資料庫欄位,以利事後的比對,或者直接取用原本用戶資料表裡的唯一值,例如註冊時間也可以。

最後,如果擔心 “Collision attacks” 的話,上述所有方法皆可以將 MD5 或 SHA1,改成更複雜的 SHA256 或 SHA512,但是運算資源也會倍增。

總結

在安全性及效能的綜合考量下,筆者建議 “隨機加料式雜湊法”, “使用兩種以上的隨機加料式雜湊演算法” 或 “HMAC 隨機加料式演算法”。愈後者安全性愈高,但效能的要求也愈高。

1. 隨機加料式雜湊法

演算法為: Hash(隨機數 + 明碼)。

當 Hash 為 MD5 時,用戶 ant 之密碼為 “123456”,系統會隨機產生一隨機數為 “i3flm234rmsldk543kf2jvl2sdfj”,則經運算後密碼以 “d0a970cc71d15aa10b07584a7bd31ff6” 儲存。當用戶 guest 之密碼為 “123456”,系統會隨機產生另一隨機數為 “43kf2jvl2sdfji3flm234rmsldk5”,則經運算後密碼以 “171773b4cbdc81b0e697ab3c21a7366d” 儲存。

img

2. 使用兩種以上的隨機加料式雜湊演算法

演算法為: Hash1(Hash2(隨機數 + 明碼)。

當 Hash1 為 MD5 且 Hash2 為 SHA1 時,用戶 ant 之密碼為 “123456”,系統隨機產生的隨機數為 “i3flm234rmsldk543kf2jvl2sdfj”,則經運算後密碼以 “1a2379a1f4e28eacb9151734f3773b23” 儲存。當用戶 guest 之密碼為 “123456”,系統隨機產生的另一隨機數為 “43kf2jvl2sdfji3flm234rmsldk5”,則經運算後密碼以 “0332d18e7e836c4df785641b4ac198cd” 儲存。

img

3. HMAC 隨機加料式演算法

演算法為: HMAC(Hash, 隨機數 + 明碼, 金鑰值)。

當 Hash 為 SHA1,Key 為 “mykey” 時,用戶 ant 之密碼為 “123456”,系統隨機產生的隨機數為 “i3flm234rmsldk543kf2jvl2sdfj”,則經運算後密碼以 “466b2528c18f4f0893be264bcc16d95d63053054” 儲存。當用戶 guest 之密碼為 “123456”,系統隨機產生的隨機數為 “43kf2jvl2sdfji3flm234rmsldk5”,則經運算後密碼以 “d7b9f21f0740e12a80e7f2cbb0df9a7f5c98bece” 儲存。

img

更新:2012-07-16

先前有前輩指出文章內容並沒有考慮到更好的演算法,於是剛好今日有空閒與心情,來補充本篇的內容,希望本文不會過於冗長才好。

上述提到的演算法對於 Rainbow tables 與 GPU 等攻擊方式沒有提供相對好的解決方法,若對於此類型的攻擊,我們該怎麼辦呢?

為了有效增加機器「駭」出 Hash(雜湊)的時間成本。Niels Provos and David Mazières 在 1999 年發表了 bcrypt 的演算法,另外在 2000 年,Kaliski 也發表了 PBKDF2,兩者在某種程度上都能夠相對有效的解決這個問題。

但目前需要擔心的其實是跳脫摩爾定律的 GPU 計算能力。GPU 技術發展了很久,但直到 2000 年後才開始逐漸被重視,不管是 bcrypt 及 PBKDF2 雖然都能夠降低 GPU 型式的攻擊,但增加的時間成本並沒有達到巨量級的程度。

於是在 2009 年,Colin Percival 在 BSDCan 上發表了新的 scrypt 演算法。相較於 bcrypt 及 PBKDF2 能夠更有效的增加 GPU 計算的時間。下圖為該簡報的第 19 頁擷圖。

Scrypt

對於 PHP 的使用者,若想使用 bcrypt,可以從我的 Github 專案中找到 php-bcrypt。若想使用 scrypt,則可以使用 php-scrypt。

但需要注意的是,當安全等級要求愈高,意謂著我們系統平常的計算量也會相對的提高,效能勢必會降低。


資料來源:https://blog.gcos.me/post/2012-01-08_best_practicing_for_password_protection/