顯示具有 Arduino 標籤的文章。 顯示所有文章

2025年6月9日 星期一

Arduino Nano program flash the hex, bin file

 這篇說明

1. 如何用 avrdude 燒錄 Arduino

2. 如何從 Arduino IDE 取得 hex , bin file


AVRDUDE is a utility to program AVR microcontrollers
https://github.com/avrdudes/avrdude/releases


✅ 前提條件(請確認)

  • 目標板子:Arduino Nano(ATmega328P)

  • 使用哪種方式上傳:

    1. 使用 USB 直接接 Nano(內建 CH340 或 FTDI)

    2. 使用 外部 ISP 燒錄器(如 USBasp、Arduino as ISP)


🔌 方式一:直接用 USB 線連接 Arduino Nano

Nano 自帶 bootloader,可以直接用 USB 上傳。

📌 指令範例(CH340 或 FTDI 晶片):

bash
avrdude -c arduino -p m328p -P COM3 -b 57600 -U flash:w:your_program.hex:i

📌 參數說明:

參數說明
-c arduino使用 Arduino bootloader protocol
-p m328pNano 的晶片 ATmega328P
-P COM3替換成你實際的 COM port
-b 57600舊版 bootloader(通常 Nano 這個 baudrate 就對)
-U flash:w:xxx.hex:i燒錄 hex 檔進 flash

💡 若你的 Nano 是新版(或 DIY 自燒 bootloader),也可能要改為 -b 115200


🧰 方式二:使用外部 ISP(如 USBasp 或 Arduino as ISP)

這會跳過 bootloader,直接燒錄程式進 flash。

【1】USBasp 方式:

bash
avrdude -c usbasp -p m328p -U flash:w:your_program.hex:i

【2】Arduino as ISP(使用 Arduino UNO 當 ISP):

bash
avrdude -c arduino -p m328p -P COM3 -b 19200 -U flash:w:your_program.hex:i

✅ 請確保 Arduino UNO 上有燒錄「ArduinoISP」範例程式


💡 從 Arduino IDE 取得 HEX 重點回顧

  • 點選:檔案 > 導出已編譯的二進位檔

  • 在專案資料夾會出現 .ino.hex.ino.with_bootloader.hex

    • 一般使用 .ino.hex(純程式)

    • .with_bootloader.hex 是要燒錄整個 bootloader 的


2024年9月24日 星期二

Control I2C SSD1306 by GPIO

#define OLED_SDA D2 // D2

#define OLED_SCL D1 // D1


#define OLED_ADDRESS 0x3c  // SSD1306 I2C 地址


// I2C 延遲,控制速度

#define I2C_DELAY 50  // 試著增加延遲


void i2c_start() {

  pinMode(OLED_SDA, OUTPUT);

  pinMode(OLED_SCL, OUTPUT);

  digitalWrite(OLED_SDA, HIGH);

  digitalWrite(OLED_SCL, HIGH);

  delayMicroseconds(I2C_DELAY);

  digitalWrite(OLED_SDA, LOW);

  delayMicroseconds(I2C_DELAY);

  digitalWrite(OLED_SCL, LOW);

}


void i2c_stop() {

  pinMode(OLED_SDA, OUTPUT);

  pinMode(OLED_SCL, OUTPUT);

  digitalWrite(OLED_SDA, LOW);

  digitalWrite(OLED_SCL, HIGH);

  delayMicroseconds(I2C_DELAY);

  digitalWrite(OLED_SDA, HIGH);

}


bool i2c_write_byte(uint8_t byte) {

  pinMode(OLED_SDA, OUTPUT);

  for (int i = 0; i < 8; i++) {

    digitalWrite(OLED_SCL, LOW);

    if (byte & 0x80) {

      digitalWrite(OLED_SDA, HIGH);

    } else {

      digitalWrite(OLED_SDA, LOW);

    }

    byte <<= 1;

    delayMicroseconds(I2C_DELAY);

    digitalWrite(OLED_SCL, HIGH);

    delayMicroseconds(I2C_DELAY);

  }

  digitalWrite(OLED_SCL, LOW);

  pinMode(OLED_SDA, INPUT);  // 切換到輸入檢查 ACK

  delayMicroseconds(I2C_DELAY);

  digitalWrite(OLED_SCL, HIGH);

  bool ack = !digitalRead(OLED_SDA);  // ACK 應該為低

  delayMicroseconds(I2C_DELAY);

  digitalWrite(OLED_SCL, LOW);

  return ack;  // 返回 ACK 檢查結果

}


void oled_command(uint8_t command) {

  i2c_start();

  uint8_t address = OLED_ADDRESS << 1;

  Serial.print("Sending Address: ");

  Serial.println(address, HEX);


  if (!i2c_write_byte(address)) {

    Serial.println("Address not acknowledged");

  }

  if (!i2c_write_byte(0x00)) {

    Serial.println("Control byte not acknowledged");

  }

  if (!i2c_write_byte(command)) {

    Serial.println("Command not acknowledged");

  }

  i2c_stop();

}


void oled_init() {

  oled_command(0xAE);  // 關閉顯示

  oled_command(0xA8);  // 設置多路復用比率

  oled_command(0x3F);  // 1/64

  oled_command(0xD3);  // 設置顯示偏移

  oled_command(0x00);  // 無偏移

  oled_command(0x40);  // 設置起始行位置

  oled_command(0xA1);  // 設置重映射

  oled_command(0xC8);  // 掃描方向

  oled_command(0xDA);  // 設置 COM 硬體配置

  oled_command(0x12);  // 代碼段

  oled_command(0x81);  // 設置對比度

  oled_command(0x7F);

  oled_command(0xA4);  // 關閉整體顯示

  oled_command(0xA6);  // 設置普通顯示

  oled_command(0xD5);  // 設置顯示時鐘分頻比/振盪器頻率

  oled_command(0x80);

  oled_command(0x8D);  // 啟用充電泵

  oled_command(0x14);

  oled_command(0xAF);  // 打開顯示

}


void oled_clear() {

  for (uint8_t page = 0; page < 8; page++) {

    oled_command(0xB0 + page);  // 設置頁地址

    oled_command(0x00);         // 設置低列地址

    oled_command(0x10);         // 設置高列地址

    i2c_start();

    i2c_write_byte(OLED_ADDRESS << 1);  // 發送地址

    i2c_write_byte(0x40);               // 控制位元 (0x40 表示後面是數據)

    for (uint8_t col = 0; col < 128; col++) {

      i2c_write_byte(0x00);             // 清空顯示

    }

    i2c_stop();

  }

}


// 定義 5x7 點陣字體

const uint8_t font5x7[][6] = {


{0x00, 0x00, 0x00, 0x00, 0x00, 0x00}, // sp

{0x00, 0x00, 0x00, 0x2f, 0x00, 0x00}, // !

{0x00, 0x00, 0x07, 0x00, 0x07, 0x00}, // "

{0x00, 0x14, 0x7f, 0x14, 0x7f, 0x14}, // #

{0x00, 0x24, 0x2a, 0x7f, 0x2a, 0x12}, // $

{0x00, 0x62, 0x64, 0x08, 0x13, 0x23}, // %

{0x00, 0x36, 0x49, 0x55, 0x22, 0x50}, // &

{0x00, 0x00, 0x05, 0x03, 0x00, 0x00}, // '

{0x00, 0x00, 0x1c, 0x22, 0x41, 0x00}, // (

{0x00, 0x00, 0x41, 0x22, 0x1c, 0x00}, // )

{0x00, 0x14, 0x08, 0x3E, 0x08, 0x14}, // *

{0x00, 0x08, 0x08, 0x3E, 0x08, 0x08}, // +

{0x00, 0x00, 0x00, 0xA0, 0x60, 0x00}, // ,

{0x00, 0x08, 0x08, 0x08, 0x08, 0x08}, // -

{0x00, 0x00, 0x60, 0x60, 0x00, 0x00}, // .

{0x00, 0x20, 0x10, 0x08, 0x04, 0x02}, // /

{0x00, 0x3E, 0x51, 0x49, 0x45, 0x3E}, // 0

{0x00, 0x00, 0x42, 0x7F, 0x40, 0x00}, // 1

{0x00, 0x42, 0x61, 0x51, 0x49, 0x46}, // 2

{0x00, 0x21, 0x41, 0x45, 0x4B, 0x31}, // 3

{0x00, 0x18, 0x14, 0x12, 0x7F, 0x10}, // 4

{0x00, 0x27, 0x45, 0x45, 0x45, 0x39}, // 5

{0x00, 0x3C, 0x4A, 0x49, 0x49, 0x30}, // 6

{0x00, 0x01, 0x71, 0x09, 0x05, 0x03}, // 7

{0x00, 0x36, 0x49, 0x49, 0x49, 0x36}, // 8

{0x00, 0x06, 0x49, 0x49, 0x29, 0x1E}, // 9

{0x00, 0x00, 0x36, 0x36, 0x00, 0x00}, // :

{0x00, 0x00, 0x56, 0x36, 0x00, 0x00}, // ;

{0x00, 0x08, 0x14, 0x22, 0x41, 0x00}, // <

{0x00, 0x14, 0x14, 0x14, 0x14, 0x14}, // =

{0x00, 0x00, 0x41, 0x22, 0x14, 0x08}, // >

{0x00, 0x02, 0x01, 0x51, 0x09, 0x06}, // ?

{0x00, 0x32, 0x49, 0x59, 0x51, 0x3E}, // @

{0x00, 0x7C, 0x12, 0x11, 0x12, 0x7C}, // A

{0x00, 0x7F, 0x49, 0x49, 0x49, 0x36}, // B

{0x00, 0x3E, 0x41, 0x41, 0x41, 0x22}, // C

{0x00, 0x7F, 0x41, 0x41, 0x22, 0x1C}, // D

{0x00, 0x7F, 0x49, 0x49, 0x49, 0x41}, // E

{0x00, 0x7F, 0x09, 0x09, 0x09, 0x01}, // F

{0x00, 0x3E, 0x41, 0x49, 0x49, 0x7A}, // G

{0x00, 0x7F, 0x08, 0x08, 0x08, 0x7F}, // H

{0x00, 0x00, 0x41, 0x7F, 0x41, 0x00}, // I

{0x00, 0x20, 0x40, 0x41, 0x3F, 0x01}, // J

{0x00, 0x7F, 0x08, 0x14, 0x22, 0x41}, // K

{0x00, 0x7F, 0x40, 0x40, 0x40, 0x40}, // L

{0x00, 0x7F, 0x02, 0x0C, 0x02, 0x7F}, // M

{0x00, 0x7F, 0x04, 0x08, 0x10, 0x7F}, // N

{0x00, 0x3E, 0x41, 0x41, 0x41, 0x3E}, // O

{0x00, 0x7F, 0x09, 0x09, 0x09, 0x06}, // P

{0x00, 0x3E, 0x41, 0x51, 0x21, 0x5E}, // Q

{0x00, 0x7F, 0x09, 0x19, 0x29, 0x46}, // R

{0x00, 0x46, 0x49, 0x49, 0x49, 0x31}, // S

{0x00, 0x01, 0x01, 0x7F, 0x01, 0x01}, // T

{0x00, 0x3F, 0x40, 0x40, 0x40, 0x3F}, // U

{0x00, 0x1F, 0x20, 0x40, 0x20, 0x1F}, // V

{0x00, 0x3F, 0x40, 0x38, 0x40, 0x3F}, // W

{0x00, 0x63, 0x14, 0x08, 0x14, 0x63}, // X

{0x00, 0x07, 0x08, 0x70, 0x08, 0x07}, // Y

{0x00, 0x61, 0x51, 0x49, 0x45, 0x43}, // Z

{0x00, 0x00, 0x7F, 0x41, 0x41, 0x00}, // [

{0x00, 0x55, 0x2A, 0x55, 0x2A, 0x55}, // backslash

{0x00, 0x00, 0x41, 0x41, 0x7F, 0x00}, // ]

{0x00, 0x04, 0x02, 0x01, 0x02, 0x04}, // ^

{0x00, 0x40, 0x40, 0x40, 0x40, 0x40}, // _

{0x00, 0x00, 0x01, 0x02, 0x04, 0x00}, // '

{0x00, 0x20, 0x54, 0x54, 0x54, 0x78}, // a

{0x00, 0x7F, 0x48, 0x44, 0x44, 0x38}, // b

{0x00, 0x38, 0x44, 0x44, 0x44, 0x20}, // c

{0x00, 0x38, 0x44, 0x44, 0x48, 0x7F}, // d

{0x00, 0x38, 0x54, 0x54, 0x54, 0x18}, // e

{0x00, 0x08, 0x7E, 0x09, 0x01, 0x02}, // f

{0x00, 0x18, 0xA4, 0xA4, 0xA4, 0x7C}, // g

{0x00, 0x7F, 0x08, 0x04, 0x04, 0x78}, // h

{0x00, 0x00, 0x44, 0x7D, 0x40, 0x00}, // i

{0x00, 0x40, 0x80, 0x84, 0x7D, 0x00}, // j

{0x00, 0x7F, 0x10, 0x28, 0x44, 0x00}, // k

{0x00, 0x00, 0x41, 0x7F, 0x40, 0x00}, // l

{0x00, 0x7C, 0x04, 0x18, 0x04, 0x78}, // m

{0x00, 0x7C, 0x08, 0x04, 0x04, 0x78}, // n

{0x00, 0x38, 0x44, 0x44, 0x44, 0x38}, // o

{0x00, 0xFC, 0x24, 0x24, 0x24, 0x18}, // p

{0x00, 0x18, 0x24, 0x24, 0x18, 0xFC}, // q

{0x00, 0x7C, 0x08, 0x04, 0x04, 0x08}, // r

{0x00, 0x48, 0x54, 0x54, 0x54, 0x20}, // s

{0x00, 0x04, 0x3F, 0x44, 0x40, 0x20}, // t

{0x00, 0x3C, 0x40, 0x40, 0x20, 0x7C}, // u

{0x00, 0x1C, 0x20, 0x40, 0x20, 0x1C}, // v

{0x00, 0x3C, 0x40, 0x30, 0x40, 0x3C}, // w

{0x00, 0x44, 0x28, 0x10, 0x28, 0x44}, // x

{0x00, 0x1C, 0xA0, 0xA0, 0xA0, 0x7C}, // y

{0x00, 0x44, 0x64, 0x54, 0x4C, 0x44}, // z


  {0x7E, 0x10, 0x10, 0x10, 0x7E, 0x00},  // 'H'

  {0x7E, 0x4A, 0x4A, 0x4A, 0x42, 0x00},  // 'E'

  {0x7E, 0x40, 0x40, 0x40, 0x40, 0x00},  // 'L'

  {0x3C, 0x42, 0x42, 0x42, 0x3C, 0x00},  // 'O'

  {0xFF, 0xFF, 0xFF, 0xFF, 0xFF, 0xFF},  // '#'

};


const char ssd1306oled_font[][6] PROGMEM = {

{0x00, 0x00, 0x00, 0x00, 0x00, 0x00}, // sp

{0x00, 0x00, 0x00, 0x2f, 0x00, 0x00}, // !

{0x00, 0x00, 0x07, 0x00, 0x07, 0x00}, // "

{0x00, 0x14, 0x7f, 0x14, 0x7f, 0x14}, // #

{0x00, 0x24, 0x2a, 0x7f, 0x2a, 0x12}, // $

{0x00, 0x62, 0x64, 0x08, 0x13, 0x23}, // %

{0x00, 0x36, 0x49, 0x55, 0x22, 0x50}, // &

{0x00, 0x00, 0x05, 0x03, 0x00, 0x00}, // '

{0x00, 0x00, 0x1c, 0x22, 0x41, 0x00}, // (

{0x00, 0x00, 0x41, 0x22, 0x1c, 0x00}, // )

{0x00, 0x14, 0x08, 0x3E, 0x08, 0x14}, // *

{0x00, 0x08, 0x08, 0x3E, 0x08, 0x08}, // +

{0x00, 0x00, 0x00, 0xA0, 0x60, 0x00}, // ,

{0x00, 0x08, 0x08, 0x08, 0x08, 0x08}, // -

{0x00, 0x00, 0x60, 0x60, 0x00, 0x00}, // .

{0x00, 0x20, 0x10, 0x08, 0x04, 0x02}, // /

{0x00, 0x3E, 0x51, 0x49, 0x45, 0x3E}, // 0

{0x00, 0x00, 0x42, 0x7F, 0x40, 0x00}, // 1

{0x00, 0x42, 0x61, 0x51, 0x49, 0x46}, // 2

{0x00, 0x21, 0x41, 0x45, 0x4B, 0x31}, // 3

{0x00, 0x18, 0x14, 0x12, 0x7F, 0x10}, // 4

{0x00, 0x27, 0x45, 0x45, 0x45, 0x39}, // 5

{0x00, 0x3C, 0x4A, 0x49, 0x49, 0x30}, // 6

{0x00, 0x01, 0x71, 0x09, 0x05, 0x03}, // 7

{0x00, 0x36, 0x49, 0x49, 0x49, 0x36}, // 8

{0x00, 0x06, 0x49, 0x49, 0x29, 0x1E}, // 9

{0x00, 0x00, 0x36, 0x36, 0x00, 0x00}, // :

{0x00, 0x00, 0x56, 0x36, 0x00, 0x00}, // ;

{0x00, 0x08, 0x14, 0x22, 0x41, 0x00}, // <

{0x00, 0x14, 0x14, 0x14, 0x14, 0x14}, // =

{0x00, 0x00, 0x41, 0x22, 0x14, 0x08}, // >

{0x00, 0x02, 0x01, 0x51, 0x09, 0x06}, // ?

{0x00, 0x32, 0x49, 0x59, 0x51, 0x3E}, // @

{0x00, 0x7C, 0x12, 0x11, 0x12, 0x7C}, // A

{0x00, 0x7F, 0x49, 0x49, 0x49, 0x36}, // B

{0x00, 0x3E, 0x41, 0x41, 0x41, 0x22}, // C

{0x00, 0x7F, 0x41, 0x41, 0x22, 0x1C}, // D

{0x00, 0x7F, 0x49, 0x49, 0x49, 0x41}, // E

{0x00, 0x7F, 0x09, 0x09, 0x09, 0x01}, // F

{0x00, 0x3E, 0x41, 0x49, 0x49, 0x7A}, // G

{0x00, 0x7F, 0x08, 0x08, 0x08, 0x7F}, // H

{0x00, 0x00, 0x41, 0x7F, 0x41, 0x00}, // I

{0x00, 0x20, 0x40, 0x41, 0x3F, 0x01}, // J

{0x00, 0x7F, 0x08, 0x14, 0x22, 0x41}, // K

{0x00, 0x7F, 0x40, 0x40, 0x40, 0x40}, // L

{0x00, 0x7F, 0x02, 0x0C, 0x02, 0x7F}, // M

{0x00, 0x7F, 0x04, 0x08, 0x10, 0x7F}, // N

{0x00, 0x3E, 0x41, 0x41, 0x41, 0x3E}, // O

{0x00, 0x7F, 0x09, 0x09, 0x09, 0x06}, // P

{0x00, 0x3E, 0x41, 0x51, 0x21, 0x5E}, // Q

{0x00, 0x7F, 0x09, 0x19, 0x29, 0x46}, // R

{0x00, 0x46, 0x49, 0x49, 0x49, 0x31}, // S

{0x00, 0x01, 0x01, 0x7F, 0x01, 0x01}, // T

{0x00, 0x3F, 0x40, 0x40, 0x40, 0x3F}, // U

{0x00, 0x1F, 0x20, 0x40, 0x20, 0x1F}, // V

{0x00, 0x3F, 0x40, 0x38, 0x40, 0x3F}, // W

{0x00, 0x63, 0x14, 0x08, 0x14, 0x63}, // X

{0x00, 0x07, 0x08, 0x70, 0x08, 0x07}, // Y

{0x00, 0x61, 0x51, 0x49, 0x45, 0x43}, // Z

{0x00, 0x00, 0x7F, 0x41, 0x41, 0x00}, // [

{0x00, 0x55, 0x2A, 0x55, 0x2A, 0x55}, // backslash

{0x00, 0x00, 0x41, 0x41, 0x7F, 0x00}, // ]

{0x00, 0x04, 0x02, 0x01, 0x02, 0x04}, // ^

{0x00, 0x40, 0x40, 0x40, 0x40, 0x40}, // _

{0x00, 0x00, 0x01, 0x02, 0x04, 0x00}, // '

{0x00, 0x20, 0x54, 0x54, 0x54, 0x78}, // a

{0x00, 0x7F, 0x48, 0x44, 0x44, 0x38}, // b

{0x00, 0x38, 0x44, 0x44, 0x44, 0x20}, // c

{0x00, 0x38, 0x44, 0x44, 0x48, 0x7F}, // d

{0x00, 0x38, 0x54, 0x54, 0x54, 0x18}, // e

{0x00, 0x08, 0x7E, 0x09, 0x01, 0x02}, // f

{0x00, 0x18, 0xA4, 0xA4, 0xA4, 0x7C}, // g

{0x00, 0x7F, 0x08, 0x04, 0x04, 0x78}, // h

{0x00, 0x00, 0x44, 0x7D, 0x40, 0x00}, // i

{0x00, 0x40, 0x80, 0x84, 0x7D, 0x00}, // j

{0x00, 0x7F, 0x10, 0x28, 0x44, 0x00}, // k

{0x00, 0x00, 0x41, 0x7F, 0x40, 0x00}, // l

{0x00, 0x7C, 0x04, 0x18, 0x04, 0x78}, // m

{0x00, 0x7C, 0x08, 0x04, 0x04, 0x78}, // n

{0x00, 0x38, 0x44, 0x44, 0x44, 0x38}, // o

{0x00, 0xFC, 0x24, 0x24, 0x24, 0x18}, // p

{0x00, 0x18, 0x24, 0x24, 0x18, 0xFC}, // q

{0x00, 0x7C, 0x08, 0x04, 0x04, 0x08}, // r

{0x00, 0x48, 0x54, 0x54, 0x54, 0x20}, // s

{0x00, 0x04, 0x3F, 0x44, 0x40, 0x20}, // t

{0x00, 0x3C, 0x40, 0x40, 0x20, 0x7C}, // u

{0x00, 0x1C, 0x20, 0x40, 0x20, 0x1C}, // v

{0x00, 0x3C, 0x40, 0x30, 0x40, 0x3C}, // w

{0x00, 0x44, 0x28, 0x10, 0x28, 0x44}, // x

{0x00, 0x1C, 0xA0, 0xA0, 0xA0, 0x7C}, // y

{0x00, 0x44, 0x64, 0x54, 0x4C, 0x44}, // z

{0x00, 0x00, 0x08, 0x77, 0x41, 0x00}, // {

{0x00, 0x00, 0x00, 0x63, 0x00, 0x00}, // ¦

{0x00, 0x00, 0x41, 0x77, 0x08, 0x00}, // }

{0x00, 0x08, 0x04, 0x08, 0x08, 0x04}, // ~

/* end of normal char-set */

/* put your own signs/chars here, edit special_char too */

/* be sure that your first special char stand here */

{0x00, 0x3A, 0x40, 0x40, 0x20, 0x7A}, // ü, !!! Important: this must be special_char[0] !!!

{0x00, 0x3D, 0x40, 0x40, 0x40, 0x3D}, // Ü

{0x00, 0x21, 0x54, 0x54, 0x54, 0x79}, // ä

{0x00, 0x7D, 0x12, 0x11, 0x12, 0x7D}, // Ä

{0x00, 0x39, 0x44, 0x44, 0x44, 0x39}, // ö

{0x00, 0x3D, 0x42, 0x42, 0x42, 0x3D}, // Ö

{0x00, 0x02, 0x05, 0x02, 0x00, 0x00}, // °

{0x00, 0x7E, 0x01, 0x49, 0x55, 0x73}, // ß

{0x00, 0x7C, 0x10, 0x10, 0x08, 0x1C}, // µ

{0x00, 0x30, 0x48, 0x20, 0x48, 0x30}, // ω

{0x00, 0x5C, 0x62, 0x02, 0x62, 0x5C} // Ω

};


// 顯示字符的功能

void oled_display_char(uint8_t c) {

    i2c_start();

    i2c_write_byte(OLED_ADDRESS << 1);  // 發送地址

    i2c_write_byte(0x40);               // 控制位元 (0x40 表示後面是數據)


    // 發送 5x7 字符數據

    c = c - ' ';

    for (uint8_t i = 0; i < 6; i++) {

      i2c_write_byte(font5x7[c][i]);

    }


    // 6th byte is space between characters

    //i2c_write_byte(0x00);


    i2c_stop();


}


// 顯示字符串

void oled_display_string(uint8_t x, uint8_t y, const char* str) {

  oled_command(0xB0 + y);  // 設置頁地址

  oled_command(0x00);         // 設置低列地址

  oled_command(0x10 + x);         // 設置高列地址


  while (*str) {

    oled_display_char(*str);

    /*

    if (*str == 'H') oled_display_char(0);

    if (*str == 'E') oled_display_char(1);

    if (*str == 'L') oled_display_char(2);

    if (*str == 'O') oled_display_char(3);

    if (*str == '#') oled_display_char(4);

    */

    str++;

  }

}


void setup() {

  Serial.begin(9600);

  delay(100);


  //setup2();


  pinMode(OLED_SDA, OUTPUT);

  pinMode(OLED_SCL, OUTPUT);


  // 初始化 OLED

  oled_init();


  // 測試顯示,打開所有像素

  //oled_command(0xA5);  // 這個指令讓所有像素點亮


  // 清空顯示屏

  oled_clear();


  // 顯示 "HELLO"

  oled_display_string(0, 0, "12345678901234567890");

  oled_display_string(0, 1, "ABCDEFGHIJKLMNOPQRST");

  oled_display_string(0, 2, "abcdefghijklmnopqrst");

  oled_display_string(0, 3, "!@#$%^&*()_+-=,./;'?");

  oled_display_string(0, 7, "H####");

}


void loop() {

  // 空的 loop

}


/*

#include <Wire.h>


void setup2() {

  Wire.begin();

  Serial.begin(9600);

  Serial.println("\nI2C Scanner");

  for (uint8_t address = 1; address < 127; address++) {

    Wire.beginTransmission(address);

    if (Wire.endTransmission() == 0) {

      Serial.print("I2C device found at address 0x");

      if (address < 16) {

        Serial.print("0");

      }

      Serial.println(address, HEX);

    }

  }

  Serial.println("Done");

}

*/

2022年12月1日 星期四

How to embed bootstrap in the SPIFFS disk of ESP8266

ESP8266 - How to embed bootstrap in the SPIFFS disk of ESP8266

This is a quick write up of me following the instruction at the link below to try out embedding bootstrap in the SPIFFS disk of ESP8266.

Embed bootstrap into an ESP8266 Web server with SPIFFS
https://www.techtinker.co.za/2018/08/28/fully-embed-bootstrap-into-an-esp8266-web-server/

Note that my Arduino IDE already has "ESP8266 Sketch Data Upload" installed from other projects, if you don't have it installed in your Arduino IDE, follow the instruction in the link below to install it.

https://www.instructables.com/id/Using-ESP8266-SPIFFS/

Uploading bootstrap to SPIFFS for off-line use

1. Create a "data" directory in the directory where the Arduino sketch is kept.

2. Download the bootstrap framework from this link https://getbootstrap.com/.

In the css and the js folder, find the highlighted files as shown below and create a compressed version of them using program such as 7zip and save them in the .gz format.

In the css folder

In the js folder

3. Copy the 4 .gz files to the "data" folder created in step 1 above.

Note, alternatively, you could just download the project which contains the main Arduino sketch and the 5 files shown below from the link below.

https://drive.google.com/drive/folders/1pxuUSQCHoMsyVPuX8-EfgiWuip-1YvfE.

- bootstrap.css.map.gz
- bootstrap.min.css.gz
- bootstrap.min.js.gz
- bootstrap.min.js.map.gz
- index.html.gz

The index.html.gz contains the web page that will be served by the webserver running on ESP8266. The content of this file is shown below.

 1
 2
 3
 4
 5
 6
 7
 8
 9
10
11
12
13
14
15
16
17
18
19
20
21
22
23
24
25
26
27
28
29
30
31
32
33
34
35
36
37
38
39
40
41
42
43
44
45
46
47
48
49
50
51
52
53
54
55
56
57
58
<!doctype html>
<html lang="en">
  <head>
    <meta charset="utf-8">
    <meta name="viewport" content="width=device-width, initial-scale=1, shrink-to-fit=no">
    <meta name="description" content="">
    <meta name="author" content="">
    <link rel="icon" href="/favicon.ico">

    <title>Fixed top navbar example for Bootstrap</title>

    <!-- Bootstrap core CSS -->
    <link href="/bootstrap.min.css" rel="stylesheet">

    <!-- Custom styles for this template -->
    <link href="navbar-top-fixed.css" rel="stylesheet">
  </head>

  <body>

    <nav class="navbar navbar-expand-md navbar-dark fixed-top bg-dark">
      <a class="navbar-brand" href="#">Fixed navbar</a>
      <button class="navbar-toggler" type="button" data-toggle="collapse" data-target="#navbarCollapse" aria-controls="navbarCollapse" aria-expanded="false" aria-label="Toggle navigation">
        <span class="navbar-toggler-icon"></span>
      </button>
      <div class="collapse navbar-collapse" id="navbarCollapse">
        <ul class="navbar-nav mr-auto">
          <li class="nav-item active">
            <a class="nav-link" href="#">Home <span class="sr-only">(current)</span></a>
          </li>
          <li class="nav-item">
            <a class="nav-link" href="#">Link</a>
          </li>
          <li class="nav-item">
            <a class="nav-link disabled" href="#">Disabled</a>
          </li>
        </ul>
        <form class="form-inline mt-2 mt-md-0">
          <input class="form-control mr-sm-2" type="text" placeholder="Search" aria-label="Search">
          <button class="btn btn-outline-success my-2 my-sm-0" type="submit">Search</button>
        </form>
      </div>
    </nav>
 <br><br><br>
    <main role="main" class="container">
      <div class="jumbotron">
        <h1>Navbar example</h1>
        <p class="lead">This example is a quick exercise to illustrate how fixed to top navbar works. As you scroll, it will remain fixed to the top of your browser's viewport.</p>
        <a class="btn btn-lg btn-primary" href="../../components/navbar/" role="button">View navbar docs &raquo;</a>
      </div>
    </main>

    <!-- Bootstrap core JavaScript
    ================================================== -->

    <script src="/bootstrap.min.js"></script>
  </body>
</html>

4. Connect ESP8266 to the computer, launch Arduino IDE. In Arduino IDE, click on "Tools", then click on "ESP8266 Sketch Data Upload" to upload the files in the "data" directory to the SPIFFS disk of ESP8266.

The upload progress will be displayed through the message window of the Arduino IDE.

5. Compile and upload the sketch below to ESP8266. Be sure to put the credential of your wifi network in the "ssid" and "password" fields.

 1
 2
 3
 4
 5
 6
 7
 8
 9
10
11
12
13
14
15
16
17
18
19
20
21
22
23
24
25
26
27
28
29
30
31
32
33
34
35
36
37
38
39
40
41
42
43
44
45
46
47
48
49
50
51
52
53
54
55
56
57
58
59
60
61
62
63
// Source: https://www.techtinker.co.za/2018/08/28/fully-embed-bootstrap-into-an-esp8266-web-server/

#include <FS.h> 
#include <ESP8266WiFi.h>
#include <WiFiClient.h>
#include <ESP8266WebServer.h>
 
const char* ssid = "Your_Existing_AP";
const char* password = "password_of your_existing_wifi_network";

ESP8266WebServer server(80);

void setup() {
  
   Serial.begin(115200);
   
   WiFi.mode(WIFI_STA);
   WiFi.begin(ssid,password); 
   
   // Wait for connection
   while (WiFi.status() != WL_CONNECTED) {
      delay(500);
      Serial.print(".");
   }
   
   Serial.println(WiFi.localIP());
 
   server.begin(); 
   server.on("/", fileindex);
   server.on("/index.html", fileindex);
   server.on("/bootstrap.min.css", bootstrap);
   server.on("bootstrap.min.css", bootstrap);
   server.on("/popper.min.js", popper);
   server.on("/bootstrap.min.js", bootstrapmin);
   server.on("bootstrap.min.js", bootstrapmin);

   //NEW
   SPIFFS.begin(); 
}
 
void loop() {
   server.handleClient();
}
 
void fileindex(){
   File file = SPIFFS.open("/index.html.gz", "r"); 
   size_t sent = server.streamFile(file, "text/html");
}

void bootstrap(){
   File file = SPIFFS.open("/bootstrap.min.css.gz", "r"); 
   size_t sent = server.streamFile(file, "text/css");
}

void popper(){
   File file = SPIFFS.open("/popper.min.js.gz", "r"); 
   size_t sent = server.streamFile(file, "application/javascript");
}

void bootstrapmin(){
   File file = SPIFFS.open("/bootstrap.min.js.gz", "r"); 
   size_t sent = server.streamFile(file, "application/javascript");
}

6. Launch the Serial Monitor of the Arduino IDE to find the IP assigned to the ESP8266. Here, the IP assigned is 192.168.31.9.

7. Launch a web browser then enter the IP address obtained from above in the URL field to connect to the ESP8266.

A neat thing about using bootstrap is that it's responsive..

Reference - UI Design:

Bootstrap: create a beautiful Web Interface for your projects ESP8266
https://diyprojects.io/bootstrap-create-beautiful-web-interface-projects-esp8266/

Using ESP8266 SPIFFS
https://www.instructables.com/id/Using-ESP8266-SPIFFS/

Embed bootstrap into ESP8266
https://mybroadband.co.za/forum/threads/embed-bootstrap-into-esp8266.972617/

Bootstrap Tutorial for Beginners
https://www.youtube.com/watch?v=FMFm9GxB_Eo

Bootstrap Glyphicon Components
https://www.w3schools.com/bootstrap/bootstrap_ref_comp_glyphs.asp

======================================================================

Icons and symbols that could be used for artworks

GLYPHICONS®
https://www.glyphicons.com/

A library of precisely prepared monochromatic icons and symbols, created with an emphasis to simplicity and easy orientation. 

資料來源:http://wei48221.blogspot.com/2020/03/esp8266-how-to-embed-bootstrap-in.html

2022年8月23日 星期二

NodeMCU 開發套件/板


介紹

NodeMCU 開發套件/板由 ESP8266 wifi 芯片組成。ESP8266芯片具有GPIO引腳、串行通信協議等特性。

ESP8266 是樂鑫開發的一款低成本的 Wi-Fi 芯片,採用 TCP/IP 協議。有關 ESP8266 的更多信息,您可以參考 ESP8266 WiFi 模塊

ESP8266 的特性是在 NodeMCU 開發板上提取的。NodeMCU(基於LUA的固件)與由 ESP8266(啟用 wifi 的芯片)芯片組成的開發板/套件結合了 NodeMCU 開發板,使其成為物聯網應用中的獨立設備。

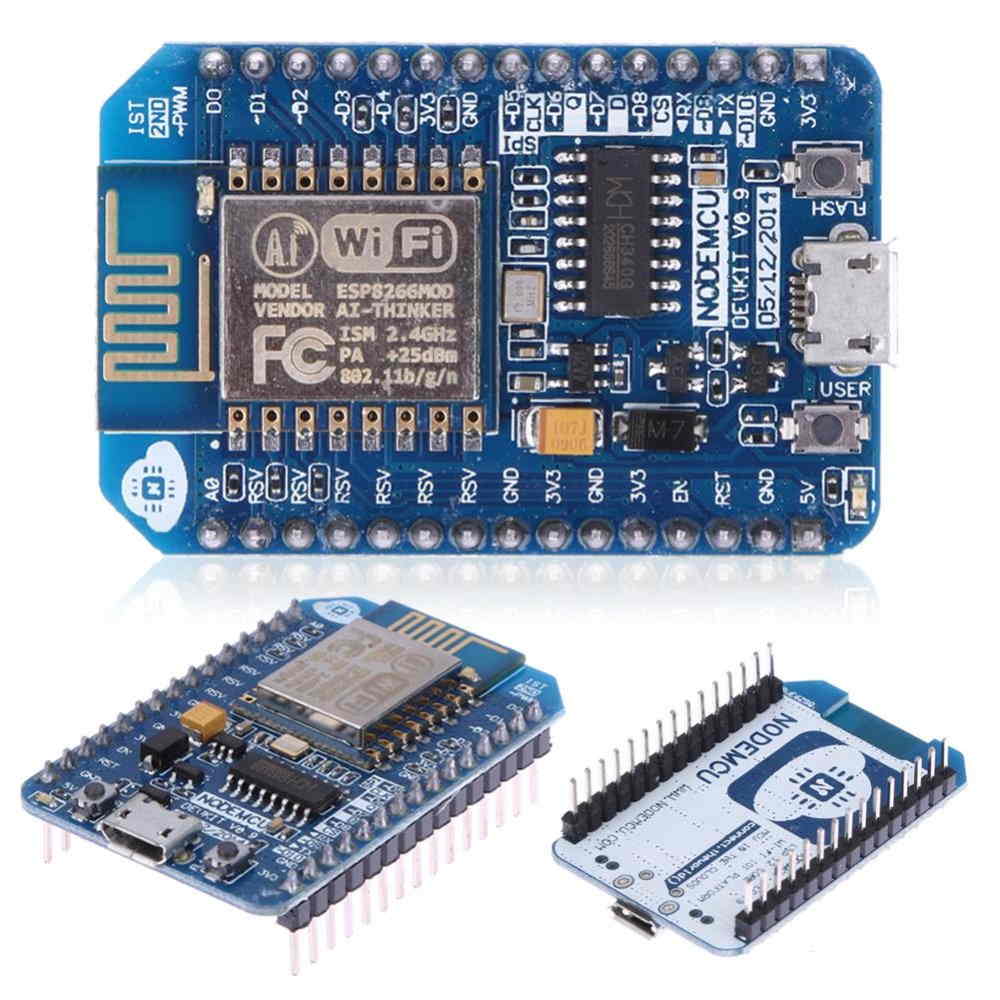
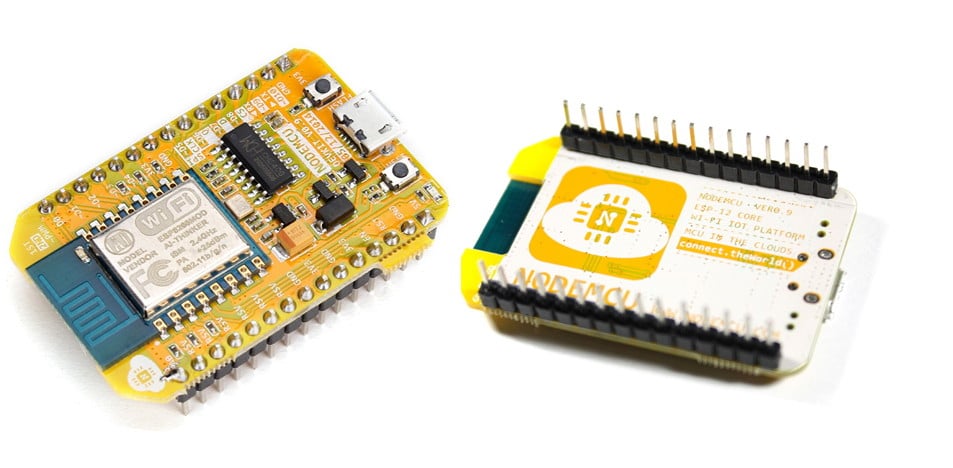
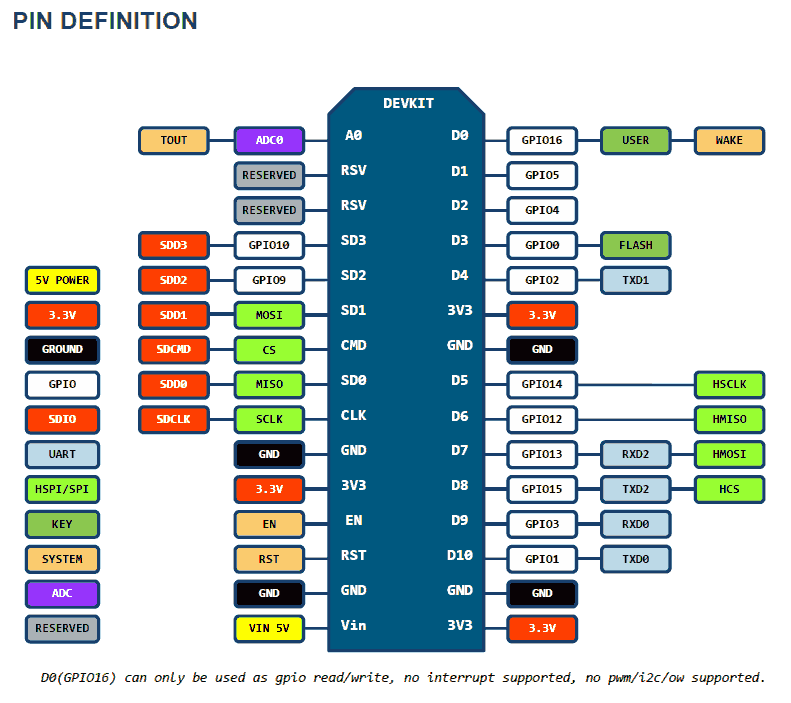
讓我們看看 NodeMCU 開發套件的第一個版本及其引腳,如下圖所示。

NodeMCU 開發套件 v0.9

NodeMCU 開發套件 v0.9

NodeMCU開發板v0.9(版本1)

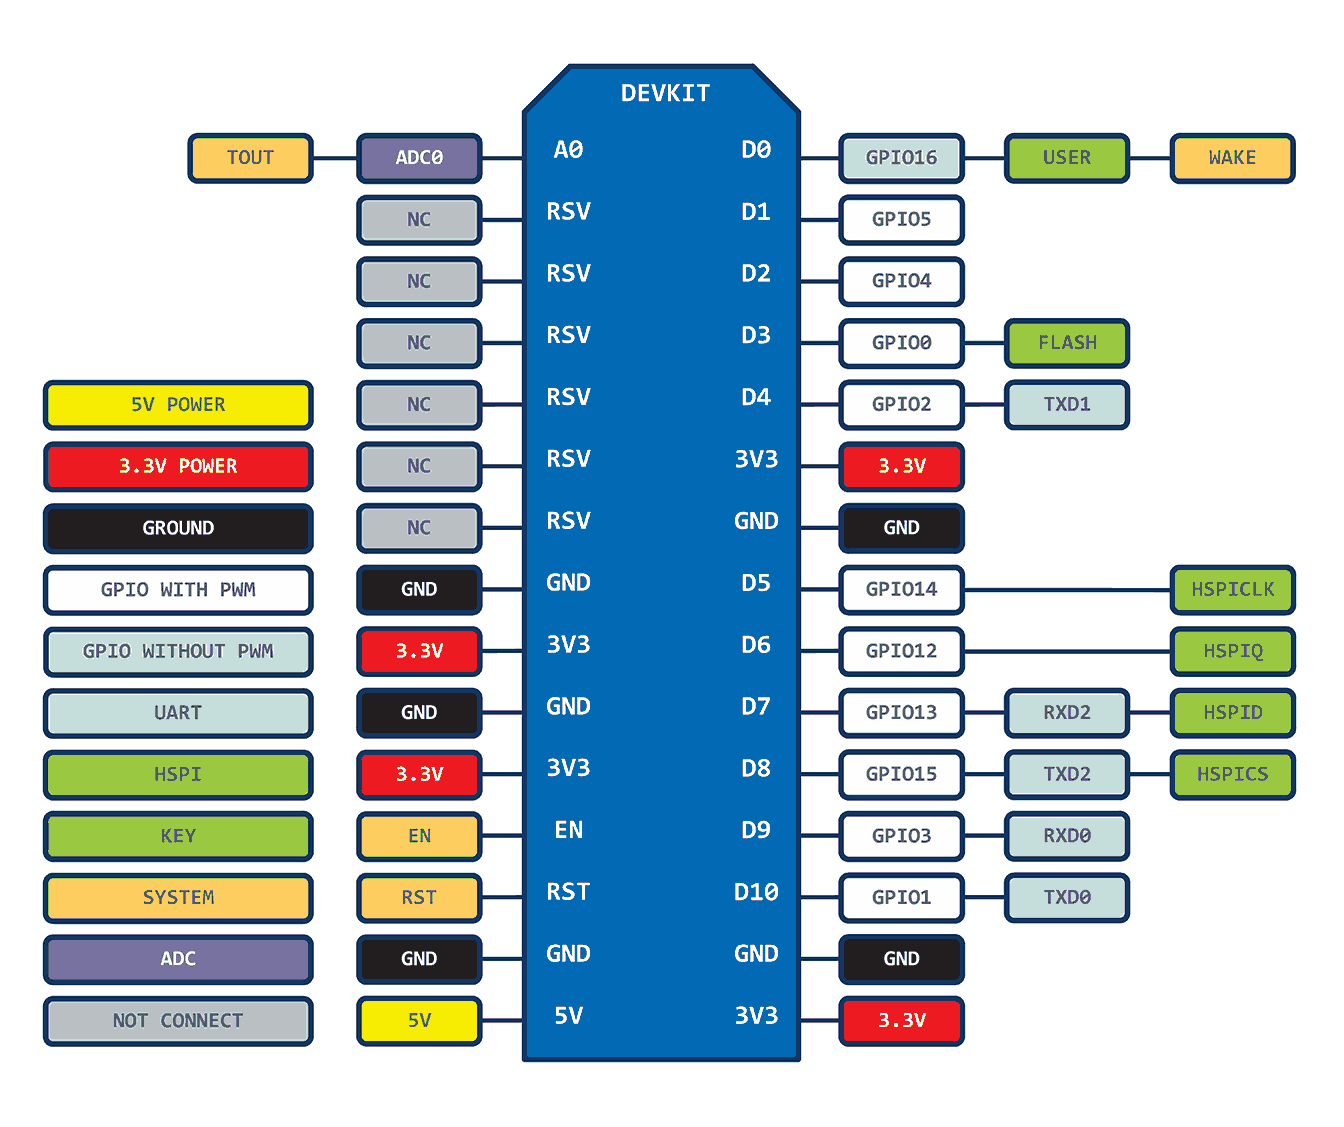
NodeMCU 開發板 v0.9 引腳分配

NodeMCU 開發套件 v0.9(V1) 引腳分配

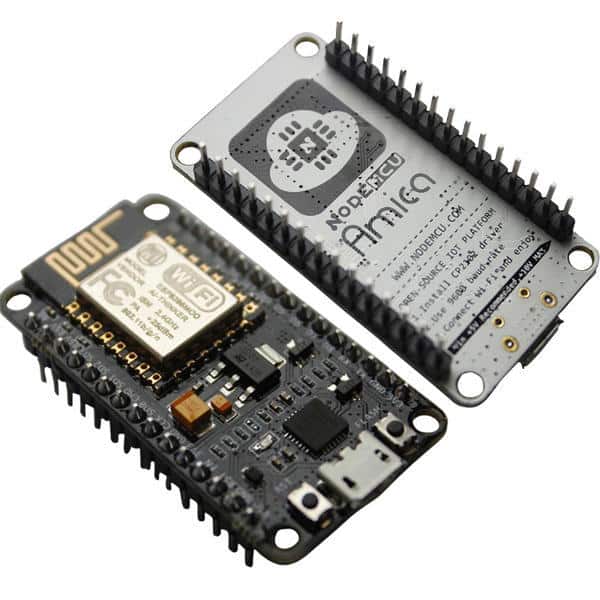
NodeMCU 開發套件的第二版及其引腳如下圖所示。

NodeMCU 開發套件 v1.0

Amica NodeMCU 開發套件 v1.0(Version2)

NodeMCU 開發套件 v1.0 引腳分配

NodeMCU 開發套件 v1.0(V2) 引腳分配

NodeMCU 開發套件 v1.0 引腳說明

GPIO(通用輸入輸出)引腳:

NodeMCU 在其板上具有通用輸入輸出引腳,如上圖所示。我們可以將其設為數字高/低,並控制 LED 之類的東西或打開它。此外,我們可以在這些 GPIO 引腳上生成 PWM 信號。

有關 NodeMCU GPIO 的更多信息,請參閱此鏈接

有關 NodeMCU PWM 的更多信息,請參閱此鏈接

ADC(模數轉換器)通道(A0):

NodeMCU 的板上有一個 ADC 通道/引腳。

有關 NodeMCU ADC 的更多信息,請參閱此鏈接

SPI(串行外設接口)引腳:

基於 NodeMCU 的 ESP8266 具有硬件 SPI (HSPI),其中四個引腳可用於 SPI 通信。它還具有用於 Quad-SPI 通信的 SPI 引腳。通過這個 SPI 接口,我們可以將任何支持 SPI 的設備與 NodeMCU 連接,並使其通信成為可能。

有關 NodeMCU SPI 的更多信息,請參閱此鏈接

I2C(內部集成電路)引腳:

NodeMCU 在 ESP8266 GPIO 引腳上支持 I2C 功能。由於 ESP-12E 的內部功能,我們不能將其所有 GPIO 用於 I2C 功能。因此,在將任何 GPIO 用於 I2C 應用之前進行測試。

有關 NodeMCU I2C 的更多信息,請參閱此鏈接

UART(通用異步收發器)引腳:

基於 NodeMCU 的 ESP8266 有兩個 UART 接口,UART0 和 UART1。由於 UART0 (RXD0 & TXD0) 用於將固件/代碼上傳到開發板,因此在上傳固件/代碼時我們不能在應用程序中使用它們。

有關 NodeMCU UART 的更多信息,請參閱此鏈接


第一版和第二版 NodeMCU Board 的區別

我們可以通過其開發板的設計和其上的 ESP 模塊在 NodeMCU 開發板的第 1 版和第 2 版中有所作為。

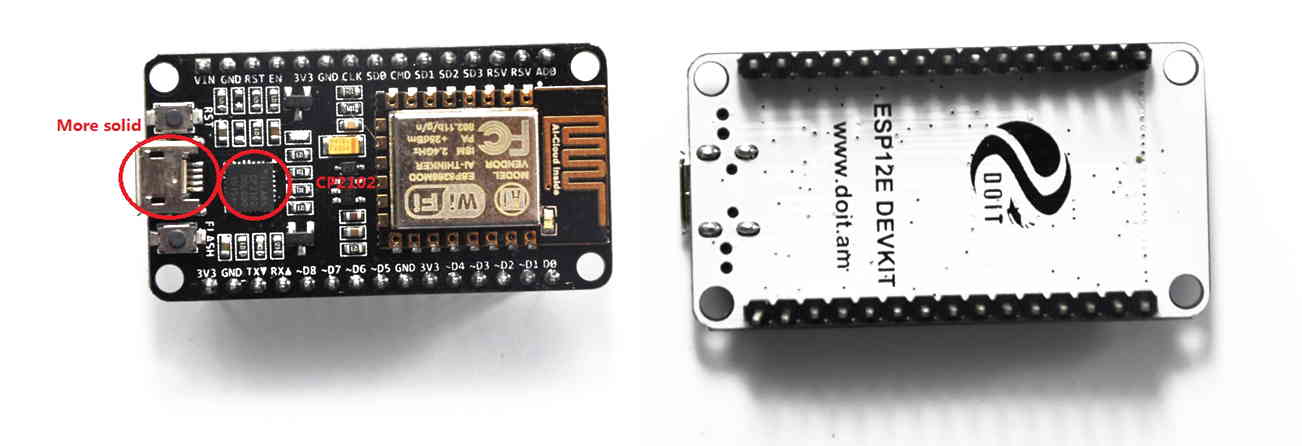
  • 在 NodeMCU Dev Kit v0.9 的第一個版本中,使用了 CH341SER USB 到串行轉換器,而在 NodeMCU Dev Kit v1.0 的第二個版本中,使用了 CP2102 USB 到串行轉換器。
  • 第一版使用 ESP-12,第二版使用 ESP-12E(增強版)。
  • ESP-12E 版本的 ESP-12 模塊上引出了額外的 6 個引腳(MTDO、MTDI、SD_3、MTMS、MTCK、SD_2),如下圖所示。雖然 Quad SPI 引腳被引出,但它們在內部用於閃存訪問。
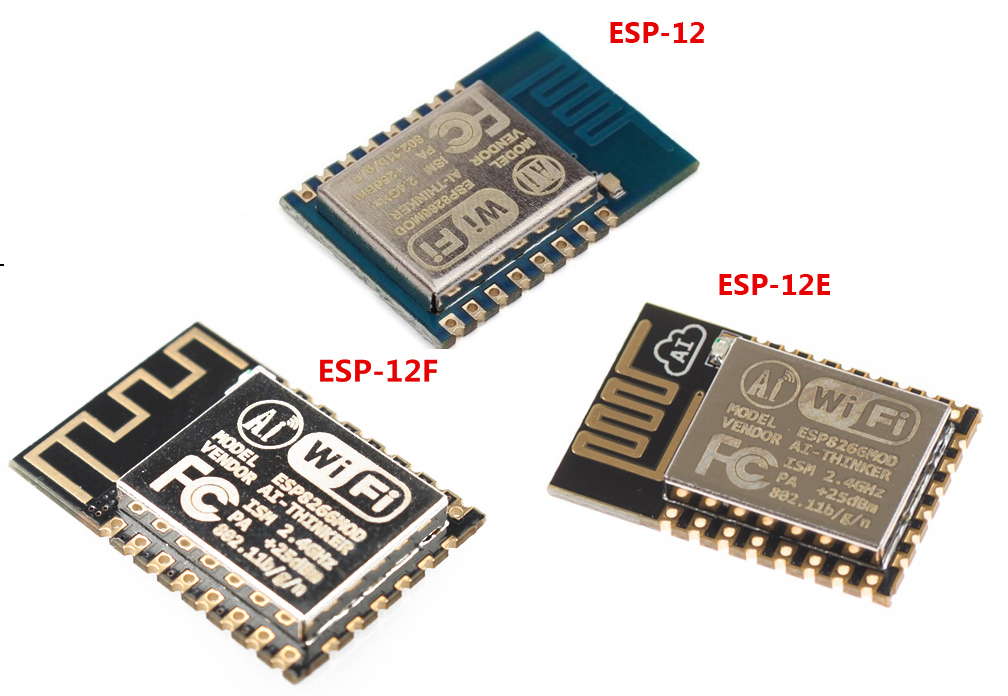
  • 此外,ESP12-E 和 ESP-12F 等 ESP-12 版本的天線設計略有不同,如下圖所示。

ESP-12 模塊

ESP-12 模塊

ESP8266 模塊系列

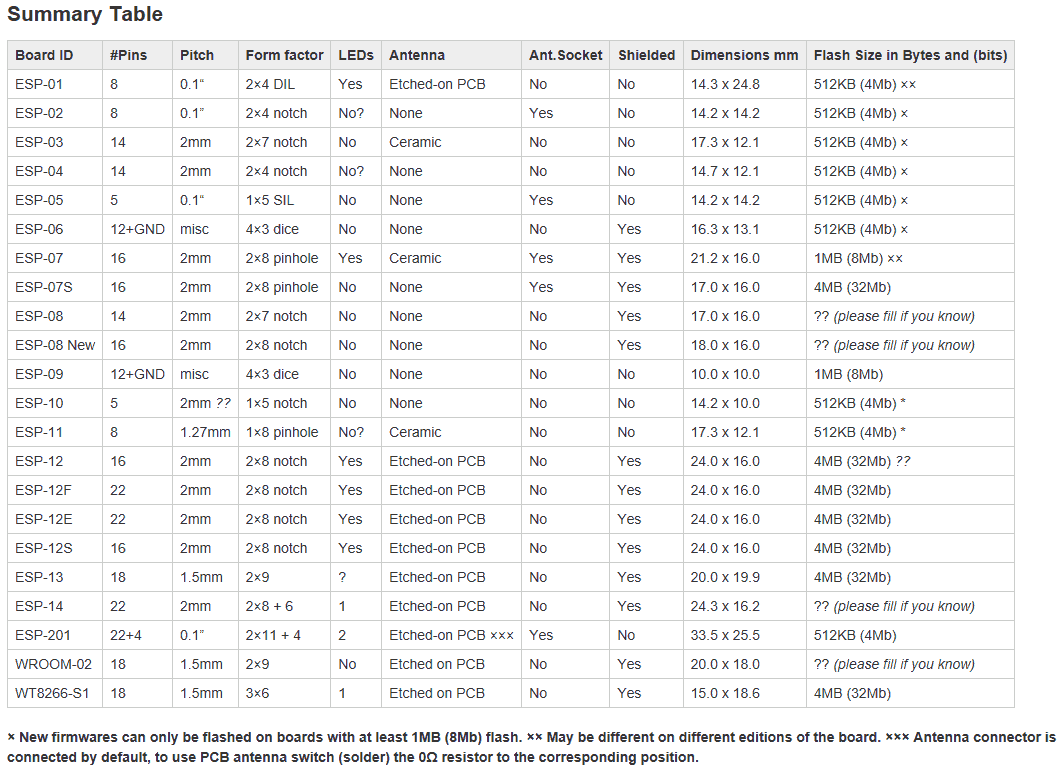
我們還可以查看各種 ESP 模塊及其 FCC 批准的esp8266 模塊系列和摘要,如下圖所示。

ESP 模塊總結

市場中的 NodeMCU 開發套件

NodeMCU 硬件是開源的,任何人都可以編輯/修改/生產它並銷售他們修改後的 NodeMCU 開發板。一般來說,我們可以看到 NodeMCU 開發板

阿米卡

多伊特

Lolin & D1 mini /Wemos 等在市場上。

Amica 生產具有設計硬件規格的 NodeMCU ESP8266 開發板 v1.0(Version2)。大多數 V2 板由 Amica 生產。

DoIt NodeMCU 開發套件

DOIT NodeMCU 開發套件 v1.0(Version2)

NodeMCU 硬件規格

我們可以從以下對所有人開放的鏈接中查看 NodeMCU Dev Kit v0.9 硬件規格和設計。

NodeMCU DevKit v0.9

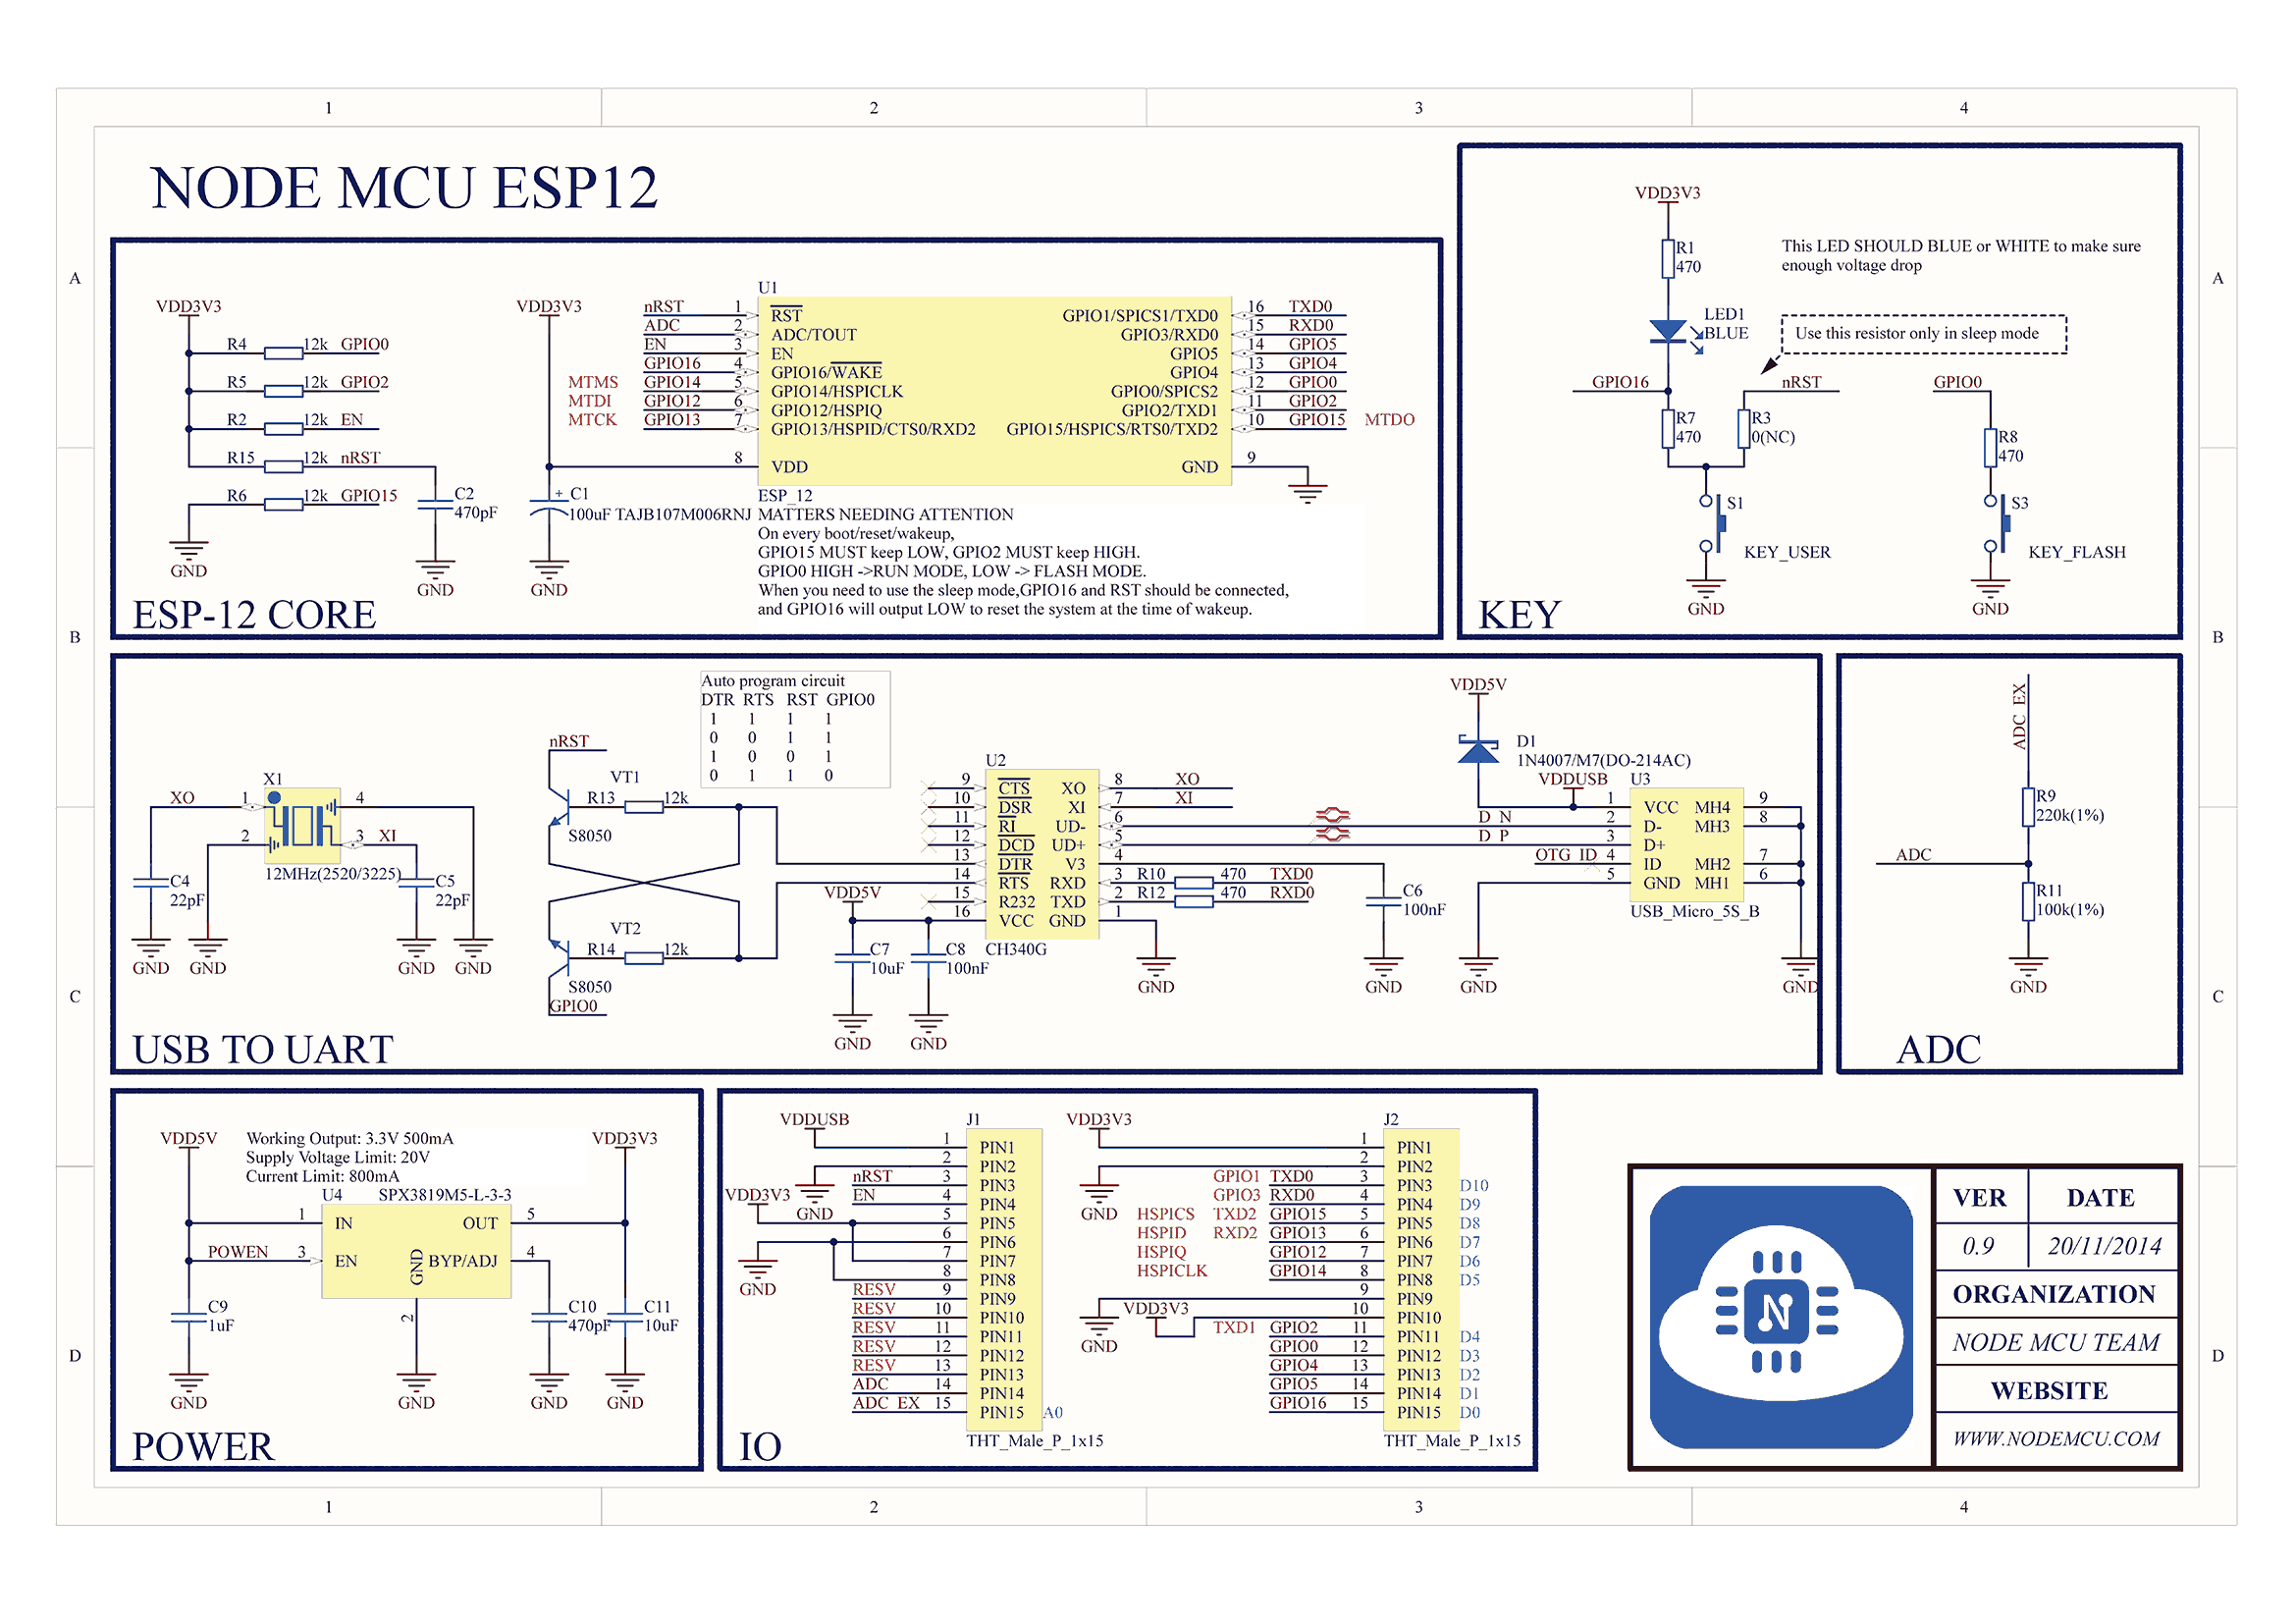
NodeMCU 開發套件示意圖

NodeMCU 開發套件 v0.9 原理圖

此外,NodeMCU Dev Kit v1.0 硬件規格和設計在以下鏈接中給出

NodeMCU DevKit v1.0

注意: -兩個版本的 ADC 模塊都使用電阻分壓器網絡(220K 和 100K)來調整 ESP8266 ADC 輸入電壓範圍從 0-1V 到 0-3.3V。由於 ESP8266 ADC 引腳的輸入模擬電壓範圍為 0-1.0V(同時讀取外部模擬電壓),NodeMCU 開發板使用此電阻分壓器網絡將其擴展到 0-3.3V。


ESP8266 開發板

此外,我們可以看到設計上與上述 NodeMCU 開發板不同的 ESP8266 開發板/分線板,我們可以將它們與 NodeMCU 固件一起用於物聯網應用。

以下是市場上提供的具有不同尺寸、引腳排列和規格的 NodeMCU 替代板。

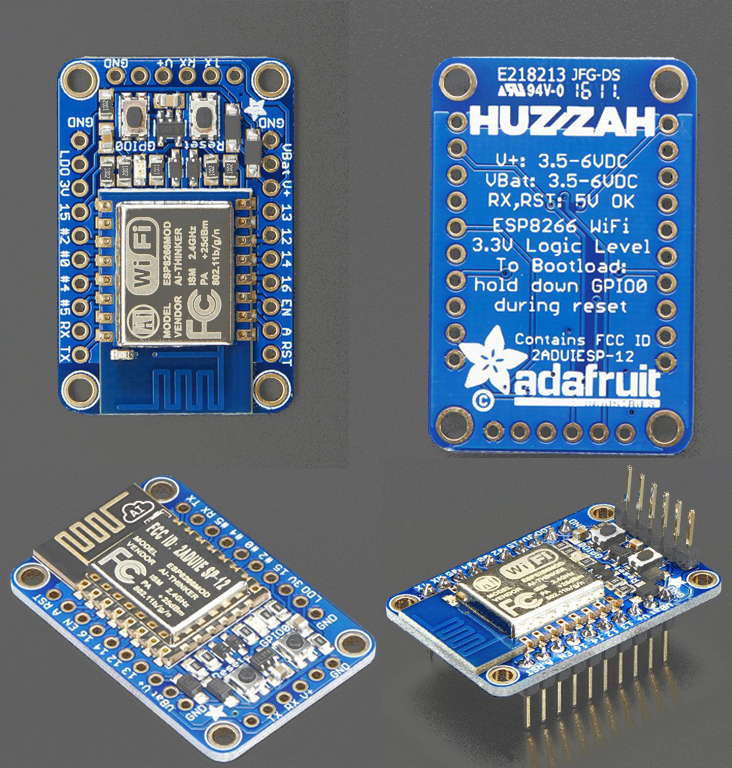
Adafruit Huzzah

Adafruit Huzzah ESP8266 開發板

Adafruit HUZZAH ESP8266 突破

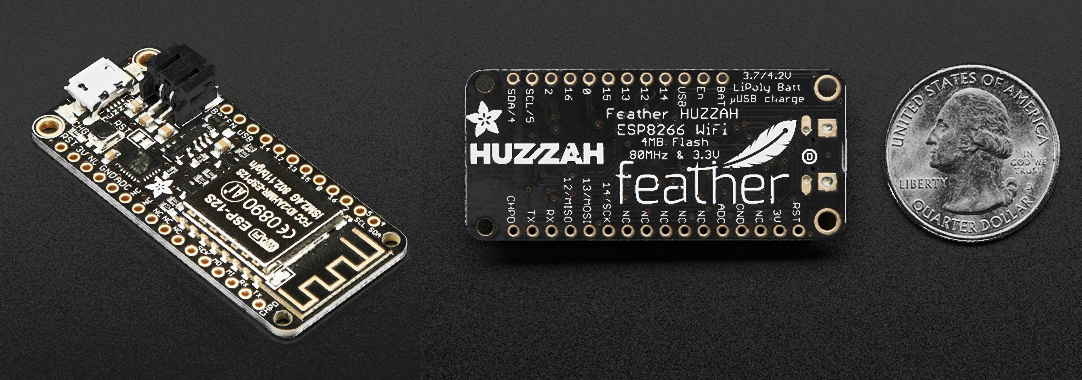
Adafruit 羽毛 Huzzah

Adafruit 羽毛 huzzah ESP8266 板

帶有 ESP8266 WiFi 的 Adafruit Feather HUZZAH

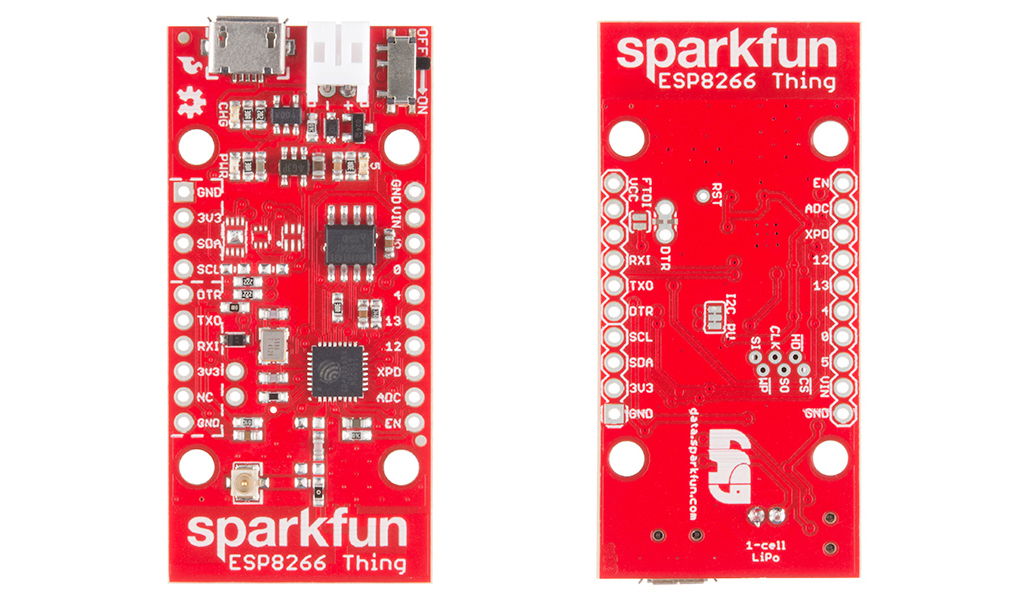
有趣的東西

Sparkfun 的東西 ESP8266 板

SparkFun ESP8266 東西

RobotDyn NodeM ESP8266

robotsdyn NodeMCU

RobotDyn WIFI NodeM ESP8266

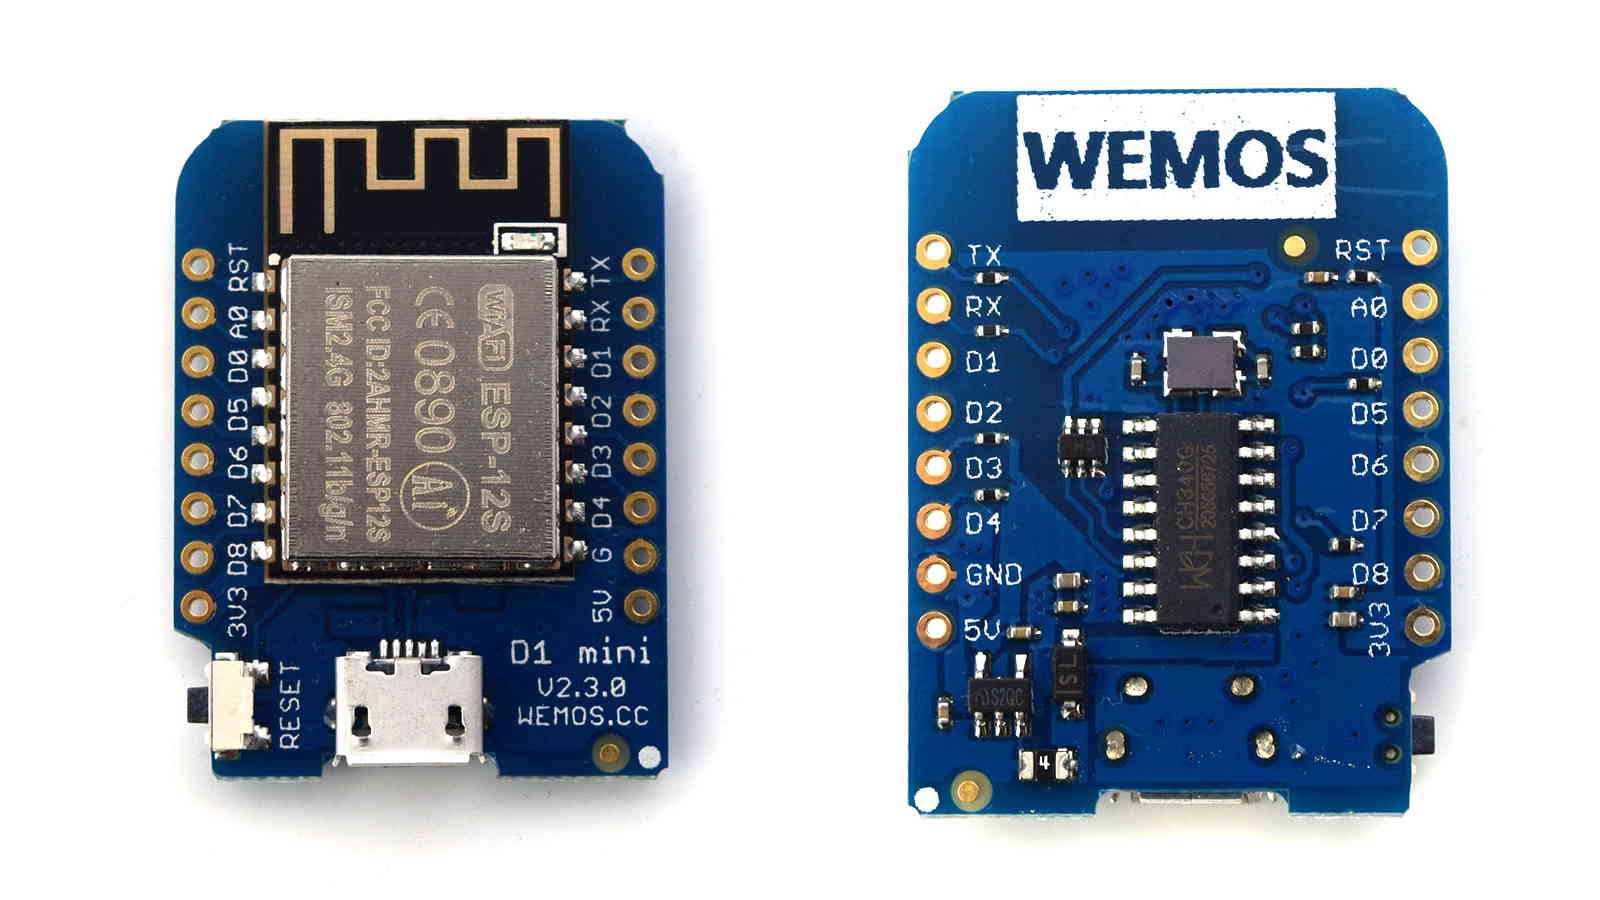
WeMos D1 迷你

WeMos D1 Mini ESP8266 開發板

WeMos D1 迷你

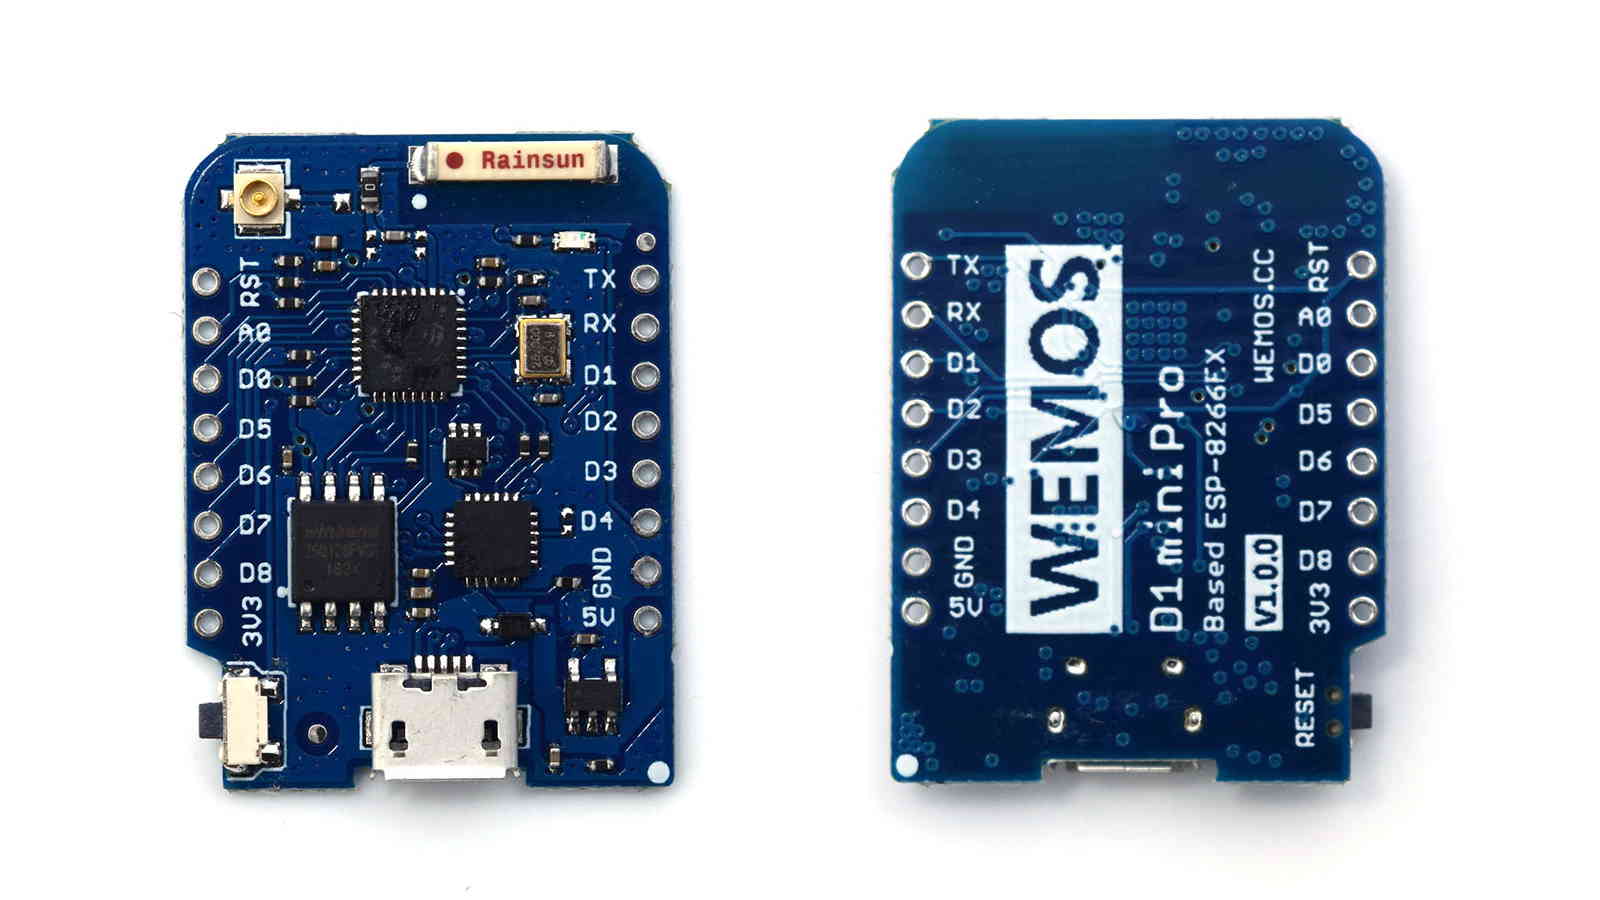
WeMos D1 mini Pro

WeMos D1 mini Pro

WeMos D1 mini Pro

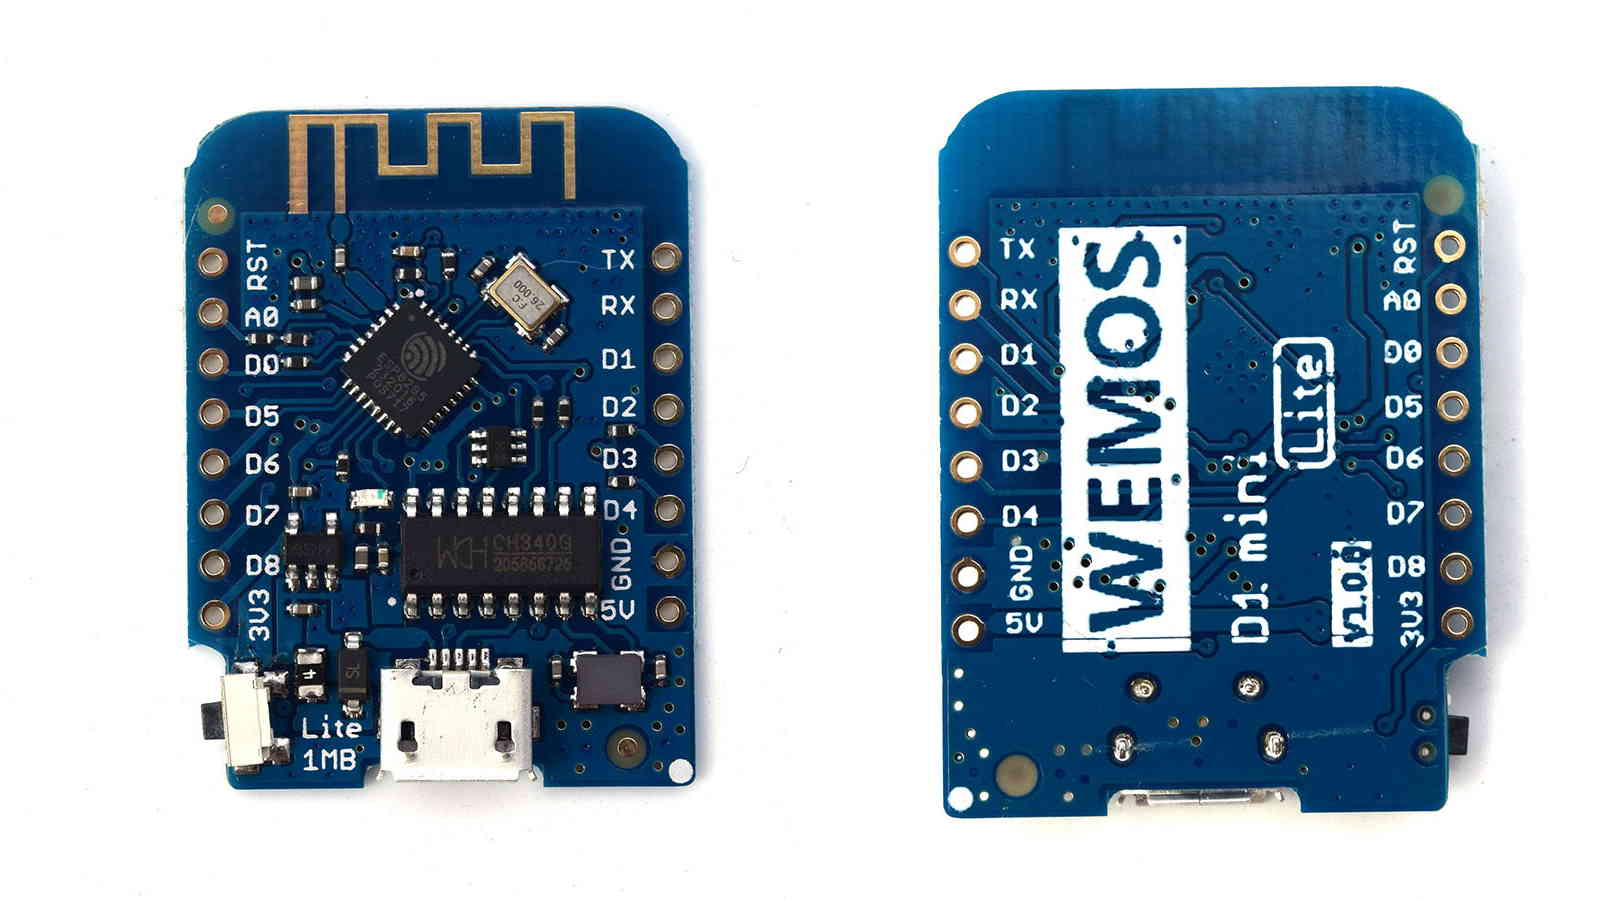
WeMos D1 迷你精簡版

WeMos D1 Mini Lite ESP8266 開發板

WeMos D1 迷你精簡版

還有一些基於應用程序的板的修改設計可用。例如,

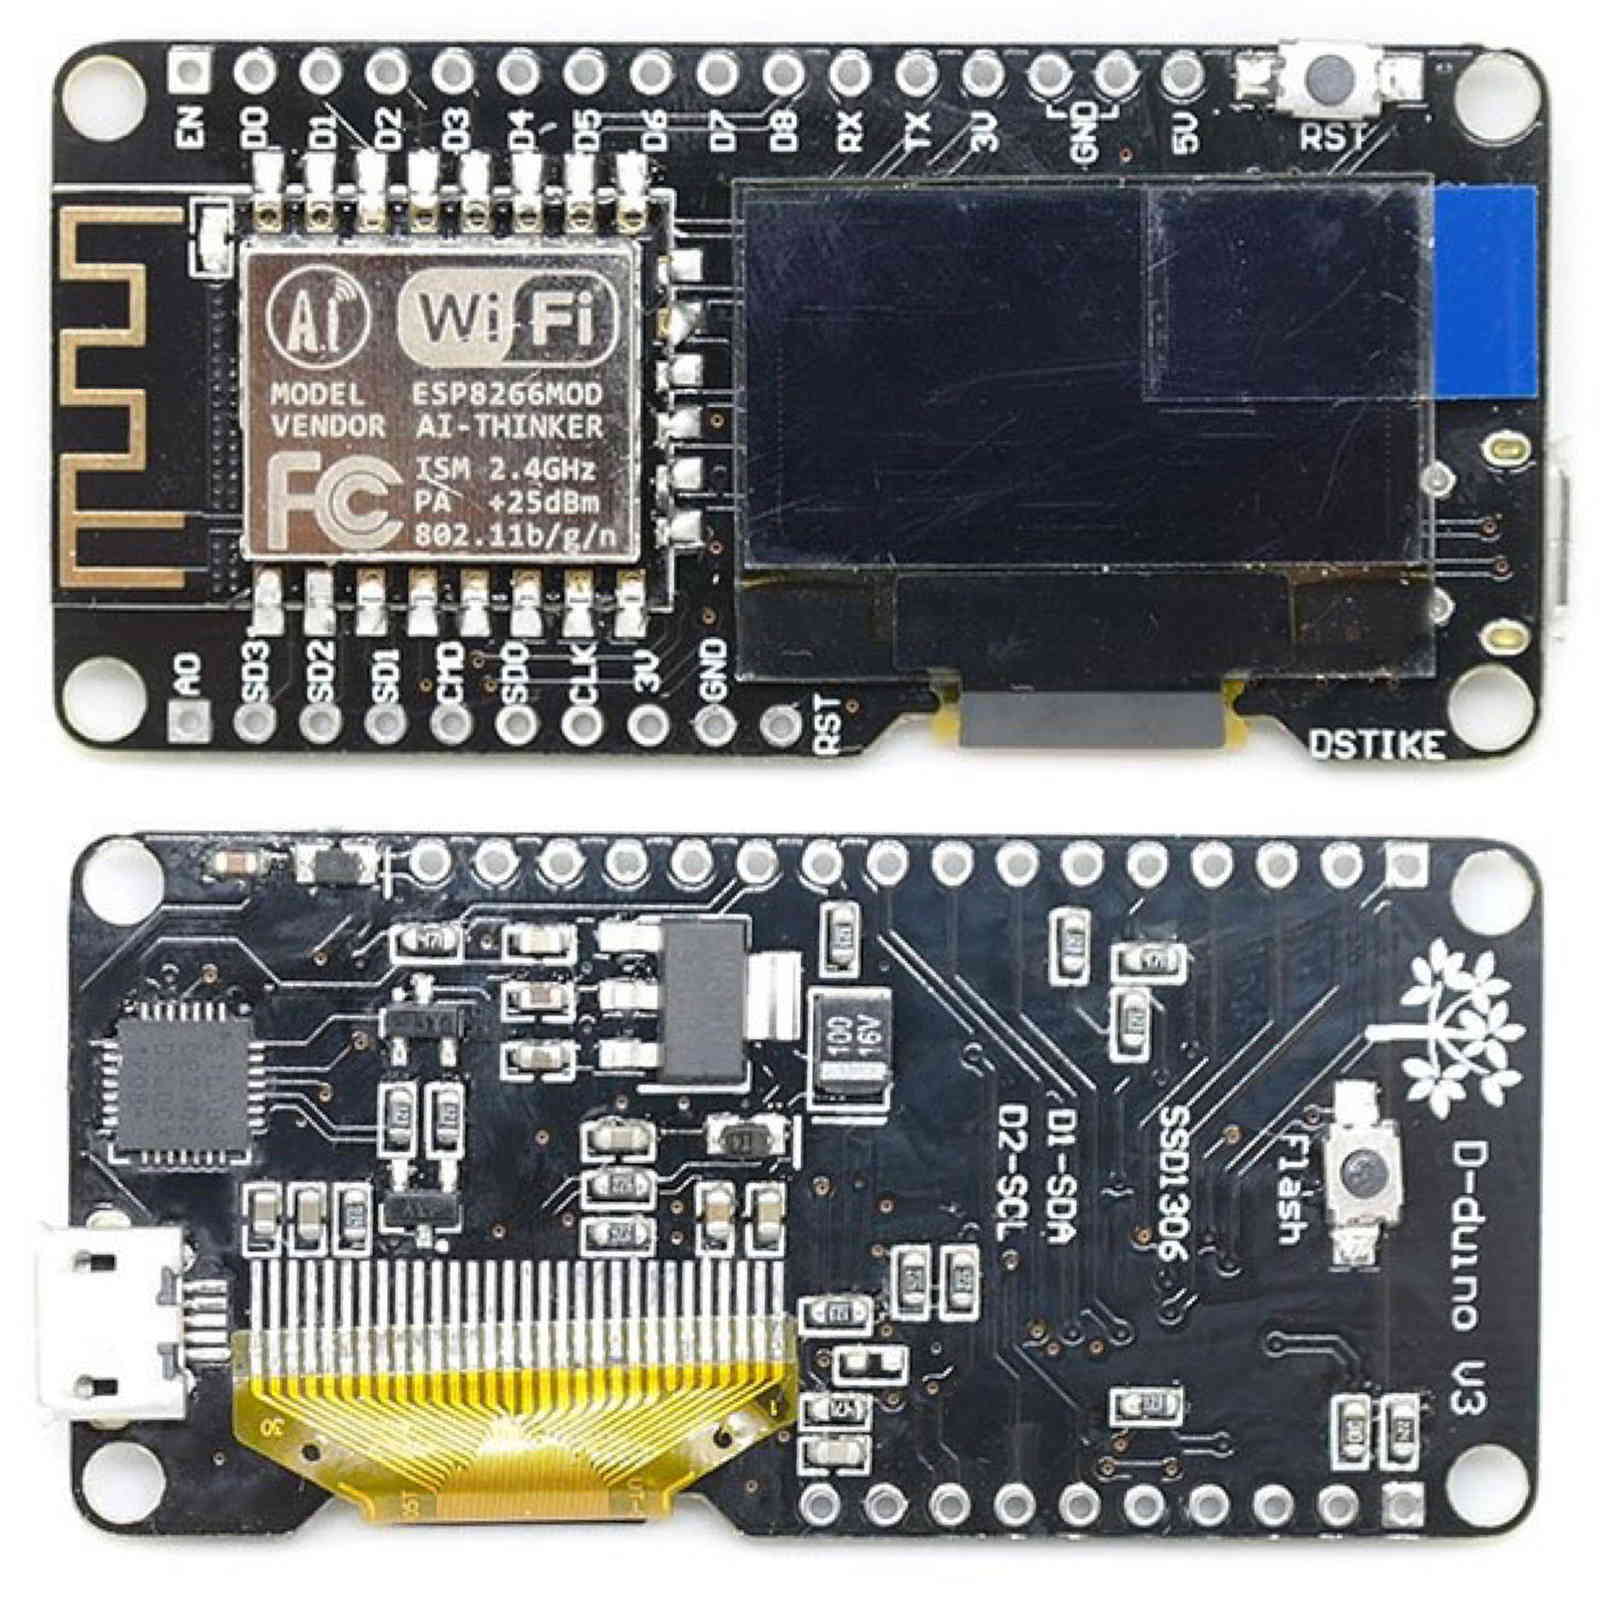
  • D-duino V3 板,板載 OLED 顯示屏。
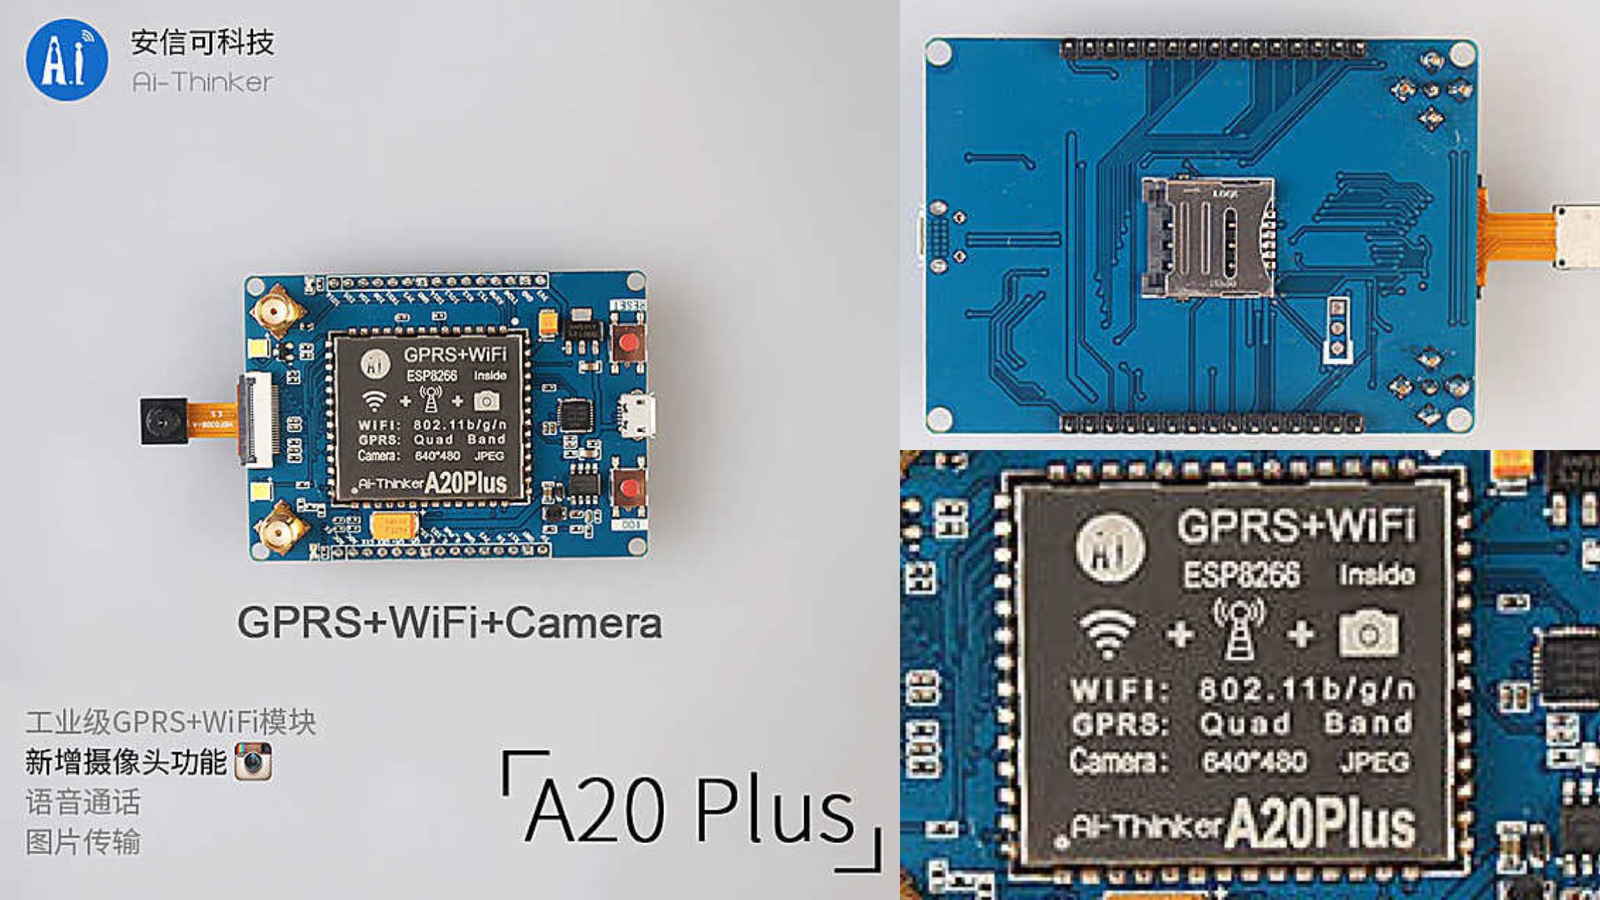
  • AI-Thinker A20 Plus 板帶有 GPRS+Camera 功能。

D-Duino ESP8266 開發套件

D-duino V3 ESP8266 開發套件


AI-Thinker A20 Plus GPRS+ESP8266(wifi)+攝像頭

AI-Thinker A20 Plus GPRS + WiFi + 攝像頭

在這裡,我們可以說市場上沒有獨特的 NodeMCU 開發板設計。如果我們遇到他們的官方板,那麼我們可以意識到 Amica 板看起來像官方版本,而其他板則不是(因為它們是應用程序設計的)。

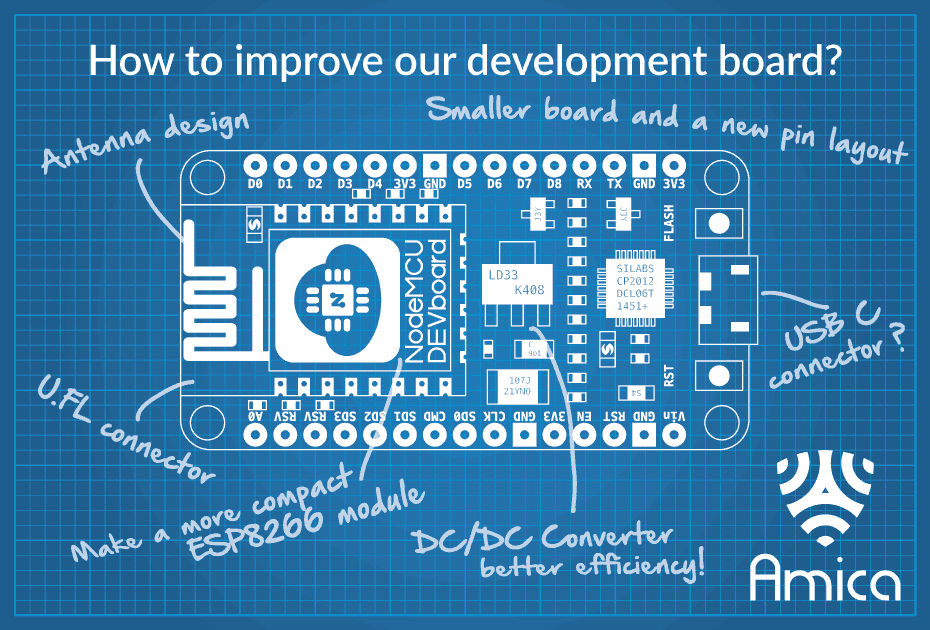
Amica 在其 Twitter 頁面上提供了一些關於改進其開發板的要點,如下圖所示。

amica 的 NodeMCU 開發套件改進


資料來源:https://www.electronicwings.com/nodemcu/nodemcu-development-kitboard