介紹
MQTT 是一種基於發布-訂閱的輕量級消息傳遞協議。
- 它比其他基於請求-響應的 API(如 HTTP)更快(更快)。
- 它是在 TCP/IP 協議的基礎上開發的。
- 它允許遠程位置設備在消息代理的幫助下連接、訂閱、發布等到服務器上的特定主題。
- MQTT Broker/Message broker 是發送者和接收者之間的一個模塊。它是用於消息驗證、轉換和路由的元素。
- 代理負責將消息分發給他們感興趣的主題的感興趣的客戶(訂閱的客戶)。
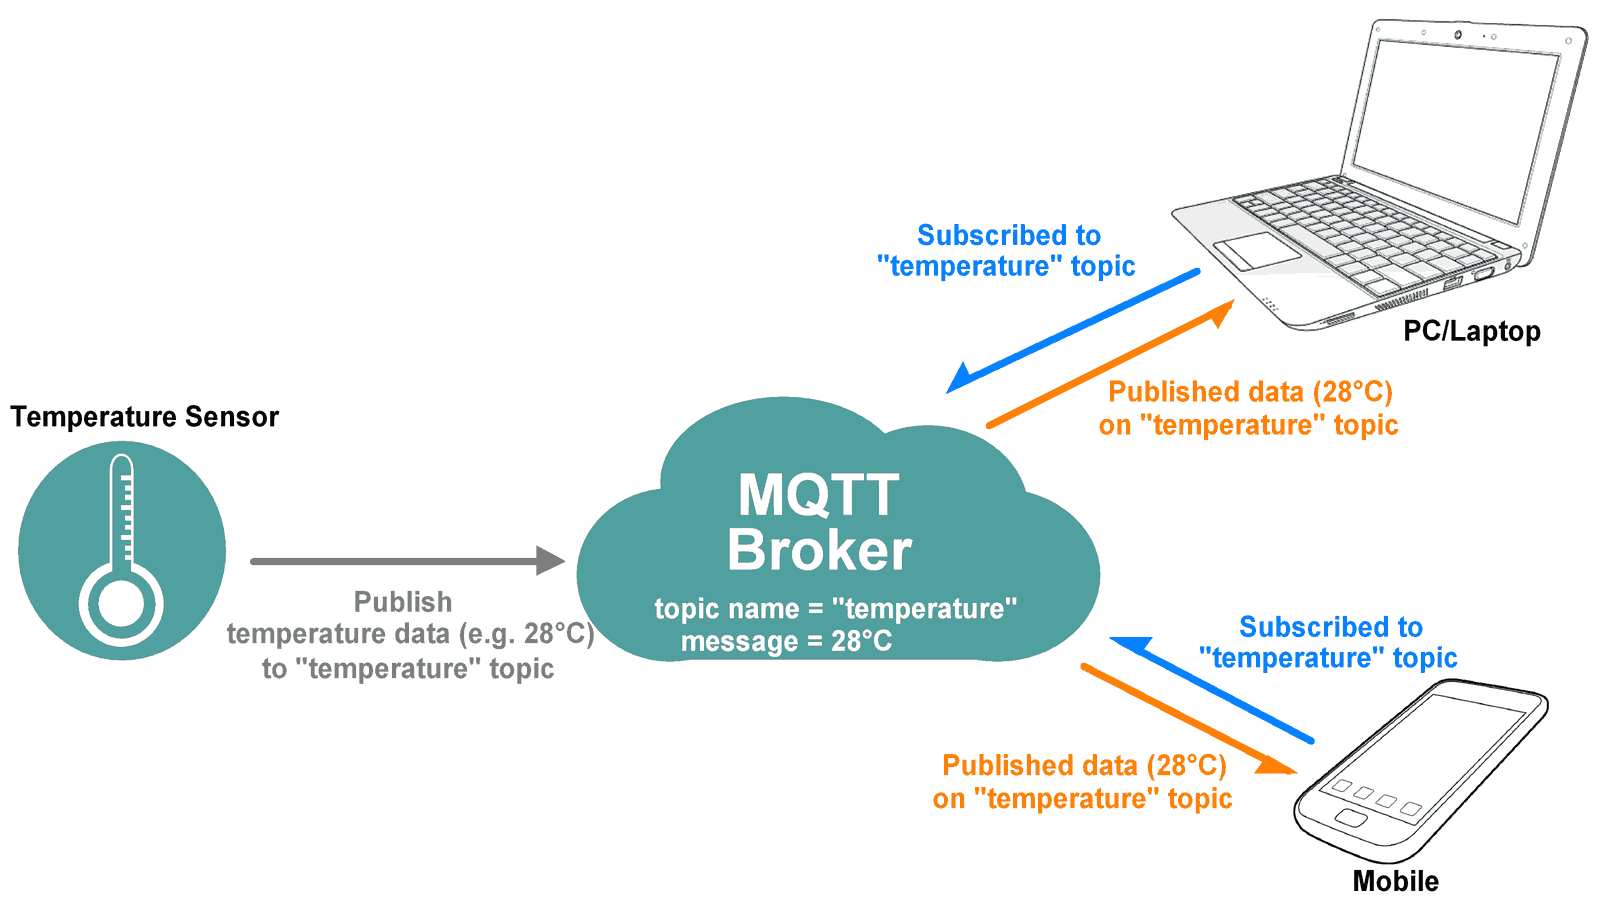
例如,如果溫度傳感器發布關於“溫度”主題的溫度數據(消息),那麼訂閱“溫度”主題的感興趣的客戶端將獲得該發布的溫度數據,如上圖所示。
MQTT 廣泛用於 IoT(物聯網)嵌入式應用程序,其中每個傳感器都連接到服務器,我們可以通過互聯網控制它們。
NodeMCU 是一個開源的物聯網平台。它是在 Espressif Systems 的 ESP8266 Wi-Fi SoC 上運行的固件。它具有板載 wi-fi,通過它可以輕鬆構建 IoT 應用程序。
NodeMCU 的 MQTT Client 模塊是根據 MQTT 協議的 3.1.1 版本。確保您的代理支持並針對版本 3.1.1 進行了正確配置。讓我們看看 NodeMCU 上用於 MQTT 的函數。
MQTT 數據包形成
MQTT 使用許多數據包格式,用於連接到服務器並訂閱或發佈到服務器上的主題。
請參閱以下鏈接了解 MQTT OASIS 標準。這將有助於理解 MQTT 數據包的形成。
http://docs.oasis-open.org/mqtt/mqtt/v3.1.1/os/mqtt-v3.1.1-os.html#_Toc398718027
例子
讓我們編寫一個 Arduino 程序來將 NodeMCU 配置為 MQTT Client
- 從遠程位置控制 LED 亮度和
- 從 Adafruit 儀表板以數字形式將 POT(電位計)上的電壓發送到遠程位置。
在這裡,我們將 Adafruit 服務器用於 MQTT 客戶端演示目的。
在 IOT 平台中,Adafruit IO Dashboard 允許我們可視化並控制連接到互聯網的設備。任何人都可以可視化和分析來自其傳感器設備的實時數據。要了解更多信息並從 Adafruit IO 儀表板開始,請參閱鏈接https://learn.adafruit.com/adafruit-io-basics-dashboards/creating-a-dashboard
只需註冊並創建儀表板。成功創建儀表板後,我們將獲得稍後用於訪問 Feed 數據的 AIO 密鑰。
一旦我們在 Adafruit 上創建了儀表板,我們就可以添加各種塊來控制設備以及監控設備的狀態。要查看有關塊的更多信息,請參閱鏈接https://learn.adafruit.com/adafruit-io-basics-dashboards/adding-blocks
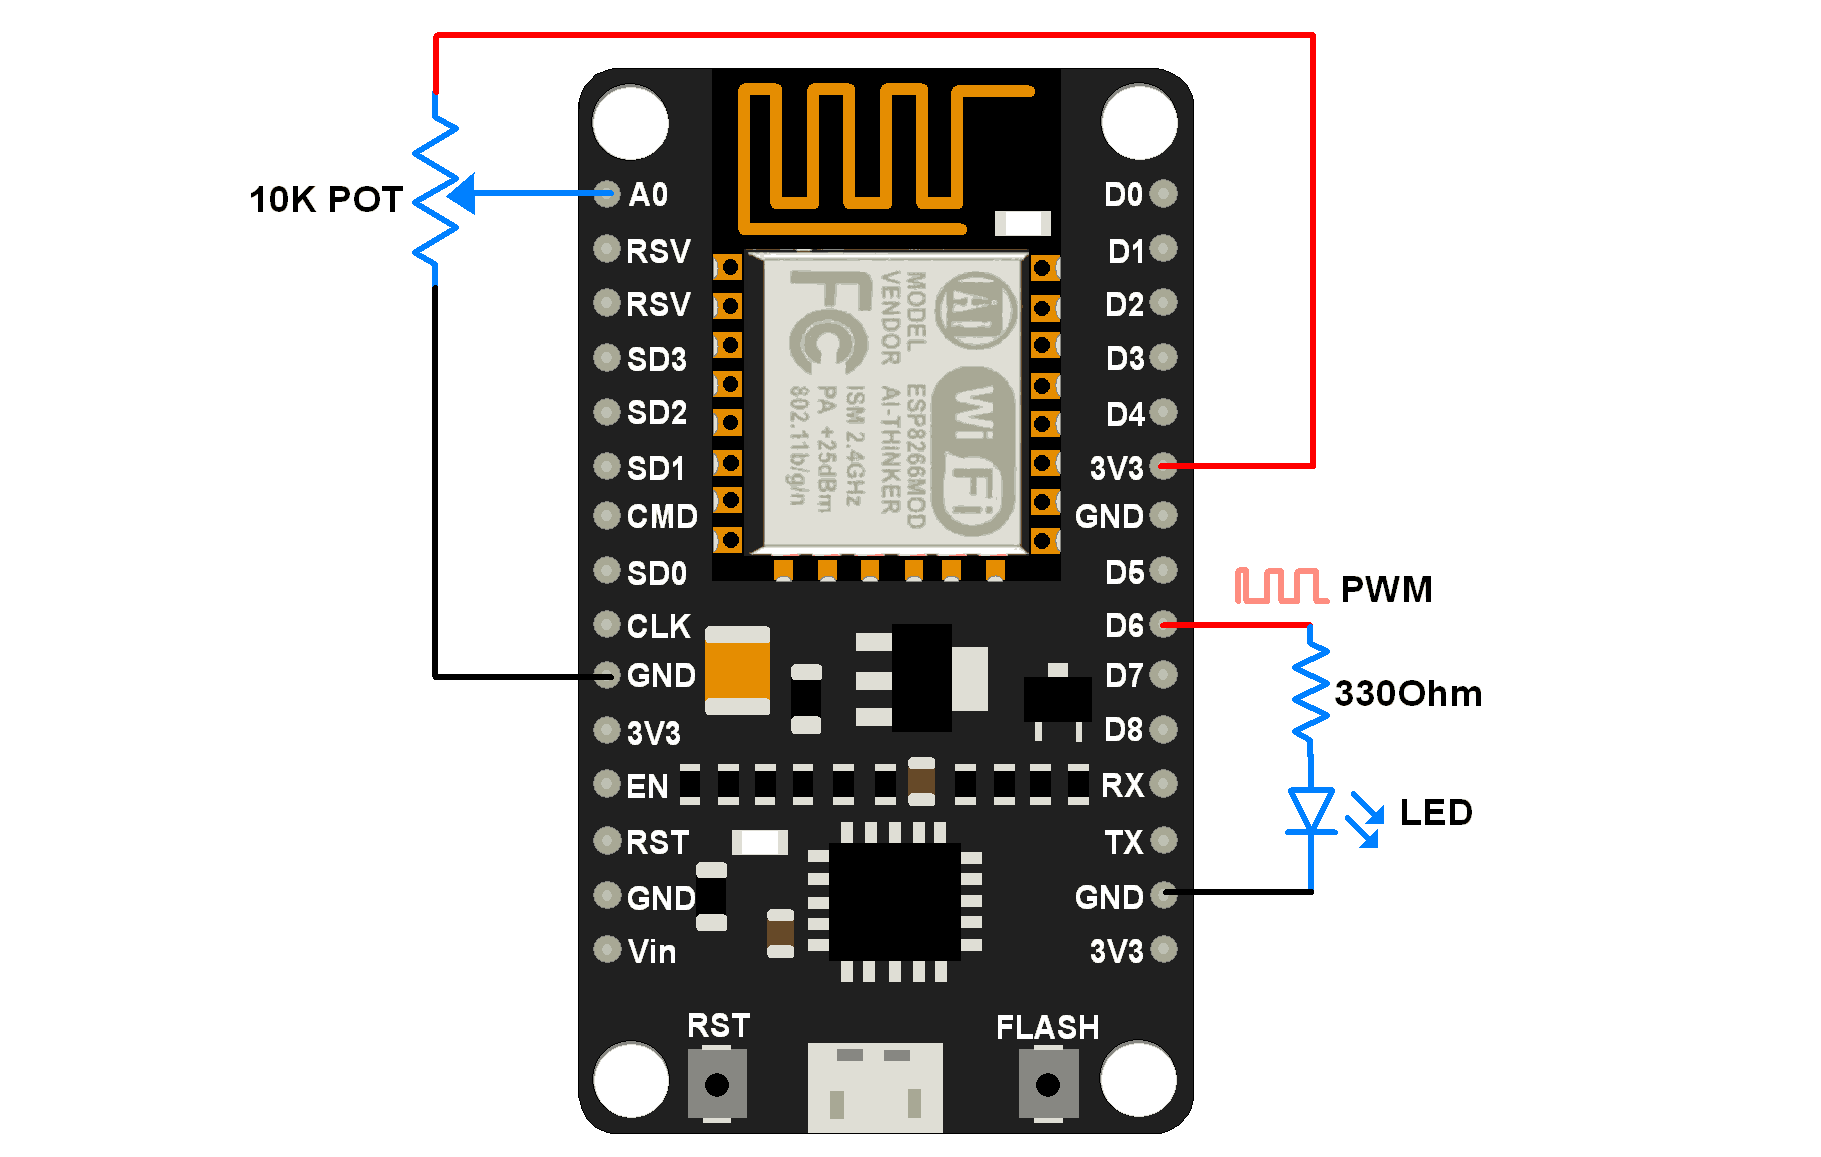
POT 和 LED 連接到 NodeMCU
安裝所需的庫
首先, 如果您沒有在 Arduino IDE 中安裝 NodeMCU 板包,請參閱使用 Arduino IDE 開始使用 NodeMCU 。
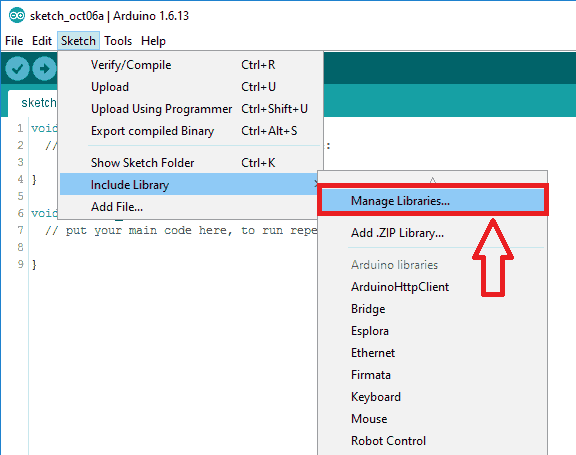
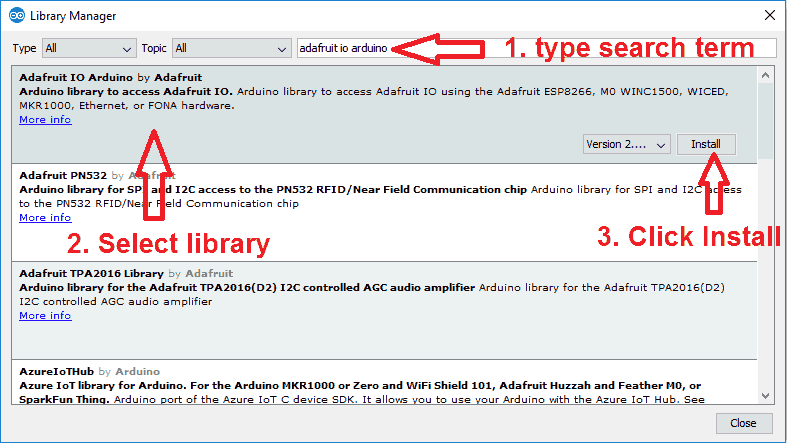
在這裡,我們將 Adafruit 庫用於上述示例。我們需要使用 Arduino Library Manager安裝Adafruit IO、Adafruit MQTT和ArduinoHttpClient庫。
打開 Arduino IDE 並導航到Sketch -> Include Library -> Manage Libraries...
將彈出庫管理器窗口。現在在搜索框中輸入Adafruit IO Arduino,然後單擊Adafruit IO Arduino library選項上的 Install 以安裝 2.6.0 或更高版本。
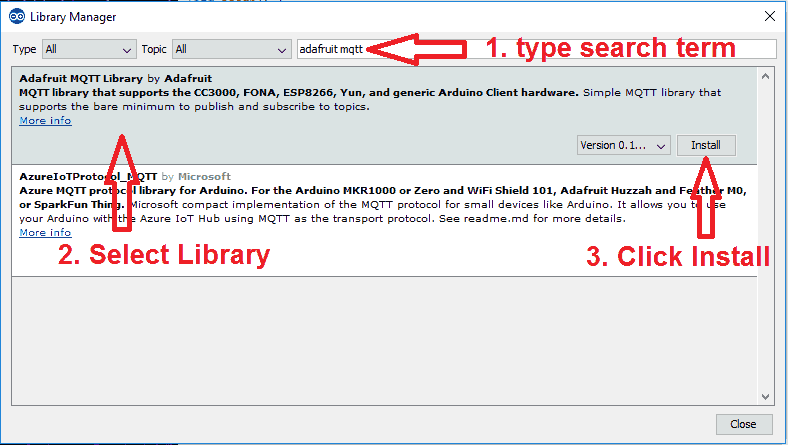
現在在搜索框中輸入Adafruit MQTT,然後單擊Adafruit MQTT 庫選項上的安裝以安裝 0.17.0 或更高版本。
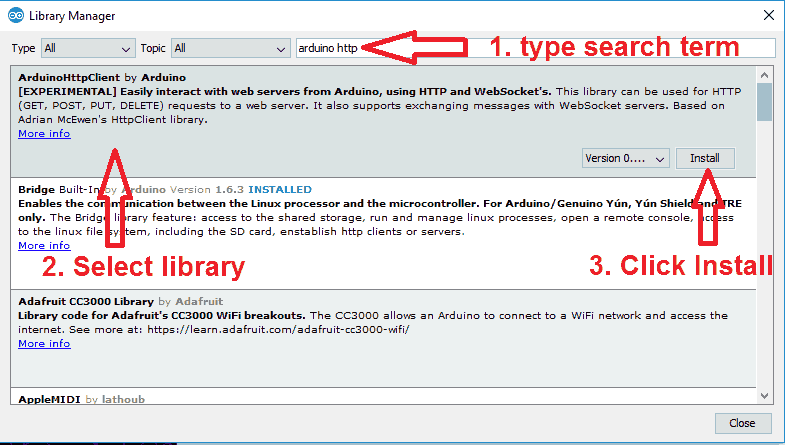
現在在搜索框中輸入Arduino Http Client,然後單擊ArduinoHttpClient庫選項上的安裝以安裝 0.3.0 或更高版本。
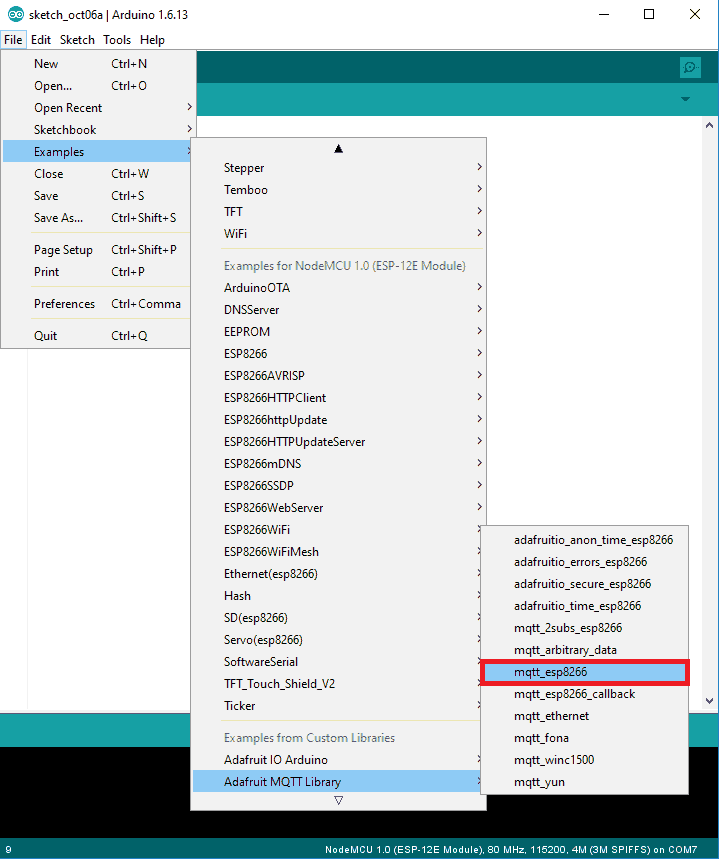
現在打開 Adafruit mqtt io 儀表板的示例。要打開它,請導航到文件 -> 示例 -> Adafruit MQTT 庫 -> mqtt_esp8266
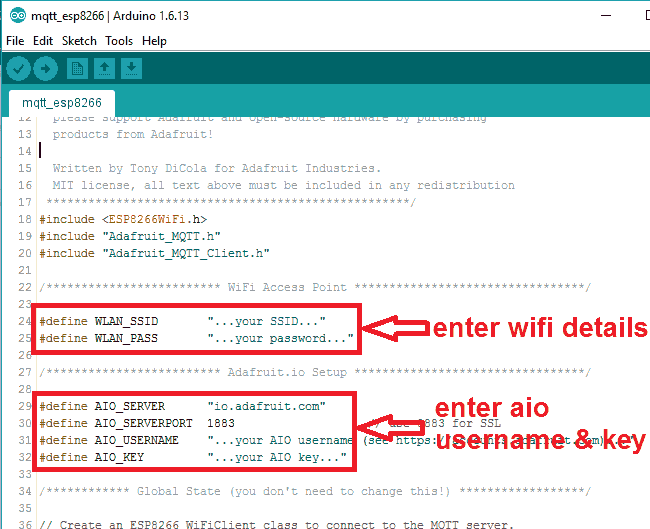
現在使用正確的示例信息編輯 wifi 和 Adafruit io 憑據,如下圖所示。
我們根據上面的示例修改了 mqtt_esp8266 示例,如下所示
用於 MQTT 客戶端的 Arduino 草圖
/***************************************************
  Adafruit MQTT Library ESP8266 Example

  Must use ESP8266 Arduino from:
    https://github.com/esp8266/Arduino

  Works great with Adafruit's Huzzah ESP board & Feather
  ----> https://www.adafruit.com/product/2471
  ----> https://www.adafruit.com/products/2821

  Adafruit invests time and resources providing this open source code,
  please support Adafruit and open-source hardware by purchasing
  products from Adafruit!

  Written by Tony DiCola for Adafruit Industries.
  MIT license, all text above must be included in any redistribution
 ****************************************************/
#include <ESP8266WiFi.h>
#include "Adafruit_MQTT.h"
#include "Adafruit_MQTT_Client.h"

/************************* WiFi Access Point *********************************/

#define WLAN_SSID       "...your SSID..."
#define WLAN_PASS       "...your password..."

/************************* Adafruit.io Setup *********************************/

#define AIO_SERVER      "io.adafruit.com"
#define AIO_SERVERPORT  1883                   // use 8883 for SSL
#define AIO_USERNAME    "...your AIO username (see https://accounts.adafruit.com)..."
#define AIO_KEY         "...your AIO key..."

/************ Global State (you don't need to change this!) ******************/

// Create an ESP8266 WiFiClient class to connect to the MQTT server.
WiFiClient client;
// or... use WiFiFlientSecure for SSL
//WiFiClientSecure client;

// Setup the MQTT client class by passing in the WiFi client and MQTT server and login details.
Adafruit_MQTT_Client mqtt(&client, AIO_SERVER, AIO_SERVERPORT, AIO_USERNAME, AIO_KEY);

/****************************** Feeds ***************************************/

// Setup a feed called 'potValue' for publishing.
// Notice MQTT paths for AIO follow the form: <username>/feeds/<feedname>
Adafruit_MQTT_Publish potValue = Adafruit_MQTT_Publish(&mqtt, AIO_USERNAME "/feeds/potValue");

// Setup a feed called 'ledBrightness' for subscribing to changes.
Adafruit_MQTT_Subscribe ledBrightness = Adafruit_MQTT_Subscribe(&mqtt, AIO_USERNAME "/feeds/ledBrightness");

/*************************** Sketch Code ************************************/

// Bug workaround for Arduino 1.6.6, it seems to need a function declaration
// for some reason (only affects ESP8266, likely an arduino-builder bug).
void MQTT_connect();

uint8_t ledPin = D6;
uint16_t potAdcValue = 0;
uint16_t ledBrightValue = 0;

void setup() {
  Serial.begin(9600);
  delay(10);

  Serial.println(F("Adafruit MQTT demo"));

  // Connect to WiFi access point.
  Serial.println(); Serial.println();
  Serial.print("Connecting to ");
  Serial.println(WLAN_SSID);

  WiFi.begin(WLAN_SSID, WLAN_PASS);
  while (WiFi.status() != WL_CONNECTED) {
    delay(500);
    Serial.print(".");
  }
  Serial.println();

  Serial.println("WiFi connected");
  Serial.println("IP address: "); Serial.println(WiFi.localIP());

  // Setup MQTT subscription for ledBrightness feed.
  mqtt.subscribe(&ledBrightness);
}

void loop() {
  // Ensure the connection to the MQTT server is alive (this will make the first
  // connection and automatically reconnect when disconnected).  See the MQTT_connect
  // function definition further below.
  MQTT_connect();

  // this is our 'wait for incoming subscription packets' busy subloop
  // try to spend your time here

  Adafruit_MQTT_Subscribe *subscription;
  while ((subscription = mqtt.readSubscription(200))) {
    if (subscription == &ledBrightness) {
      Serial.print(F("Got LED Brightness : "));
      ledBrightValue = atoi((char *)ledBrightness.lastread);
      Serial.println(ledBrightValue);
      analogWrite(ledPin, ledBrightValue);
    }
  }

  // Now we can publish stuff!
  uint16_t AdcValue = analogRead(A0);
  if((AdcValue > (potAdcValue + 7)) || (AdcValue < (potAdcValue - 7))){
    potAdcValue = AdcValue;
    Serial.print(F("Sending pot val "));
    Serial.print(potAdcValue);
    Serial.print("...");
    if (! potValue.publish(potAdcValue)) {
      Serial.println(F("Failed"));
    } else {
      Serial.println(F("OK!"));
    }
  }
  // ping the server to keep the mqtt connection alive
  // NOT required if you are publishing once every KEEPALIVE seconds
  /*
  if(! mqtt.ping()) {
    mqtt.disconnect();
  }
  */
}

// Function to connect and reconnect as necessary to the MQTT server.
// Should be called in the loop function and it will take care if connecting.
void MQTT_connect() {
  int8_t ret;

  // Stop if already connected.
  if (mqtt.connected()) {
    return;
  }

  Serial.print("Connecting to MQTT... ");

  uint8_t retries = 3;
  while ((ret = mqtt.connect()) != 0) { // connect will return 0 for connected
       Serial.println(mqtt.connectErrorString(ret));
       Serial.println("Retrying MQTT connection in 5 seconds...");
       mqtt.disconnect();
       delay(5000);  // wait 5 seconds
       retries--;
       if (retries == 0) {
         // basically die and wait for WDT to reset me
         while (1);
       }
  }
  Serial.println("MQTT Connected!");
}
視頻
資料來源:https://www.electronicwings.com/nodemcu/nodemcu-mqtt-client-with-arduino-ide
沒有留言:
張貼留言