介紹

熱敏電阻
熱敏電阻是可變電阻元件;其電阻隨溫度的變化而變化。電阻值的變化是溫度的量度。熱敏電阻分為PTC(正溫度係數)或NTC(負溫度係數)。
它們可用作電流限制器、溫度傳感器、過流保護器等。有關熱敏電阻及其使用方法的更多信息,請參閱傳感器和模塊部分中的主題NTC 熱敏電阻。
接口圖
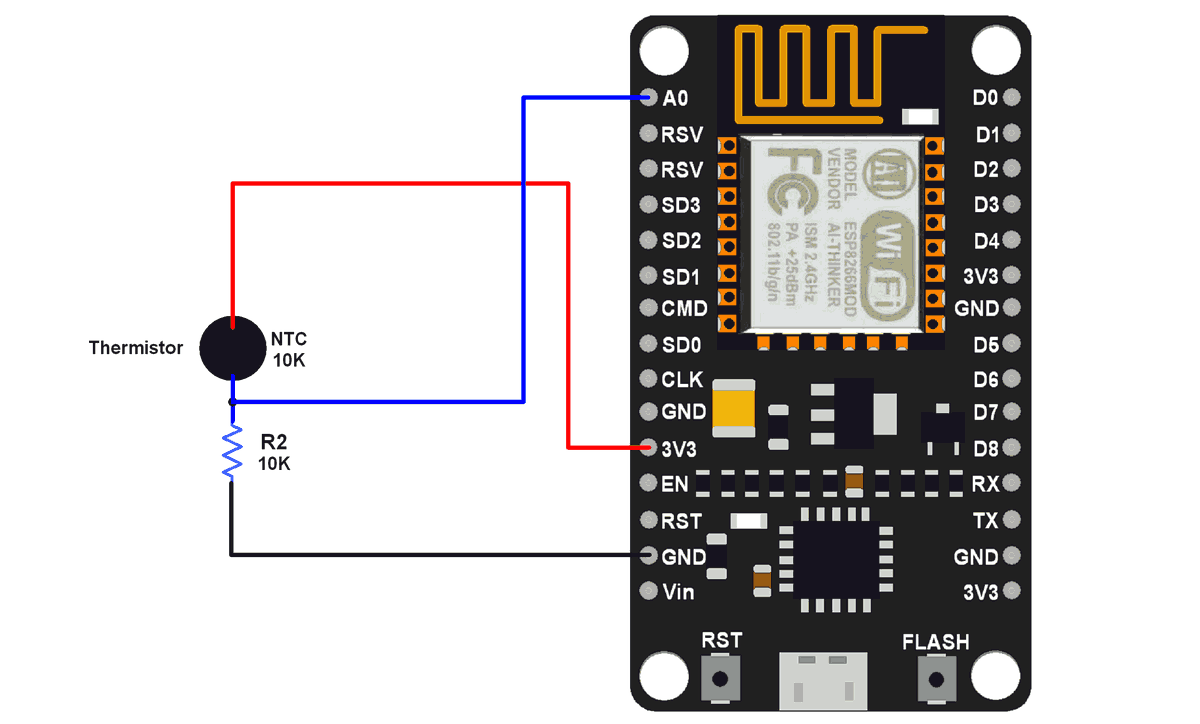
將熱敏電阻與 NodeMCU 連接
例子
使用熱敏電阻測量溫度。
這裡,使用 10kΩ(熱敏電阻)的 NTC 型熱敏電阻。10kΩ 的 NTC 意味著該熱敏電阻在 25°C 時的電阻為 10kΩ。10kΩ 電阻兩端的電壓提供給 NodeMCU 的 ADC。
我們可以將一系列 10kΩ 電阻(上圖中的 R2)上的電壓計算為,
Vout = VCC * ADC_Value / ADC_Resolution
其中 Vout 是 NodeMCU 的 ADC 測得的電壓
可以使用 Steinhart-Hart 方程從熱敏電阻電阻中找出溫度。
溫度(開爾文)= 1 / (A + B[ln(Rth)] + C[ln(Rth)]^3)
其中,A = 0.001129148,
B = 0.000234125,
C = 8.76741*10^-8 和
Rth 是熱敏電阻電阻。
可以使用簡單的分壓器網絡公式計算出熱敏電阻 (Rth)。
Rth + 10k = VCC * 10k / Vout
其中 Rth 是熱阻
NodeMCU ADC 可用於測量 10kΩ 電阻上的模擬電壓。要了解 NodeMCU 的 ADC,請參閱 NodeMCU ADC with ESPlorer IDE和NodeMCU ADC with Arduino IDE。
我們可以用 Lua Script 或 C/C++ 語言為 NodeMCU Dev Kit 編寫代碼。我們使用 ESPlorer IDE 編寫 Lua 腳本,使用 Arduino IDE 編寫 C/C++ 代碼。要了解更多信息,請參閱 使用 ESPlorer IDE 開始使用 NodeMCU(對 NodeMCU 使用 Lua 腳本)和使用 Arduino IDE 開始使用 NodeMCU(對 NodeMCU 使用基於 C 語言的 Arduino 草圖)。
讓我們為 NodeMCU 編寫 Lua 腳本以使用熱敏電阻測量溫度。
熱敏電阻的 Lua 腳本
VCC = 3.3   -- NodeMCU on board 3.3v vcc
R2 = 10000  -- 10k ohm series resistor
adc_resolution = 1023 -- 10-bit adc

-- thermistor equation parameters
A = 0.001129148
B = 0.000234125
C = 8.76741*10^-8

function ln(x)      --natural logarithm function for x>0 real values
    local y = (x-1)/(x+1)
    local sum = 1
    local val = 1
    if(x == nil) then
        return 0
    end
-- we are using limited iterations to acquire reliable accuracy.
-- here its upto 10000 and increased by 2
    for i = 3, 10000, 2 do
        val = val*(y*y)
        sum = sum + (val/i)
    end
    return 2*y*sum
end

while true do
    local Vout, Rth, temperature
    local adc_value = adc.read(0)

    Vout = (adc_value * VCC) / adc_resolution
    Rth = (VCC * R2 / Vout) - R2
    temperature = (1 / (A + (B * ln(Rth)) + (C * (ln(Rth))^3)))   -- Temperature in kelvin
    temperature = temperature - 273.15  -- Temperature in degree celsius
    print(string.format("Temperature = %0.3g °C",temperature))
    tmr.delay(100000)
end
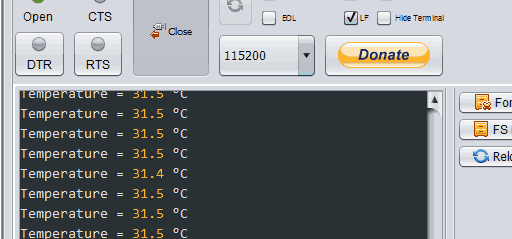
ESPlorer 串行輸出窗口
ESPlorer 使用熱敏電阻的溫度串行監視器輸出窗口
現在讓我們使用 Arduino IDE 為 NodeMCU 編寫一個熱敏電阻程序
熱敏電阻的 Arduino 草圖
const double VCC = 3.3;             // NodeMCU on board 3.3v vcc
const double R2 = 10000;            // 10k ohm series resistor
const double adc_resolution = 1023; // 10-bit adc

const double A = 0.001129148;   // thermistor equation parameters
const double B = 0.000234125;
const double C = 0.0000000876741;

void setup() {
  Serial.begin(9600);  /* Define baud rate for serial communication */
}

void loop() {
  double Vout, Rth, temperature, adc_value;

  adc_value = analogRead(A0);
  Vout = (adc_value * VCC) / adc_resolution;
  Rth = (VCC * R2 / Vout) - R2;

/*  Steinhart-Hart Thermistor Equation:
 *  Temperature in Kelvin = 1 / (A + B[ln(R)] + C[ln(R)]^3)
 *  where A = 0.001129148, B = 0.000234125 and C = 8.76741*10^-8  */
  temperature = (1 / (A + (B * log(Rth)) + (C * pow((log(Rth)),3))));   // Temperature in kelvin

  temperature = temperature - 273.15;  // Temperature in degree celsius
  Serial.print("Temperature = ");
  Serial.print(temperature);
  Serial.println(" degree celsius");
  delay(500);
}
Arduino 串行輸出窗口
使用熱敏電阻測量溫度的 Arduino 串行監視器輸出窗口

視頻
資料來源:https://www.electronicwings.com/nodemcu/thermistor-interfacing-with-nodemcu
沒有留言:
張貼留言